
Written by Tom Sullivan
Abridged review and flight footage.
Featured in the April 2015 issue of Model Aviation.
Specifications
Model type: Sport ARF Skill level: Beginner to intermediate Wingspan: 109 inches Wing area: 1,663 square inches Airfoil: Semisymmetrical Length: 78 inches Weight: 16.5 to 17.5 pounds Power system: 30cc gas or 160-size electric Radio: Five-channel minimum with seven (electric) to eight (glow) digital servos Street price: $599.99Test-Model Details
Power system: Evolution 33cc gas engine Radio system: Spektrum DX18 radio; Spektrum AR9000 receiver; eight Spektrum A6180 digital servos; Spektrum 2S 2,200 mAh LiFe receiver battery, several servo extensions Propeller: XOAR 18 x 8 Ready-to-fly weight: 15.5 pounds Flight duration: 10 to 12 minutesPluses
• Laser-cut balsa and plywood construction. • Includes tank, wheels, and all control hardware. • Prepainted fiberglass cowl, wheel pants, and aluminum gear are included. • The fin and stabilizer are removable via six bolts for easy transportation. • The wing halves are a plugin design and are supported by an aluminum tube. • All parts and templates are included for gas or electric power. • Large top and bottom fuselage hatches offer access to the radio (and batteries if you choose electric power). • It is a blast to fly, stable at low speeds, yet capable of basic IMAC maneuvers. • Flaps are included and are quite effective.Cons
• Out of the box the covering was extremely wrinkled.Abridged Review
Read the full review in the April 2015 issue of Model Aviation. Today I’m reviewing a new 30cc-size model from Horizon’s Hangar 9 division: the Valiant 30cc ARF. It initially appears to be a large trainer, but the semisymmetrical airfoil suggests some aerobatics. Then there’s that wing—that long wing. So does that also mean it’s good at gliding? Let’s find out. The first thing that struck me is that the Valiant is a large model, especially for a 30cc design. Each wing half is a respectable 501/2 inches long and the horizontal stabilizer is slightly more than 36 inches wide. With the exception of the fiberglass cowl and wheel pants, the entire airframe is built up from laser-cut balsa and plywood. Peering inside the fuselage and wing, the interlocking construction is visible, making the parts strong and flex resistant. Hardware can either make or break a kit. In the case of the Valiant, Horizon has done a good job of providing a complete hardware package, and I was quite satisfied with the quality. There are the obvious things such as the hinges, screws, and the landing gear, but then there are not-so-obvious touches. Yes, a fuel tank is provided, but it comes completely preassembled. I didn’t expect that!Image

There aren’t a lot of parts for an airplane of this size. Most of the parts you see here bolt into place, making this a quick-to-assemble model.
Image

This shot of the wings and stabilizer highlights the difference between the highly visible top and bottom color schemes.
I’d be remiss if I didn’t mention the 72-page manual. It is well done and covers everything in great detail. Each step has a photo showing exactly what needs to be done. There was only one negative about this review model and it was at the start. As I was taking the pieces out of the box for the obligatory parts photos, I couldn’t help but notice the wrinkles. Each piece of iron-on covering was wrinkled. Because this is such a large model, I spent at least an hour going over everything to seal the seams and remove the wrinkles. But the covering has since remained taut. Assembly starts with the wing halves. For both the ailerons and flaps, point-type hinges are provided that fit into predrilled holes. The surfaces are epoxied to the wing with little fuss. The aileron and flap servos are then mounted on their respective hatches, screwed into position, and the 4-40 control hardware is hooked up. Work then moves to the vertical fin and horizontal stabilizer. The control surfaces are installed with the same point-type hinges. Then the tail wheel and control horns are installed. Assembling the fuselage begins by bolting the tail surfaces in place. Yes bolting, not gluing. Both the complete fin and stabilizer assemblies are held in place by first bolting the fin to the stabilizer with two long screws. Then this subassembly is bolted to the fuselage with six more bolts (four on the top, two on the bottom). When everything is tightened, it is as rigid and secure as if it was glued in place, but the tail surfaces can be removed for storage or transportation. Next the three servos for the rudder and elevator are installed. Each elevator half utilizes its own servo. After the elevator pushrods and rudder pull-pull hardware are attached, focus moves to power system. An Evolution 33GX engine was supplied with the review Valiant. It’s a compact 2-cubic-inch gasoline engine that features an up-front carburetor placement. Beam or radial mounting options are included. Because the Valiant is made for the Evolution 33GX, I bolted the radial mount into position, inverted. Also included with the review was an Evolution Pitts-style muffler. I had to cut away a small corner around the firewall to allow for the muffler clearance, but other than that, it fit nicely. The fuel tank, fuel line, and hardware are then fitted to the fuselage. There is no specific spot indicating where the fuel dot filler mounts, so I left that until after the cowl was fitted. The cowl was next on the list. This is the only step were a bit of modeling comes into play. If you’re using a gas engine, the manual recommends that a baffle be cut and glued inside the cowling. This baffle will direct airflow over the engine’s fins to help with cooling. A template is provided on the inside back page of the manual. Using the template, the baffle is cut out from thick cardstock, and then epoxied into position. I had to work with it to get the baffle to fit snuggly, yet allow the cowl to be removed. When I was satisfied with everything, and double-checked the measurements, I glued it in with 30-minute epoxy and microballoons. To complete the fuselage assembly, the side and front windows were glued into place. When the glue cured, the Valiant was finished. The completed Valiant weighs 15.5 pounds—lighter than the manual specified! It was slightly nose-heavy, so I repositioned the ignition battery and that solved the problem. Working on the model a couple of hours a night, it took approximately three days to assemble—roughly 7 hours in all.
Image

TThe Valiant is designed to accept the Evolution 33GX engine shown here. Mounted inverted, the engine is a great match for this airplane.
Image
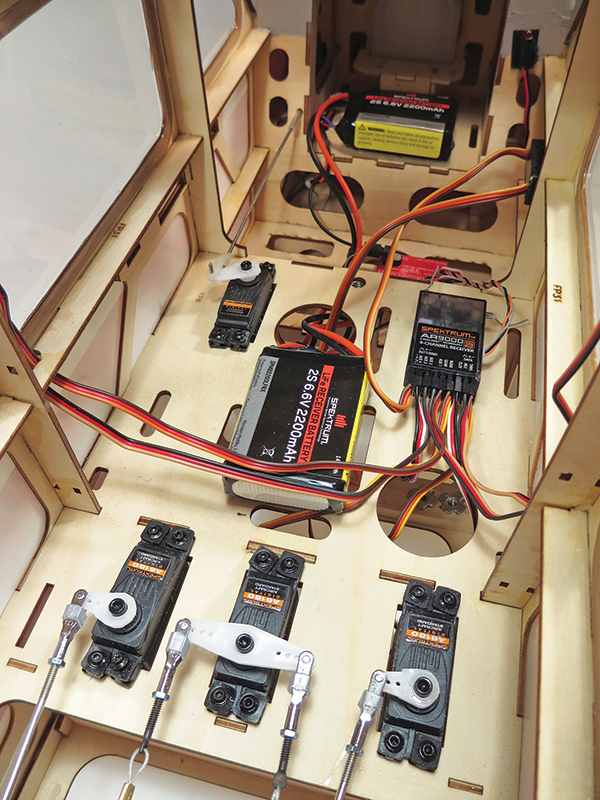
By removing the large hatch on the top of the fuselage, there is plenty of room to access the radio and fuel systems.
Image

Each of the wing panels are a plug-in design, sliding on an aluminum tube and held in via a single 1/4-20 nylon bolt.
One small “feature” inside the Valiant’s fuselage puzzles me. It’s not referenced in the manual, nor could I see any obvious use for it. If you look on the radio/servo tray in the cabin area, directly on the center-of-gravity point is a hole with a 1/4-20 T-nut trapped inside. (Refer to the manual on page 40, step 5, for a clear picture of it.) This is the same thread that is used in camera tripods. Maybe it was envisioned as a place to mount a camera, but with the smoky windows it would be hard to get good, clear videos or pictures. Could it be part of an aerotow arrangement? I don’t know, but I’m sure someone will quickly tell me. Assembling the Valiant at the field is fast, even if you transport it without the tail surfaces attached. The fuselage is quite nose-heavy without the tail attached, so be sure to secure it properly in your vehicle. When the bolts and clevises are attached, the wings slide on and attach with a single thumbscrew each. Attach the top hatch, fuel the model, and it’s ready to go. After checking the controls, I taxied out to the runway. My field has some grass between the pit area and the runway. It’s not the smoothest, but the Valiant had no problem with the little bumps. When it came time to line up on the runway, I found that I would have liked more rudder because the long fuselage makes for a wide turn. I throttled up for the maiden flight and the Valiant was airborne in only a few seconds. Its climbout was nice and stable, and it only needed a few clicks of trim. By the time I had flown once around the field, the Valiant was dialed in and flying perfectly. I spent some time on low passes to grab some flight shots. After those were done, it was time to have some fun, and fun was exactly what I was having! Not knowing quite what to expect, I was pleasantly surprised by the Valiant’s wide flight envelope. Under power, it’s quite agile and capable of basic International Miniature Aerobatic Club (IMAC) maneuvers. The ailerons offer good control, but the rolls are slow, no doubt in part because of the long wings. The elevator is quite sensitive and I found myself dialing in more exponential during subsequent flights. I spent some time seeing how effective the flaps were. At half flaps, the Valiant slows nicely and I needed to feed in a little down-elevator to hold level flight. At full flaps, the model will slow down to walking speed when the throttle is at idle. Even at this super-slow speed, it is quite controllable and shows no tendency to tip stall which makes it perfect for spot landings. On the next flight, I explored the more aerobatic side of the Valiant. As I mentioned, it is capable of basic IMAC maneuvers such as rolls, loops, point rolls, hammerheads, etc. Snap rolls can be done, but it requires holding it in the snap until the second roll for the “snap” to kick in.
Taking the Valiant up to altitude, I explored the stall and spin threshold. During stalls, I had a hard time getting it to do anything other than continue flying with somewhat mushy controls. Spins have a slow, almost majestic look as this large model slowly tumbles vertically downward. Recovery was instantaneous. I simply returned the controls to neutral, then pulled to level flight. At the beginning of this review, I wondered how to categorize the Valiant. As you can see, it really isn’t one particular type of airplane. With good low-speed stability and controllability, it is a nice intermediate trainer, or a great first-time Giant Scale model. It has a good glide ratio because of its long wings, but if you move the throttle stick up slightly, the Valiant transforms into a capable aerobatic performer. Yes, it will require some cross control for knife-edge passes and point rolls, but that’s to be expected. It has been a while since the Valiant’s maiden flight and I have not had any problems. The Evolution engine has been broken in and provides plenty of power. For a 30cc aircraft, its size gives it quite a presence at the field. Horizon Hobby also offers two landing gear options for the Valiant. One is a float kit for all of you water fliers out there. The other is a tundra-style landing gear with large wheels for bumpy landing strips. —Tom Sullivan [email protected]


Comments
T-nut
Thanks for the nice review! That t-nut is for fastening the battery tray for the electric power option. It's in the manual, just read the part where they descibe the electric motor installation.
Motor
Any problem installing a DLE 35 in this aircraft?
Add new comment