
Great ideas from our readers
How-to
As seen in the July 2017 issue of Model Aviation.
Rivets
There are many ways to add scale details to a project. One of my favorites is rivets—lots of rivets. There are many ways to do this but my favorite is a syringe and canopy glue. Using a syringe and an 18g needle with the sharp point cut off allows you to control the size of your rivets. —Aaron LibersatMaking Seat Belts for Your Model
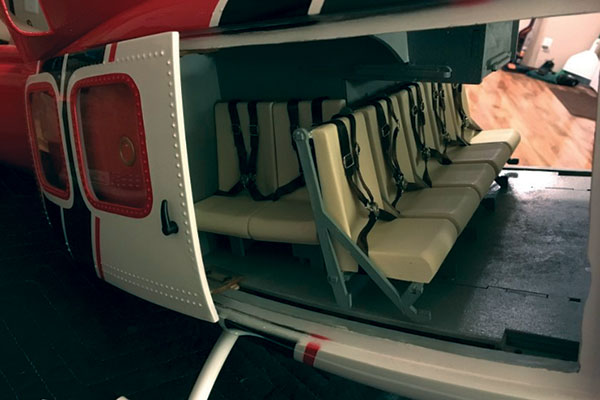
For you Scale enthusiasts, adding a figure is nice but every pilot and passenger should also have a seat belt. There are some available online, but they can be costly and if you need more than one, you could be dishing out some money. In my case, I was building the Los Angeles County Fire Department Bell 412 that had 15 seats. This was a Scale 800-size heli that just didn’t look right without seat belts. With some cheap ribbon and bits of jewelry pieces from a fabric/craft store, I custom-made some seat belts. A little bit of white glue, a simple jig, and a little soldering and I had some nice-looking seat belts. —Tom GuglielmoImage
Soldering a Connector
After soldering a new XT-60 battery connector to a new battery, I found that it couldn’t be connected to the ESC’s connector. What happened? During soldering, the heat softened the XT-60’s case and the pins moved enough that the connector couldn’t be plugged into the ESC’s connector. The solution? Before soldering the XT-60 connector to the battery leads, plug it into a female connector. That will hold the pins in place during the soldering and the XT-60 connectors will then plug together as they are supposed to. —John VinsonWing Racks
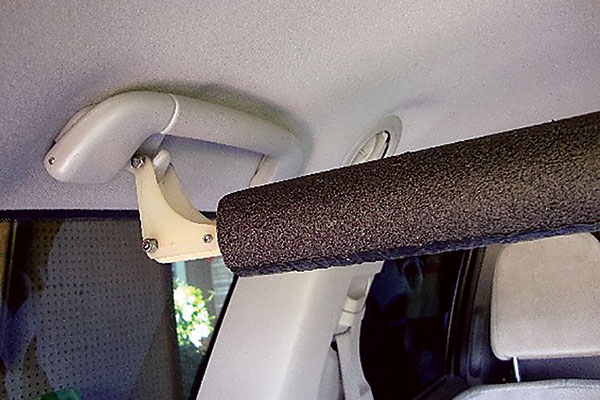
Many of us transport our models to the flying field in our minivans with wing racks of some sort across the cargo area in the rear. They will usually sway from side to side, and if this sway is not prevented, the wings and models are subject to damage. I have prevented this sway by using a right angle hanger on the left ends of the bars. —Ron OgrenImage
Hand Plainer
I have been using an old-fashioned potato peeler as a hand planer to shape balsa into leading edges for years. It works better than anything commercially produced. When it gets dull, throw it away and buy a new one for $1 at the dollar store. —Fred CountrymanCollet Propeller Adapter Wrench
Some collet propeller adapters are perfectly circular and do not have two flat spots you can use to grasp them with a wrench. If you’re having trouble holding onto a collet propeller adapter while threading on a new propeller or removing a broken propeller, take a short strip of the foam rubber that you would wrap around a receiver or other electronics and place it in the jaws of a good set of pliers, then use the padded jaws to grasp the collet propeller adapter. This usually provides an effective grip without the damage caused by using pliers without foam rubber padding. —Kevan SizemoreEZ Connector Pliers
To help me seat EZ Connectors, I drilled a hole in one side of a small pair of flat-nose pliers. I start seating the plastic (or metal) clip manually then use the modified flat-nose pliers to finish the job. It helps if the servo arm or control arm is removed, then reinstalled after the connectors are added. —Ken BarclayRemoving Epoxy From Your Hands
To get 5-minute epoxy off your hands quickly, easily, and safely, use apple cider vinegar. It works in 2 minutes with no harsh chemical smell or burning. I found this out by accident. —Richard BaehrFabric Softener Sheets
Since as far back as 1995, I have been using Downy fabric softener laundry sheets. They are approximately 5.25 x 9 inches and are very thin. They can be formed around compound curves and also 90° corners. Cut them to fit and tack-glue them with Sig-Bond or similar white glue. When dry, go over the sheet with a thin/smooth layer of 20-minute hobby epoxy and sand as needed. —John StachInstalling Blind Nuts
Here’s an easy way to avoid frustration when installing blind nuts in areas where you cannot reach, such as inside the nose of an airplane. Insert a threaded rod matching the thread of your blind nut through the hole from the outside. Thread the nut a little way onto the rod and then pull the rod out so that the blind nut is at the hole. Thread a washer and a nut from the outside of the airplane and tighten it down while holding the rod to keep it from turning. The nut pulls the blind nut into the hole and seats it. Then loosen the nut and remove the rod. That’s it. You’re done. —David LutzowHandy Sanding Stick
Steal one of your wife’s emery boards and keep in your flight box for a small sanding stick! —Jim SlaughterCharged Battery Notification
I wrap rubber bands around my fully changed LiPo batteries for a better grip. Then after use, I remove the rubber band as an indication that it is no longer fully charged. —Douglas LewisFishing Servo Extensions Through a Wing
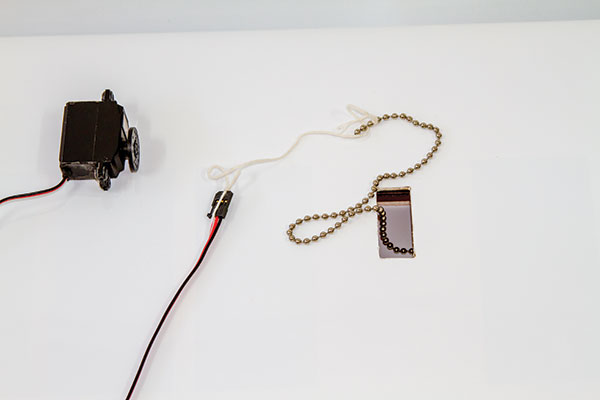
Most of the ARFs on the market today have strings inside the wings to help pull servo wires through them, but sometimes they don’t. When that happens, what is an easy way to pull the servo wires through? Go to the local hardware or big-box store and buy a couple different sizes of pull chains for ceiling lights. I get approximately 4 feet of each, which is more than enough to go through most wing halves. Tie a string to one end. Holding the wing panel vertically, start to feed the end of the lamp chain (without the string) through the servo opening. The chain will easily find its way to the other end. When it is there, simply pull a piece of it through the opening where you want the servo plug to be placed. Tie the string to the servo plug and begin to gently pull the other end of the lamp chain. The servo wire will work its way through the wing panel behind the chain. If it hangs up, try shifting the position of the panel or giving it a slight shake. Keep working the servo wire through until it exits at the root of the wing panel. Remove the string from the servo plug and secure the servo to the wing in the usual fashion. Mission complete! —Greg GimlickImage
Cleaning Scissors
I build 6mm foam board jets and use lightweight 3M strapping tape for hinges on the control surfaces. After using scissors to cut the hinges to size, glue from the tape will build up on the blades and make them almost unusable after a while. Not wanting to use chemical cleaners, I asked my wife what she thought might remove the built-up adhesive. I tried her suggestion and it worked wonders. The solution was simply to use peanut butter. I just smear a little on the blade and work it into the glue. I then use a paper towel to easily wipe off the built-up glue. The solution works like a charm. —Don AdamsKeeping Your Trim Centered
After the first test flight on a new airplane, or one that has just had some repairs and requires retrimming, you should try and reset the trim tabs back to center on your transmitter. This way you do not need to remember what the trim setting was in case you accidentally bump or move the trim tab. This is not always easy to do. This quick, easy method should get you close to having the trim tabs centered with the correct amount of trim that you put into the control surface of that airplane on its initial flight. Let’s say, for example, that you had to add 10 clicks of up-elevator to trim your airplane during the initial flight. Turn the airplane and the transmitter on. Move the trim tab back up to center or neutral counting the number of clicks or beeps that it takes you to center the trim tab—in this case, 10 clicks or beeps. Then continue another 10 clicks or beeps in the other direction. You moved the elevator trim tab up 10 clicks or beeps to center and then up another 10 clicks or beeps toward down-elevator for a total of 20 clicks or beeps. Turn the airplane and transmitter off and adjust the linkage on the elevator back to neutral by removing the clevis from the control horn on the elevator. Turn the clevis in or out until the elevator is centered to the horizontal stabilizer as it was the first time you set up the elevator. Reconnect the clevis to the elevator control horn. Turn the transmitter and airplane back on and move the elevator trim tab down 10 clicks or beeps so that the trim tab is now back at center or neutral. With the elevator trim tab now back at zero or center, the elevator surface will be in the same position (10 clicks of up elevator) as it was when it was trimmed during that initial flight. —Bill FroederCutting a Perfect Hole
When I built my first ARF, I wanted to use an ArmSafe switch. I was unsure how to cut a clean, round hole in the fuselage to mount the switch. I searched online and found this solution. At a hardware store, you can purchase a short piece of copper tubing and use a Dremel or similar tool to cut and sharpen one end. Trace the size hole you need from the ArmSafe backing plate and remove the covering from the fuselage with a razor knife. Place the sharpened end of the copper pipe over the area to be removed and rotated gently back and forth. The pipe will work its way through the balsa and cut a perfect hole. —Scott EldredgeKeeping CA Tips Clean
I place my dispensing tips for CA glue in a jar with acetone in it—enough to cover the tips. I also put my spray can tips in as well. The acetone dissolves the CA and/or paint and makes them usable the next time I need them. Because acetone evaporates easily, even with a seemingly tight lid, I put some plastic film on top of the jar (like the plastic backing from covering) and this helps seal the jar even better. —Lou FoxServo Mounts
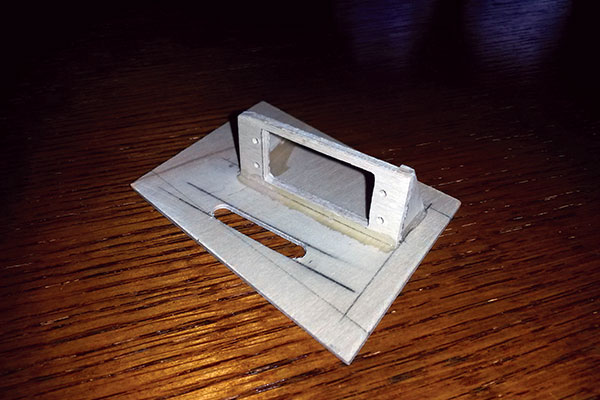
I build my own wing servo mounts/cover to hide the servo in the wing. My pet peeve is a servo hanging out in the breeze! I started with two blocks glued to the cover and had issues with the blocks breaking off. I then added triangles to the blocks but it was a fussy job and still not as secure as I wanted. The basis for the mount is a plywood rectangle cut out in the center for your servo of choice. I use a downward-cutting spiral bit in my drill press set to its highest speed and guide the bit by hand. Take your time here. You can always clean up the edges with a file or small sanding block. The top (cover) side of the mount can be sanded to match the curve of the wing so the cover gives a perfect fit. Two small triangles of plywood stabilize the servo mount on the cover. So far, I’ve not broken one, even in a crash! The mount/cover in my photo is to mount a servo in a fairly thin wing so the mount is fairly compact. —Ken HanawaltImage
Hinges
When installing pinned hinges on control surfaces, sometimes the glue gets in the hinges and causes them to bind. Before installing the hinges, simply put a small amount of light oil right on the hinge line. Be sure not to let the oil spread to the part of the hinge you are going to glue. This will ensure that the hinge will not bind after the glue dries. —Brad GambleCutoff Wheel Storage
No matter how careful I am, I always break brittle Dremel cutoff wheels when I’m done using them. I solved this problem by drilling a 1/8-inch hole in the plastic cap of the cutoff wheel container. Now I simply return the partially used wheel back to the container still mounted on the shaft with the shaft sticking out of the hole and the cutoff wheel protected inside of the container.Adding Color to Epoxy
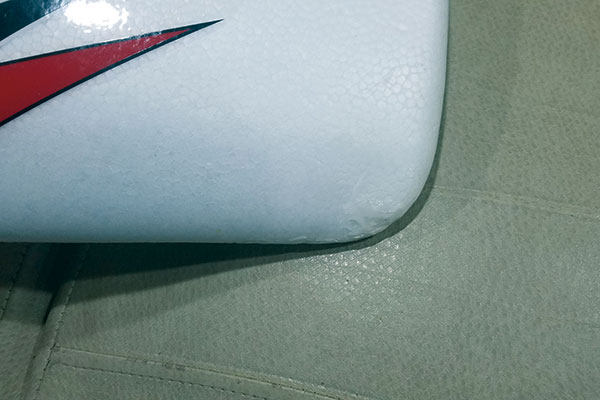
When making repairs, especially on Styrofoam airplanes, I mix one drop of resin pigment into my epoxy glue to color the adhesive to match the repair area. This helps to make the repair nearly invisible. I add one drop of white pigment in my epoxy mix to fill in little dings and dents on my foam aircraft. —Roy ChauvinImage


Comments
Charged battery notification
An even easier way to tell your charged batteries from your discharged ones is that once you charge your battery, slip your balance connector between the discharge leads you plug into the ESC. Then pull the balance connector out from between them once you're ready to use the battery.
Jay Smiths tips
Good stuff Jay!!
DuBro Factory Tour
Thanks for the video tour - very interesting. Just wish hobby shops weren't disappearing like they are today!
Add new comment