
Written by Terry Dunn
A simplistic FPV aerial platform
Product review
Photos by Bryan McLarty
As seen in the April 2016 issue of Model Aviation.
Specifications
Type: Electric FPV platform Skill level: Intermediate Wingspan: 70.9 inches Wing area: 604 square inches Length: 48 inches Radio: Futaba 14SG 2.4 GHz transmitter; Futaba R7008SB receiver; three Futaba S3270SVi micro servos Components needed to complete: Four-plus-channel radio system with three micro servos; 500-plus watt power system; adhesives; basic assembly tools Price: $129.99Test-model Details
Power system: Origin Hobby 950 Kv outrunner brushless motor; APC 11 x 5.5E propeller; Castle Creations Phoenix Edge Lite 50 ESC; FlightPower 4S 5,000 30C LiPo battery Power output: 43.2 amps, 669 watts Power loading: 145 watts per pound Flying weight (with GoPro HERO3): 74 ounces Flight time: 10-plus minutes Wing loading: 17.6 ounces per square footPluses
• Nicely molded foam parts. • Adaptable to many equipment configurations. • Good flying qualities. • Long flight times.Minuses
• Incomplete instructions. • Awkward hand-launch required. • All-gray color scheme is tough to see.Product review
When flying with an FPV system, it is helpful to have an aircraft that is designed with FPV in mind. For instance, you’ll probably want a pusher or twin-powered model so that the propeller is not in your camera’s field of view. Your model will also need a place to mount the FPV equipment and the ability to carry the extra weight. As FPV flying continues to rise in popularity, more manufacturers are producing models that include such design features. The Skyhunter FPV from Origin Hobby is one of those off-the-shelf offerings. In spite of the high-tech purpose of the Skyhunter, the airplane is deceptively simple.In the Box
The model’s main components are molded from EPO foam. All of the foam parts in my kit were cleanly molded and the paint was nicely applied. The wing spar and tailbooms are made of large-diameter composite tubes. There are several large, factory-applied decals on the wings and fuselage. I’d prefer to handle that job, but they were adequately applied. Origin Hobby offers a power set for the Skyhunter that includes a 950 Kv brushless motor and propeller. Interestingly, the package indicated that a 10 x 8 propeller was included, but a 12 x 6 propeller was inside. The mismatch was of no consequence because I ended up using an APC 11 x 5.5E propeller.Image

The Skyhunter FPV is a simple model featuring molded EPO foam components and composite tailbooms.
Image

The Origin Hobby 950 Kv brushless motor fits perfectly on the Skyhunter’s predrilled firewall. The author liked the performance of this motor when using a 4S battery and an APC 11 x 5.5E propeller.
To round out the power system, I used a Castle Creations Phoenix Edge Lite 50 ESC and a FlightPower 4S 5,000 mAh 30C LiPo battery. There is ample room in the fuselage to use large-capacity batteries or even multiple packs in parallel. The Skyhunter is only a three-channel airplane (aileron, elevator, and throttle). You might wish for more channels if your FPV system utilizes a gimbal-mounted camera with head tracking. I used a Futaba 14SG transmitter and an eight-channel R7008SB receiver. The system is overkill channelwise, but it provided me with the flexibility to add telemetry sensors to the model via the receiver’s S.Bus2 port. I plan to later install a GPS module, variometer, and voltage meter. The manual calls for three 9-gram micro servos. Not only is this is a sizeable model with large control surfaces, it will be carrying expensive camera and FPV equipment, so I would hesitate to trust bargain-bin servos in this application. Although heavier (16 grams), Futaba S3270SVi servos fit into the molded servo pockets. In addition to programmability options, these servos provide metal gears and approximately double the torque of most micro servos.
Image

Futaba S3270SVi servos fit nicely in the molded slots intended for 9-gram units, and provide better durability and torque on this large model.
Assembly
Origin Hobby includes a printed manual with written instructions and photos. It covers the basic assembly steps, but omits a few details such as receiver placement and wire routing. Anyone who has built a few ARFs should have no trouble sorting things out. The first assembly step involves nestling the servos in their molded pockets. The manual suggests using servo tape and hot glue to hold them in place, but I substituted GOOP adhesive. The E/Z connectors that attach the pushrods to the control horns are unique. The screw that locks the pushrod in place is also the pivot shaft for the connector. It works well, but you must be careful to prevent slop in the linkage. The Origin Hobby motor perfectly matched the predrilled holes on the firewall. I routed the motor wires through the air exit below the motor. I used 13-gauge wire to extend the motor leads from the ESC by 6 inches. This allowed me to place the ESC near the forward edge of the plywood tray within the fuselage, which worked well for center of gravity purposes. I secured the ESC to the tray with a zip tie. I used foam-safe CA glue to adhere the vertical stabilizers to the mounting brackets found on each end of the horizontal stabilizer. Although the glue joints were solid, I thought that the vertical stabilizers were not rigid enough and could potentially flutter during flight. A single 45° brace on each vertical stabilizer shored things up. I used scrap pieces of 3mm x 1mm carbon-fiber strips embedded and glued into the foam. Carbon-fiber rod or fiberglass rod would work equally well. Perhaps even a bamboo skewer could work.Image
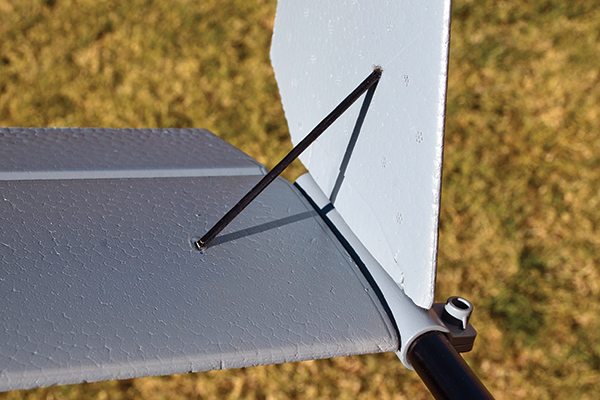
The author added braces made of carbon-fiber strip to make the vertical stabilizers more rigid.
All of the main airframe components are attached to each other with hardware. The wing panels bolt to the fuselage and four clamps secure the tailbooms to the tail feathers and the wing. With all of the pieces assembled, the Skyhunter is a large airplane. Take a moment to consider how you will break down the model for transport and/or storage. This will dictate how you configure the necessary servo extensions. You will want the ability to separate the relevant servo leads at the same junctions where the airframe will be split. I decided that I would transport my Skyhunter by removing the tailbooms from the wing, leaving the wing attached to the fuselage, and the tail feathers attached to the tailbooms. To accomplish this, I extended the lead for the elevator servo by approximately 36 inches. The lead is routed through the starboard boom and the connector emerges from the front of the tailboom with a little slack. The receiver is mounted in the middle of the plywood tray in the fuselage. Eighteen-inch extensions were required to connect the receiver to the aileron servos and the other extension on the elevator servo. After tucking the wires into the channels on the underside of the wing, I covered them with strips of Blenderm tape. When I arrived at the field with the Skyhunter, I placed the tailbooms in their sockets on the wings. As the tailbooms became fully seated, I made sure that the elevator servo lead emerged below the wing. I then connected the elevator servo extensions and tightened the tailboom clamps. The process takes a minute or two. The battery must be mounted in the forward part of the fuselage for proper balance. I set down two side-by-side strips of self-adhesive hook-and-loop tape on the floor of the battery bay. The batteries are configured with hook-and-loop tape. This gives me flexibility to utilize different battery arrangements. The hatch for the battery bay is a two-part foam piece. With the upper part omitted, the bottom piece provides a broad platform to mount FPV equipment. My preferred camera mount features 1/4-20 female threads on the base. I drilled a 1/4-inch diameter hole through the foam (with a sharpened brass tube), which allows me to attach the camera mount to the hatch with a nylon 1/4-20 thumb screw. I initially flew the Skyhunter with a GoPro HERO3 (with case) in the camera mount. With that camera in place and the battery fully forward, the model balanced precisely at the suggested location.
Flying the Skyhunter
Before the first flight, I was concerned that the Skyhunter’s gray color scheme would make visual orientation difficult. Even FPV airplanes require good color contrast for the spotter to keep track of it. To mitigate this issue, I painted the outer part of the left wing with bright orange spray paint and black accents. Hand-launching the Skyhunter presents a couple of challenges. Not only is it a significant mass to be hurling, the girth of the fuselage makes it somewhat difficult to grip. I also couldn’t ignore the large propeller located near the launcher’s grasp. I decided that it was best to have an assistant throw the model while the motor was shut down. I then powered up as soon as the airplane was clear of the launcher. Although it isn’t a casual affair, this process is safe and works consistently. After several flights, I added simple, removable landing gear that permitted rolling takeoffs and landings.Image

After several hand-launched flights with the Skyhunter, the author added this simple landing gear arrangement to allow for rolling takeoffs and landings.
My first several flights with the Skyhunter were strictly line of sight, although I did have the GoPro attached and operating. I found the airplane easy to fly. The power system provides plenty of push for strong climbs and aerobatics. It also flew well at lower power settings. I was easily able to log flights lasting 10 minutes and longer with each charge. The Skyhunter behaves like a sport airplane. It is capable of rolls, loops, inverted flight, and more. When performing these maneuvers, I often found myself wishing that the model had rudders, yet when I flew sedately in to get smooth video, I didn’t miss having yaw control. Landing the Skyhunter is no problem. It slows down well and the control surfaces maintain good authority all the way to touchdown. This one is easy to grease in.


Comments
Exellent review
Exellent review
I'm considering buying this
I'm considering buying this plane but want to know the difference between the Origin Skyhunter and all the other Skyhunters out there (RMRC). Is there a difference or is it just branding?
Also, I'm a little concerned about no rudder or flaps. Any comment?
Add new comment