


Horizon Hobby Spektrum iX12 Transmitter

Written by Jay Smith The functionality of Android right in your radio Product review As seen in the August 2018 issue of Model Aviation.
Specifications
Band: 2.4 GHz Channels: 12 Frame rate: 11/22 per millisecond Model memory: 250 Modes: User Selectable Mode 1-4 Modulation: DSMX Range: Full Rate positions: Three Receiver: AR9030T nine-channel air telemetry receiver Resolution: 2048 SD card/AirWare capable: Yes Telemetry: Integrated Transmitter battery type: 3.7-volt 1S 6,000 mAh Li-Ion battery Price: Transmitter only: $599.99; with receiver: $699.99Pluses
• Access to tension, ratchet, and travel adjustments can be made through the front of the transmitter. • Wi-Fi and Bluetooth connectivity. • Micro USB connectivity. • Full-color, 4-inch touch screen.Minus
• Longer load times for startup and changing model memories.Product review
The Spektrum line of radios has brought several innovations since its beginnings in 2004. I began my journey to frequency freedom with the original DX6. No longer concerned about someone operating a radio on my frequency or the challenges of placement of a long antenna, I jumped in with both feet. Then the DX7 provided the Model Match feature, ensuring that you have selected the proper model in the transmitter. No longer were our aircraft at risk by accidentally attempting to fly with the radio set to the wrong model. Other notable enhancements and innovations included DSMX, which added frequency agility over DSM2, and the addition of an SD card slot to allow the user to store more model setups and provide for easy upgrades. It also brought the ability for model sharing. Wireless trainer functionality and telemetry are other beneficial features that come to mind. The new iX12 continues to provide enhanced functionality with the inclusion of a touch screen, Wi-Fi and Bluetooth connectivity, and an Android-powered interface.First Impressions
Inside the box you will find the Spektrum iX12 transmitter, 6,000 mAh Li-Ion transmitter battery pack (installed), AR9030T receiver (if you purchased the transmitter with the receiver), USB power supply and cable, quick-start guide, iX12 neck strap, sticker set, and accessories. The color of the transmitter is similar to my DX9 Black edition. Although I have nothing against silver radios, I find that I prefer a darker, less-reflective color. The radio felt comfortable in my hands, thanks in part to the molded grips on the back of the transmitter. The sticks felt good and are nice and smooth. I was happy to see that the stick tension can be adjusted right from the front of the transmitter. I normally tend to tighten the stick tension slightly on a new transmitter. With the iX12, simply remove the screw covers. Using a small Phillips screwdriver, turn the appropriate screws near the sticks clockwise a small amount to tighten the stick tension and counterclockwise to loosen it. The manual provides the locations of the screws. You can also add or remove the rachet on the throttle stick the same way. The iX12 does not include a case, and for now I am keeping it in the original box until the iX12 Spektrum Air Transmitter Case is back in stock.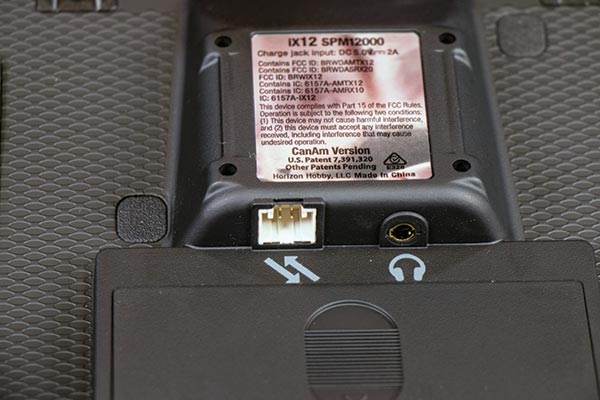
The iX12 has a serial port that has long-range RF module support. Using the iX12 transmitter with a compatible long-range RF system will require an adapter (see text). Also on the back of the transmitter is the headphone jack.
Using the Transmitter for the First Time
After fully charging the transmitter, it’s time to learn how to use an Android-enabled Spektrum transmitter. Horizon Hobby realized that we might need a little assistance and has posted several YouTube videos about the radio and its functionality. The phrase “With great power comes great responsibility,” comes to mind when getting started with the iX12. Given that the radio uses Android, there are a few more steps to go through to get it up and running the first time. Press and hold the power button for several seconds to power on the iX12 transmitter. The transmitter is designed to prevent inadvertently powering it on by touching the power button. You will find that powering on the radio takes slightly longer than previous Spektrum radios—roughly 90 seconds. Sleep mode, accessed by double pressing the power button, will allow you to have your radio available in moments. Sleep mode is used when you are planning to use the radio again the same day. When you are done flying or working with the radio for the day, it should be powered off normally.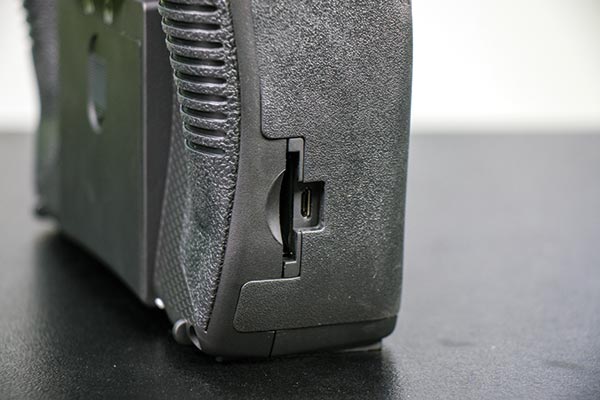
As do more recent Spektrum transmitters, the iX12 accepts an SD card. It also uses a micro USB port for charging. Other accessory devices can be connected, including your PC or laptop.
Registration can be done on the transmitter after you have set up Wi-Fi. This can be done by swiping down from the top of the screen and selecting the Wi-Fi icon to connect to available Wi-Fi networks. Registering the transmitter is done in System Settings then Product Information. You will also need to register for Google Play if you do not already have an account. If you do have an account, you can simply link to it. After you access Google Play, you can update the transmitter software through the Spektrum AirWare software.
Navigating the Transmitter
Spektrum AirWare software provides the interface to set up your models. When the transmitter finishes booting up, you will be in the AirWare software. This runs independently of Android, so if Android ever crashes, you will still have full control of your model aircraft. Horizon Hobby states that if you are flying the same model that you flew the last time the transmitter was powered, you can fly that model while Android is still booting up. Inside the AirWare software, you will start on the main screen that provides information about the currently selected model, trim inputs, and enabled timers. On the top left is the name of your model. If you click on that, you will be taken to Model Utilities where you can switch models. When you switch models it saves your current model and loads the one you have selected. This process takes nearly 30 seconds. On the top right you can find the battery indicator and the volume setting. On the bottom of the screen is Model Adjust. The Model Adjust menu contains features and adjustments that are used to finalize the settings for a model configuration such as Servo Setup, Dual Rates and Expo, and the Flap System. The Model Setup menu features are used for basic aircraft setup configuration. Here you will find options such as Audio Events, Timers, and Model Start Warnings. The System Settings allow you to access System Configuration, where you can set the mode and language used for the transmitter. Product Information provides the serial number of the transmitter, app version, and firmware version. It is also where you register the transmitter. The Calibration menu allows the user to ensure that the analog input devices (control sticks, sliders, and knob) are working properly. To complete the calibration procedure, move every control to the extreme and return it to center. The screen shows a graphic representation of each input. The indicator turns green when each control’s range of movement is confirmed. The control must be centered for the indicator to stay green. Select Save when all of the indicators are green. Calibration is required whenever a stick mode change is performed.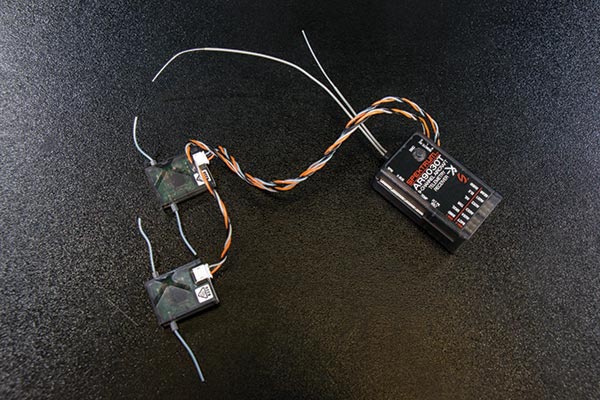
The Spektrum AR9030T receiver is a nine-channel integrated telemetry receiver that can be purchased with the transmitter for an additional $100 (a $20 savings).
Viewing the manual is the final option found in the System Settings. It is handy to have the manual accessible if you have a quick question about one of the functions of the transmitter. You can even search for information and double tapping the screen will enlarge the text. Double tap again and it will return to its original size. Although I wouldn’t use this option for any heavy reading, it is great if you need a quick reminder about one of the transmitter’s many features. The roller system used in previous Spektrum transmitters works well, but I have found that the touch screen makes navigation easy. All of the menus inside of the AirWare software are simple to understand and changes are easily made. On the Android side of things, you have plenty of preinstalled apps and widgets you can use and more can be downloaded. Many third-party apps that work with Android are available and others are under development.
Setting Up a Model
If you generally fly Horizon Hobby aircraft and have appreciated the ability to download aircraft setups, the iX12 takes it to the next level by allowing you to download the setup directly to the transmitter then import it. As awesome as this option is, it is important to remember that because mechanical setups can vary on some types of models, it is your responsibility to ensure that all of the controls are operating in the proper direction and within the manufacturer’s recommended throws. If you then want to add a photo of the aircraft to go along with that model memory, several Horizon Hobby aircraft are already available, or you can download or transfer one to the transmitter. If you want to use your cellphone to take and transfer the photo, that can be done using Bluetooth. To set up a new model from scratch, touch the expand icon with three red dots at the top right corner of the Model Utilities screen. Select Add a New Model from the drop-down menu then Select Default or Template from the pop-up menu. Use Default to create a model using default values for all model settings. Use Template to start from a model template that has been saved to the iX12 transmitter. Select the desired model option and select Create to continue. The iX12 will return to the Model Utilities screen and the new model will be selected. Touch the new model to enter the Model Details screen or touch the back arrow at the top left of the screen to return to the Dashboard.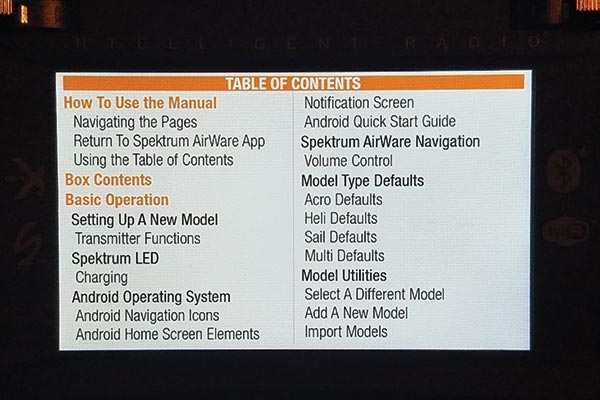
The iX12 allows you to access and read the manual on the 4-inch touch screen. A double tap on the screen will increase the text size to make it easier to read.
Using a template will give you a head start when creating new models by setting up a generic model in each model type with desired switch assignments, rates, curves, and other details. Name the model, and save it as a template. Future setups can be based on the saved template by selecting Template when adding a new model.
Voice Alerts
Audio Events on the iX12 can be set up to report virtually any action on the transmitter. The Audio Events menu is meant to serve as one location to find any audio report in the system. Reports can be set up based on timers, sticks, switches, telemetry data, and more. The iX12 features a powerful text-to-speech engine in the Android operating system. Many of the options listed in this menu can also be accessed from the related function menu. In the System Settings menu, select Accessibility then Text-to-Speech output. Install Voice Data will then allow you to select different languages as well as different male or female voices to allow you to customize the voice output. When making voice changes, you must restart the AirWare software for a new voice to take effect. Because the radio uses Android and Google Text to Speech, you can also alter what the voice alert says if the default options aren’t what you are looking for. Create any voice alert by typing in the words. It can even take WAV extension files so you can have virtually any sound imaginable.Long-Range RF Module Support
The iX12 has a serial port that has long-range RF module support. Using the iX12 transmitter with a compatible long-range RF system will require an adapter (SPMA3090). Because flying beyond line of sight is not supported under the AMA Safety Code, I didn’t use or test this functionality.Wireless Trainer Link
The iX12 has the ability to wirelessly link up with other Spektrum transmitters and specially equipped Spektrum FPV headsets. After it is bound to another transmitter or component, ModelMatch technology will allow the iX12 to relink without having to go through the bind process again.
The Model Adjust menu contains features and adjustments that are used to finalize the settings for a model configuration. The touch screen makes selecting and changing settings easy.
Bluetooth Connectivity
The iX12 is compatible with nearly any Bluetooth device. This allows a pilot to use wireless headphones or wireless earbuds to hear voice alerts privately, or pair a set of speakers and listen to music. A range of other devices can also be used, including file sharing, photo sharing, and more.Conclusion
The Spektrum iX12 provides many new features along with Android functionality, a first for a Spektrum radio. For those who are comfortable with a smartphone or tablet, the general use and programming is intuitive and easy to learn. The inclusion of Wi-Fi and a touch screen makes this new radio a joy to use. Being able to perform tension, ratchet, and travel adjustments from the front of the transmitter is appreciated. Although the initial startup time and the time it takes to switch models is longer than with previous Spektrum radios, the sleep mode makes the radio accessible in seconds when it is continuously being used. The iX12 continues to build upon the innovation that Spektrum has brought to its radio systems since 2004. —Jay Smith [email protected]Manufacturer/Distributor:
Horizon Hobby (800) 338-4639 www.horizonhobby.com Spektrum www.spektrumrc.comThis Month's Issue

Join the AMA
![]()


2 comments
iX-12 Tx
IX12
Add new comment