
Written by Clancy Arnold
As featured on page 39 in the April 2013 issue of Model Aviation magazine and tablet app.
A step-by-step guide to resurrecting a dead glow plug igniter.
Glow plug igniters can range from easy to repair to not repairable. The difficulty in removing the battery can be as simple as opening the igniter and slipping out the old battery, or as complicated as going through several steps only to realize that the only option is to replace it.

-
1. Remove the heavy, clear shrink sleeve from the battery and mount.
2. Scrape the label off the battery and try to see how it was assembled. If the answer is an interference press fit backed up by the shrink sleeve, skip this step.
3. Hold the battery in a vice with the glow-plug connector pointed down. Tap down on the edge of the mount using a screwdriver and a small hammer. Work around the mount until it comes off of the battery. Do not lose the insulator.
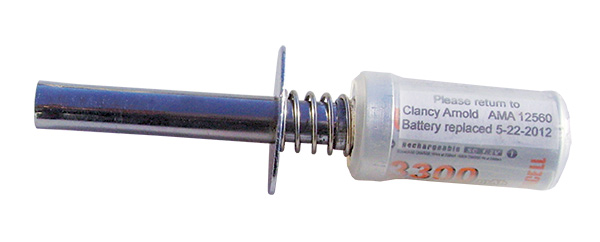
4. Examine and measure the battery. What size is it? What is different or unique about it? The battery I removed and measured is a Sub-C size with a flat top. eBay is an excellent source for battery-style information. Do a search for the different sizes and then scroll down and look at the technical specifications provided by the sellers.
5. Order a new battery and some clear shrink sleeve material large enough to loosely fit over the mount. I purchased two NiMH flat-top 3300 mAh Sub-C batteries for $5.34 and 100 cm of 30 mm clear shrink sleeve material for $3.68 through eBay from Recyclepowers, which offered free shipping. I ordered two batteries in case I damaged the first one. The shortest length of shrink sleeve that would work is 100 cm (1 meter). You will need about 21/2 inches per igniter.
6. Prepare the new battery by carefully cutting the covering back to the edge of the groove that is farthest from the positive terminal, where the battery is crimped together. Cut the label, not the metal! Save the insulator disk to reuse if it comes loose. I used both insulator disks when I reassembled the igniter.
7. Eliminate any burrs on the mount that occurred when removing the original battery.
8. Ensure that you have all the parts in the proper locations. Press the battery into the mount by hand as much as you can. It will slide in easier if cocked slightly, similar to mounting a car tire on a rim. Mine has a .005-inch interference fit and there is a ridge around the inside of the mount that ends up in the groove around the battery. I considered heating the mount and cooling the battery before assembling the parts, but I got it assembled without using that technique.
9. Press the battery into the mount using minimum pressure. I used large slip-joint pliers to reach across the 2 inches. After it starts moving, work around the mount to seat the battery.
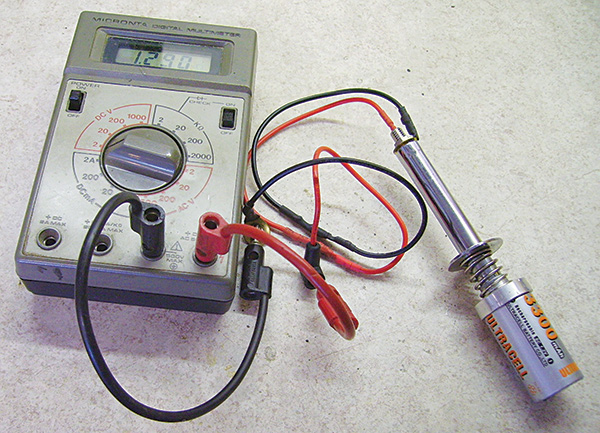
10. Check the voltage at the glow plug connector. It should be roughly 1.2 volts. Record the voltage, wait approximately 24 hours, then measure it again.
11. If the voltage readings are nearly the same, then it should be safe to charge the new battery. After the battery is charged, try it on a glow plug. In my unit, I nearly doubled the power-storage capacity from 1900 mAh to 3300 mAh with only a 7-gram weight increase. This will increase the recharge time from 10 hours to 17 hours. A different charger to provide the extra power could be used to charge the new battery quicker. The difference between 1900 mAh and 3300 mAh capacity is the ability to heat a typical glow plug that draws 3 amps for 66 minutes, compared to 38 minutes.
12. If you have another igniter or other field equipment, consider labeling them with your name and address and covering the label with the clear shrink sleeve material. This is a good use for all of those “free” address labels that keep arriving in the mail.


Comments
thanks clancy
Thanks for the article, many of us still like tinkering ;)
Source of the battery.
Bill
I am glad you liked it. I had to repair mine so decided to take pictures while doing the battery replacement. This is my secod article in Model Aviation. My first article was of my CL Scale P-38 in the March 1986 issue.
Clancy
I received my copy of Model Aviation, April 2013 issue, today with my article in it and have allready received an email asking for a suggested source of the battery.
Sub C flat top NiMH 3300 mHA Batteries without solder tabs are available on eBay:
Qty 1 eBay item # 181099877199 for $5.12 total cost.
Qty 2 eBay item # 350722310193 for $7.61 total cost.
I stand corrected
I stand corrected!
Three modelers on RC Groups and two more on Stunt Hangar have convinced me that the Glow Plug Igniter that I said was not repairable is in fact repairable.
My original decision was based on looking at the one working unit loaned to me for the article. The fact that it was still working precluded any in depth attempt to disassemble it. The joint between the battery and the outer sleeve may have been solder but the flux residue looked like an epoxy compound. It still remains at the bottom of the ranking for battery replacement due to the amount of heat required to solder the outer sleeve to the bottom of the battery case and the risk of damage to the battery from excessive heat. You need a "big" soldering iron. If the original manufacturer still offers a trade-in program then that would be my first recommendation.
You will have to be careful to not damage the insulation on the center conductor wire. It appears there is a notch in the edge of the outer sleeve to allow the insulated wire to pass between the battery and the outer sleeve safely.
A couple of modelers have mentioned that not using the battery regularly causes it to loose capacity. When I was working, over 23 years ago, I saw this problem that was referred to as a "Memory Problem." The NiCad battery manufacturers mostly solved this problem years ago and I have not heard of it being a problem with NiMH batteries. Now if they could fix the self discharging problem!
Clancy
thankssssssssssssss from
thankssssssssssssss from chile
McDaniel
The McDainel (orange sleeved) glow igniter battery can be changed by a high watt pistol type soldering gun. I believe it is soldered on the (-) pole of the battery. I have changed them by melting the solder and pulling the post off with pliers to not get burned. The unmetered ones are easy. The metered type as shown may be bonded to the top. Carefully nudge/slide the casing off. The wire to the (+) pole I think is soldered. The meter is pretty fragile.
Add new comment