
Written by Andrew Griffith
Relive the Golden Age with this Giant Scale classic
Product review
As seen in the March 2018 issue of Model Aviation.
Bonus Video
Specifications
Model type: Semiscale ARF Skill level: Intermediate Wingspan: 90.5 inches Wing area: 2,519 square inches Wing loading: 26 ounces per square foot Airfoil: Semisymmetrical Length: 73.7 inches Weight: 27 to 30 pounds Engine: 50-61cc two-stroke gas or 65cc electric Radio: Seven channels Construction: Laser-cut balsa and light plywood Covering/finish: Film covered in white with red trim Price: $549.99Test-Model Details
Motor/engine used: DLE-61 two-stroke gas engine Receiver battery: Trak Power 2,400 mAh 2S LiPo (two for the receiver, one for the smoke pump) Propeller: Falcon classic 24 x 9 Radio system: Futaba 14SGH; six Futaba S30370HV servos Ready-to-fly weight: 29 pounds, 4 ounces Flight duration: 12 minutesPluses
• A piece of aviation history. • Large hatch for easy access to radio equipment. • A clever jig is included that makes balancing a one-person job. • Instrument panels (not a decal) and two pilot figures included. • Painted fiberglass cowl and wheel pants.Minus
• Plastic parts, such as the landing gear fairings, are brittle and can crack while cutting. See text for solution.Product Review
Other than perhaps a Piper Cub, nothing says “nostalgic aircraft” like a Weaver Aircraft Co. YMF-5 or, as most of us know it, simply a WACO biplane. Originally built in the 1930s, Weaver went out of business shortly after World War II. In 1983, the Lansing, Michigan-based Classic Aircraft Corporation had a dream of bringing back the timeless full-scale WACO. The dream was realized in 1986 when the first YMF-5 received FAA certification. In order to bring the 50-year-old design back to life, Classic Aircraft hired industry experts who made more than 300 engineering changes to modernize the WACO with current material and construction techniques, while maintaining the vintage look and flying characteristics of the classic design. I have a 20cc-size Waco from Phoenix Model that I am quite happy with, but I was holding out hope that the company would release a larger version. It turns out that this was the plan and shortly before the Christmas holidays, I found out that one was headed my way for review. Nice present! The Waco arrived nicely packaged in a large box that ensured the contents were well protected. Construction is mostly laser-cut balsa and plywood and is covered with what appears to be Oracover in white with red trim. A large decal sheet features the arrows and stripes found on many Waco models. With a nearly 91-inch wingspan, the Waco takes up a fair amount of space, and the fuselage is quite bulky. Make sure that you have room to store and transport a large model if you’re considering the 60cc Waco. Despite its size, the equipment required to fly the Waco is fairly modest. Although the Waco has ailerons on both the top and bottom wings, the ailerons are driven by two servos, one in each bottom wing half. This makes for easier field assembly and teardown because there is no wiring to connect in the upper wing. I had some questions about the Waco needing one servo per aileron, but if it is flown in a scalelike manner and at a reasonable speed, one good servo on each side should be plenty. I will equip the Waco with Futaba S3070 HV S.Bus servos and a DLE-61 engine. Because you can’t barnstorm without smoke, I’ll also add a Holy Smokes smoke pump to the Waco. Instead of a separate battery for the receiver and ignition, I will use two batteries to power the receiver, a Tech-Aero IBEC to power the ignition from the receiver bus, and add a separate battery for the smoke system. Those who prefer cleaner and quieter aircraft can outfit the Waco with an electric power system. If you choose this route, you will need a 60cc RimFire motor, a 120-amp ESC, and a 12S LiPo battery system.Assembly
I love classic aircraft and was excited to get started on the Waco, but I had the patience to read through the 50-page instruction manual first. The manual has plenty of amplifying information and many clear diagrams. Experience is expected with a project of this scope, but the manual is comprehensive and detailed. The Waco was well packed and, despite the outside of the box getting slightly beaten up during shipping, the model emerged from the box damage free. Despite its long journey through various temperatures, the covering on the Waco was in excellent shape. Even with four wing panels and a large fuselage, touching up the seams and shrinking out what wrinkles there were only took approximately 15 minutes. I assembled the Waco with Zap thin and medium CA glue, Pacer Z-Poxy 15- and 30-minute epoxy, Z-42 medium threadlocker, and Formula 560 canopy glue. Construction begins by building the wings. The ailerons use CA-style hinges. These were installed using thin Zap CA glue. The servos mount to the servo hatch. Although the manual shows the use of the stock servo arms, by the time you’re done, there isn’t much arm sticking out, so longer arms will help. All four servo-mounting screws and the holes on the servo mounting hatch were drilled and threaded. The screws were removed, and the threads hardened with thin CA glue. A pull string is positioned in the wing to pull the servo extension wire through to the root rib. The heavy-duty plastic control horns bolt in place through the aileron. It was nice to see beefy ball links on either end of the pushrods. I prefer ball links where it is possible, especially on large gas models, but even on smaller models they give you a nice slop-free control system. Next, it was time to install the landing gear. The main landing gear is composed of two aluminum struts with molded plastic fairings and fiberglass wheel pants. The mounting screws were treated with a drop of Z-42 threadlocker and installed. The plastic landing gear fairings are the one area of the kit that needs special care and take some time. Cutouts should be made with plenty of material to spare then the pieces carefully sanded and fitted to their final outline. This will minimize the chances of cracking the plastic when using RC car body scissors. Formula 560 glue or clear silicon adhesive can be used to glue the fairings into place.Image
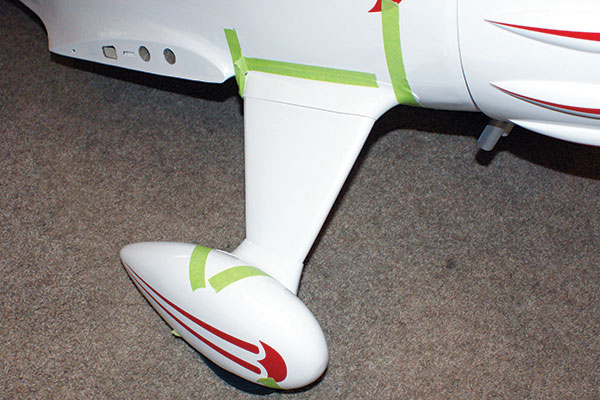
Care should be taken when dealing with the plastic fairings. Cut a rough outline, leaving plenty of room, and sand and fit to final shape.
The wings get four aluminum L brackets and two G10 fiberglass control horns on each side. The brackets are for mounting the interplane struts, and the additional control horns are for the lower to upper aileron pushrods. The gluing area of the control horns was masked off and they, along with the angle brackets, were painted white to match the covering. The manual directs you to install the control horns with CA, but I scuffed the gluing area and used 30-minute epoxy. The top wing has a center section and two wing panels. The center section stays attached to the model and I used threadlocker on all of the bolts when I was sure all of the struts were correctly set up. The outer wing panels have a small amount of built-in dihedral, which should assist with stability. The bottom wing is flat. Most biplanes with high-lift wings have a small amount of negative incidence built into the top wing to keep them from climbing all of the time. I hope that will be built into the struts. Building the tail is the next step. After aligning and marking the horizontal stabilizer, I used a soldering iron with an old tip to remove the covering. This serves two purposes: It doesn’t cut into the stabilizer wood, and it seals the covering. I had to use a sanding board on the saddle to achieve a perfect horizontal alignment with the wing, but it was minimal. I used 30-minute Z-Poxy to attach the horizontal stabilizer, and the elevators and rudder were hinged using thin Zap CA and the provided hinges. I centered and mounted all of the servos in the fuselage. This was done using the same technique previously described: pilot drill, prethread the hole, and harden the threads with thin CA glue. The Waco uses a double pull-pull cable system from the rudder servo to drive both the rudder and tail wheel steering. The rudder is rigged and the tail wheel cables are rigged when you install the tail wheel. The instructions cover the installation in detail. I will only add that you can find replacement cable (called leader line) and crimps at any store that sells fishing tackle supplies. I was pleased to see that a shock-absorbing tail wheel appropriate to a 30-pound airplane was included and not something made from music wire. There is a removable hatch for you to easily access the entire mechanism. I removed one setscrew and found no threadlocker, so I removed all of them and treated each with a drop of threadlocker and tightened everything down. I used clear tape on the hatch to keep it from vibrating in flight.
Image
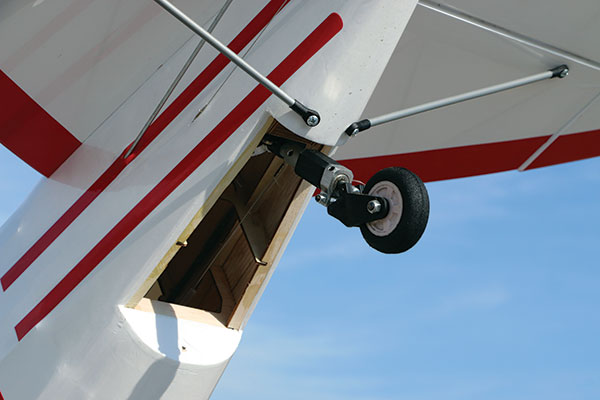
A heavy, shock-absorbing tail wheel is included with the Waco. It is suitable for a 30-pound airplane. A removable hatch makes installation and maintenance easy. Clear tape on the seams helps prevent vibration.
The engine installation step is needed if you’re using one of the recommended power setups. The roomy cowl should accommodate a variety of engines, and installing a radial would make a wonderful sound. There are laser-etched plywood drilling templates included for the DLE-61 and the O.S. GT60 two-cycle gas engines. The DLE-61 template also fits the mount of the RimFire 65cc electric motor. The standoffs included with the DLE-61 provide the proper propeller spacing. The choke rod, routed into the fuselage, is accessed for starting by removing the hatch cover. Adding a Falcon classic-series propeller to the engine and a Tru-Turn hub completed the look.
Image
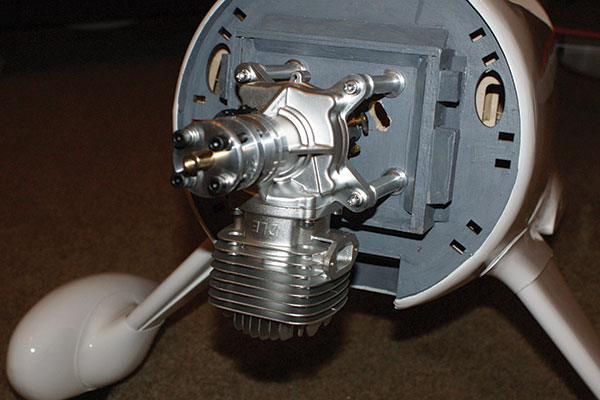
A laser-etched mounting template makes lining up the DLE-61 an easy task. Everything in the engine compartment was painted and fuel proofed.
The provided tank will work great, but I chose to install a pair of water bottle tanks obtained from Taildragger RC. One will be used for fuel and the other for smoke fluid. The fuel tank is slightly smaller, but they fit nicely next to each other. After the tanks were installed and plumbed, I installed the Holy Smokes smoke pump and mounted the cowl. The Waco comes with a dummy radial engine, but it’s nothing more than black plastic. A couple of hours of work detailing and painting the cylinder heads and pushrods, and adding some scrap wire to simulate spark plug wires, was well worth the results. Like the landing gear strut covers, the dummy engine should be carefully trimmed and sanded to shape. I also added RTL Fasteners bonded washers to the cowl-mounting screws. Another area that can be cleaned up for scale appearance is the switch mounting. The manual shows them mounted externally but I mounted mine, as well as the fuel and smoke fill lines, inside of the hatch. The Waco includes two pilot figures and detailed instrument panels. I felt the pilots were on the small side, so I used a junk box pilot figure that was slightly larger and included a flying scarf that flaps in the breeze. Decals for the classic Waco arrows are on two large sheets made of clear peel-and-stick Mylar. I opted for cut vinyl and made my own set that included a custom N-number, as well as Waco Aircraft logos and, of course, the toll-free number for my favorite modeling organization. I was glad I made my own because if the interest shown during the review flying was any indication, I will be able to distinguish mine from the two or three others that were preordered that day! Large airplanes such as the Waco can be difficult to balance, especially by one person. I’m happy to report that Phoenix Model has included a balancing jig that makes balancing accurate and easy to accomplish without a helper! It took 3.5 pounds of lead mounted up front in the engine compartment to balance the Waco slightly nose down. The good news is that despite adding the smoke system and the lead, I was still at the low end of the weight range! This is great news if you plan to install a heavier radial engine.
Image
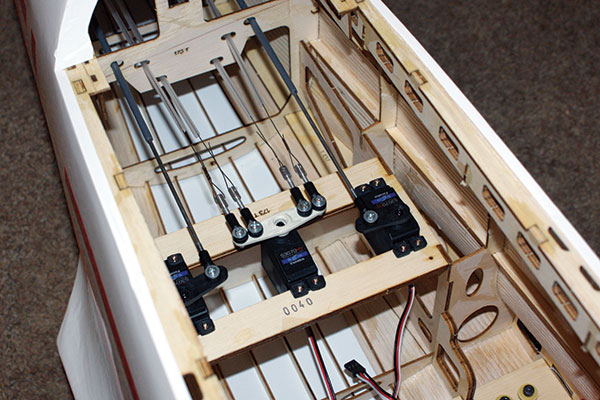
The cavernous fuselage has plenty of space for radio and fuel tank installation.
The control throws were set according to the manual, and I added 25% exponential in my Futaba 14SG radio to all of the control surfaces. Total build time, including detailing the dummy motor and creating the custom vinyl graphics, was approximately 20 hours. I had a last-minute work trip come up in the middle of this project that had a short deadline, so I can’t thank Adam Strong enough for helping me to complete this on time.


Comments
Add new comment