
Bonus Video
At A Glance
Specifications Model type: Semiscale warbird Skill level: Intermediate Wingspan: 69.5 inches Wing area: 848 square inches Wing loading: 33.4 ounces per square foot Airfoil: Semisymmetrical Length: 60 inches Weight: 11.5 to 13 pounds Power system: 20cc gas or Power 60 electric Radio: Full-range, seven-channel minimum Construction: Built-up balsa and light plywood Covering/finish: Printed covering Price: $399.99 Test-Model Details Engine used: Evolution 20cc two-cycle gas Receiver battery: Spektrum 4,000 mAh 2S receiver; 2,000 mAh 2S ignition Propeller: 16 × 8 Evolution plastic Radio system: Spektrum DX-20; Spektrum AR9350 receiver; eight Spektrum A6380 HV Digital servos Ready-to-fly weight: 12 pounds, 5 ounces Flight duration: 15 minutes Pluses- Exceptionally detailed printed covering includes rivet details, panel lines, and appropriate flat finish.
- Operational flaps and retractable landing gear.
- Supports fuel or electric-based power systems.
- Includes scalelike details such as a pilot figure, instrument panel, and wing tanks.
Product Review
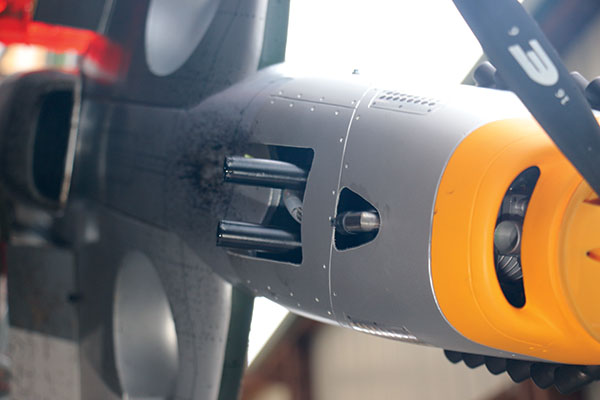
I Was On Vacation in Washington, D.C., and had a chance to visit the World War II Memorial. It’s a stunning monument to the dedication and sacrifices the people of our nation and others made during the war. While I was taking in the experience, Model Aviation editor-in-chief, Jay Smith, called to ask if I was interested in reviewing the new Hangar 9 20cc P-51D Mustang. How appropriate! Why yes, I’d love to! The Mustang was born mainly from the requirement for a fighter with the legs to escort bombers from England into Germany and back. The large, internal fuel capacity, augmented by wing-mounted drop tanks, gave the Mustang the duration it needed for bomber-escort duty. The two-stage, supercharged Packard V-12 engine meant solid performance at high altitude where the bombers operated. The six .50-caliber Browning machine guns wreaked havoc on German fighters, and the Mustangs claimed nearly 5,000 aerial victories in WW II. The new Hangar 9 Mustang is interesting for several reasons. This one is built-up, with an accurate scale outline, and is extremely detailed, all in a package that will fit fully assembled in an average SUV and break down easily for storage. Throw in the fact that you can power it with gas or electric, and it comes equipped with flaps and optional retractable landing gear, and it’s easy to see how the 20cc Mustang will appeal to a variety of modelers. While unpacking the Mustang, the first thing that stood out was its printed covering. Gone are the days of spending hours with a fine-line drafting pen to create panel lines. All of the the panel lines, rivet details, and even nomenclature markings are applied at the factory with computer-aided design precision. The printed covering also brings a nice flat finish that is much closer to a painted finish than most film coverings can achieve.Image

Image

Assembly
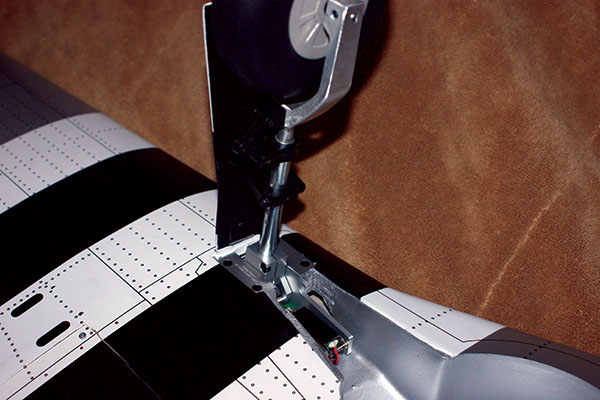
The Mustang arrived well protected and free of damage. After sitting down and familiarizing myself with the manual, I was excited to get started. I’ll assemble the Mustang using Zap thin and medium CA glue, Z-Poxy epoxy, and Z-42 threadlocker. All are available from Frank Tiano Enterprises. The following practices will be used wherever required while assembling the Mustang. All metal-to-metal fasteners will be secured using a drop of Z-42 threadlocker, except where using nyloc nuts. All wood screws, such as for servo mounting, will be installed by prethreading the hole, hardening the threads with a drop of thin Zap CA adhesive, and then installing the screw. Painter’s tape is used in several steps. Not knowing how well the printed details would hold up to tape, I used a technique that is used when masking painted foam surfaces. Take the tape and stick it to your shirt once or twice to tame down the adhesive. The control horns are painted, which looks great when finished, but you need to sand the paint from the gluing areas and clean them with isopropyl alcohol before installing them with Z-Poxy 30-minute epoxy. To avoid mixing several small batches of epoxy and waiting for them to cure as I went, I prepped and glued the control horns at the same time. Assembly begins by hinging the flaps and ailerons and installing the four wing servos. The flaps use point-style hinges that install on the bottom of the flap surface so that they move slightly back as well as down when deployed. A drop of oil on the hinge pivot prevents any glue from seizing up the hinge. The point hinges were installed using 30-minute Z-Poxy. The ailerons are hinged using CA hinges and thin Zap CA adhesive. The wing servos are all mounted to hatch covers then installed in their respective bays. Each servo mount and hatch cover was prepared as previously described. Strings are provided to facilitate pulling the servo extensions to the wing roots. With the wing servos installed, it’s time to turn your attention to the main landing gear. The Mustang comes equipped with fixed gear, but most buyers will surely equip theirs with retracting landing gear. Because retracts are optional, you must carefully remove the covering from the landing gear bays to expose the liners. I recommend using a fresh blade in your hobby knife. The E-flite landing gear drops right in and the servo extensions are routed to the wing root. With three connections at each wing root, I suggest marking them in some way to make connections easier. This might be the most tedious part of the build, but spending some time here getting the gear doors correctly rigged will pay dividends in a nice, tight fit.Image
Flying
The Mustang will transport in many SUVs fully assembled, but for those needing to break it down, the wing mounts with two easily accessible wing bolts and six servo connections. My RC Fueling Systems gas can was filled with 20:1 Red Line oil mixed with zero-ethanol regular gas (after 1 gallon you can switch to 32:1, but I maintain 20:1 on my smaller engines). With the engine running smoothly, taxi tests were done on both the paved and grass taxiways. A few tweaks to the tail wheel steering had the Mustang going nice and straight. Holding some slight up-elevator to keep the tail wheel down until it was moving, I smoothly added power and relaxed the elevator as the speed picked up. After approximately 50 feet, the Mustang made a nice takeoff and was climbing briskly as I brought up the landing gear. With a few clicks of up-elevator trim and some right aileron, the Mustang was flying hands off. After several laps around the field to get comfortable, I took the Mustang up high to test the stall. Into the wind, the Mustang slows extremely well, and although it will drop a wing in a full stall, the thick airfoil means that stall speed is quite low. Recovery consisted of relaxing the elevator and adding power.Image

Image
Image

Conclusion
The Hangar 9 P-51 is a striking model in the air or just sitting on the flightline. Any time it came out of my truck, it attracted a curious crowd. The Evolution 20cc engine is a perfect match for the Mustang. It is economical to operate, and the wraparound muffler produces a nice, throaty sound. The included tank will provide more than enough fuel for more than 10-minute flights. Even at 12 minutes I had plenty of fuel remaining. The fit and finish is outstanding, and the fun factor in the air makes this Hangar 9 P-51 one of the most exciting new models to hit hobby shop shelves in a while.Manufacturer/Distributor Horizon Hobby/Hangar 9 (800) 338-4639 www.hangar-9.com


Comments
H9 P51D 20cc
This is an unbelievable bird in terms of quality and detail. I'm still in the build process and should have her in the air in the next couple weeks. I'm making her "Electric" so I'm just waiting on some parts. The build itself is going smoothly even for me as a relative beginner (2-years into this hobby). I'd highly recommend this H9 P51 ARF - BUT - put a pencil to it to get a good understanding of what your total investment will be. At $399 I think it's a good buy but when you add all the other items you need it adds up quick so be prepared. The only disappointment I have are the retracts. IMHO - they're a bit pricey at $159 (40%) of the cost of the plane itself so I'm using the static gear that comes with it for awhile until I can budget for the retracts. All-in-all I give her 4-STARS!
Add new comment