
Written by Terry Dunn
Ready for long, relaxing flights?
Product Review
As seen in the May 2018 issue of Model Aviation.
Specifications
Type: ARF electric glider Wingspan: 118 inches Wing area: 1,050 square inches Length: 49 inches Radio: Futaba 14SG 2.4 GHz transmitter; Futaba R617FS receiver; Futaba S3010 high-torque ball bearing servo; Futaba S3154 digital micro servo Components Electric power system; three- needed to complete: plus-channel radio with one standard servo and one micro servo; basic assembly tools Minimum flying area: Club field Price: $219.99 Power system: Great Planes RimFire .32 brushless motor; 13.5 x 7 folding propeller (included); Castle Creations Phoenix Edge Lite 75 ESC; Flight Power FP50 4S 3,600 50C LiPo battery Power output: 53.8 amps; 785 watts Power loading: 168 watts per pound Flying weight: 4.7 pounds Wing loading: 10.2 ounces per square foot Duration: How long have you got?Pluses
• Great styling. • Super gliding performance. • Powerful climbs.Minuses
• Some building challenges. • Few energy-management tools.Bonus Video
Product Review
With its classic, curvy styling and distinctive wing profile, the Bird of Time is one of the most recognizable RC models around. But this airplane is more than just a pretty face. The Bird of Time was originally designed as a competition glider, which explains its low-drag fuselage, thin airfoil, and full-flying elevator. Throughout the years, countless Bird of Time models have been built from plans, kits, and ARFs. Many of those airplanes were modified to use an electric motor and folding propeller on the nose. Electric sailplane fans can now put away their cutting wheels and sanding blocks. Great Planes recently unveiled the Bird of Time EP. This variant of the company’s Bird of Time ARF is factory equipped for electric power. The Bird of Time EP features a fiberglass fuselage with a firewall that accepts a brushless outrunner motor. A folding propeller with an integrated spinner is included. You’ll have to supply the motor, ESC, and battery to round out the power system. The aircraft’s characteristic wing has a huge span of 118 inches. It is a built-up balsa and hardwood structure that breaks down into three pieces. The elevator and rudder are built up and factory covered as well. Despite the model’s substantial size, it requires only a three-plus-channel radio with two servos.Image

The Bird of Time EP is a simple, but elegant powered glider that is perfect for enjoying relaxing flights on calm-weather days.
Inspecting the Bird of Time EP
My inspection of the kit was mostly positive, but I did find some minor workmanship-related blemishes. I thought that the fuselage was well molded, nicely painted, and appropriately sturdy. The wing panels felt lightweight, yet strong. A few areas in the MonoKote covering had poorly adhered seams. I was able to tidy them up with my covering iron. I also spotted a few “pimples” in the covering which hinted that the underlying balsa framework had not been adequately sanded. This kit includes two manuals. One is for the pure glider version of this ARF. The other is an addendum that notes specific steps to add or delete for the powered variant. It’s a bit cumbersome to seesaw between the two manuals. After you factor in the additional online-only addendum, things can get a little clumsy. A single EP-specific manual would be a helpful update. This is not the kind of ARF that builds in a single afternoon. Although there is not much to do, the assembly steps often demand precise, careful actions. I don’t think that any of the tasks are challenging for experienced modelers. You just want to give yourself plenty of time to complete them accurately.Image

The Bird of Time EP includes prefabricated balsa wing panels and a fiberglass fuselage that is ready to accept a brushless power system.
Assembling the Bird of Time EP
The first assembly step is to construct two dihedral braces that join the outer wing panels to the center section. Each of these beefy components is made by sandwiching two plywood parts between thick aluminum plates. Although it isn’t mentioned in the manuals, the plywood parts in my kit were two different thicknesses. Make sure that each brace gets one thick and one thin plywood piece. As suggested in the manual, I used 6-minute epoxy when laminating the dihedral braces. I think that the additional working time of 15- or 30-minute epoxy would have been helpful. I used several clamps to hold the parts firmly in place until the epoxy cured. I chose to permanently glue the dihedral braces to the center wing panel. I also rounded the exposed tips of the antirotation pins to ease panel alignment during field assembly. My assembled wing has some minor gaps at the panel joints, but they are nothing to be concerned about. I used several pieces of clear Scotch tape to hold the panels together.Image

Stout dihedral braces are constructed by laminating aluminum and plywood components with epoxy. Take your time to ensure that the parts are properly aligned.
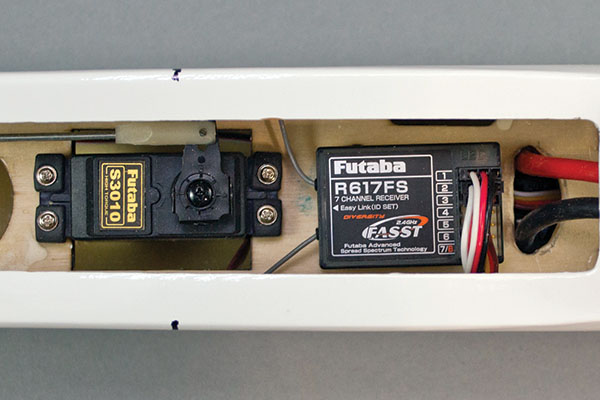
A Futaba S3010 high-torque standard servo fits perfectly in the servo tray beneath the wing saddle. It actuates the rudder via a long pushrod. The full-flying elevator is actuated by a Futaba S3154 digital micro servo located at the base of the vertical stabilizer. Although small, the S3154 has plenty of torque for this application.
Image

The full-flying elevator is actuated by a digital micro servo, located at the base of the vertical stabilizer.
The manual outlines a combination of hardwood blocks, servo tape, and screws to hold the elevator servo in place. I decided to forego that method. After scuffing and cleaning the mounting area and servo case, I glued the servo directly to the airframe with 6-minute epoxy. My Bird of Time EP is powered by a RimFire .32 brushless motor, Castle Creations Phoenix Edge Lite 75 ESC, and a Flight Power four-cell 3,600 mAh LiPo battery. Space in the motor/battery compartment is tight, so I planned my equipment layout to make the best use of the available space. I also wanted to get the battery as far forward as possible to avoid any need for nose weight. I mounted the RimFire .32 to the firewall with the motor wires emerging toward the bottom of the fuselage. The ESC is mounted at the rear of the battery tray. In fact, the ESC capacitors protrude rearward under the servo tray. Motor wires from the ESC are routed beneath the battery tray. The battery leads from the ESC emerge upward though the servo tray and forward into the battery compartment. To fit the Deans Ultra Plug through the servo tray, I had to slightly enlarge the forward lightening hole. The battery is placed just forward of the ESC. I replaced the kit’s two-piece hook-and-loop strap with a single length of double-sided hook-and-loop tape. Using the arrangement described, my model did not require any nose weight to balance at the suggested center of gravity (CG). I actually have some latitude with which to adjust the CG slightly forward or aft. I have to be careful that I do not place the battery against the rotating portion of the motor.
Image

The author was able to arrange all of the necessary components in the battery bay to fit cleanly and avoid adding any nose weight.
The kit includes a 13.5 x 7 folding propeller that has an integrated spinner and 5 mm propeller adapter. This assembly fits the motor shaft perfectly and blends with the shape of the fuselage. I made sure to balance the propeller before installing it on the model. I noticed a significant gap between the spinner’s backplate and the firewall when the propeller adapter was fully seated. Shortening the motor shaft was not a solution because the pan-head screws holding the motor to the firewall would have interfered with the spinner. I decided to fill the gap with a ring cut from a scrap piece of sheet foam. I glued the ring to the firewall using Foam-Tac contact adhesive.
Image

The gap between the spinner and firewall was filled by adding a ring made of thin foam sheet.
The fuselage has air inlets on either side of the motor, but no exit holes. Cooling has not been an issue while flying in winter. I plan to cut out an exit hole behind the wing mount to ensure that the electronics stay cool during the summer. I connected the servos and ESC to a Futaba R617FS receiver linked to my 14SG transmitter. With only three channels, radio setup is a snap. I had to expand the elevator travel to 130% to get the suggested high-rate movement. It is necessary to activate the brake function on the ESC to halt the propeller and allow the blades to fold back while gliding.
Image


Comments
Bird of time EP ARF
If you have the above glider, please let me know.
Please reply via email.
Thank you.
Do you have Bird of a Time
Do you have Bird of a Time
Bird of Time
Will these be available again ?? , I would like to get hold of one.
bird of time
putting it together , bought on e-bay ,,, fiberglass glider fuselage , wings built up wood all completed
good article by the way , cut off nose waiting for hardware on e flight 32 motor then done
rudder assembly truly a headache , followed the directions in the article glued the servo in with
epoxy , the instructions in the manual are way too tedious and quite frankly silly ,,,
we shall report back on the maiden
Bird of Time with spoilers
Amazing airplane and difficult to land so I added electriclly powered spoilers from Hobbyking, work like a charm to land in a short space!
Add new comment