
Indoor aerobatics is all about doing it slow
By Michael Ramsey
Static photos by the author. Flight photos by Jay Smith
As seen in the March 2009 Model Aviation
The cool thing about flat-foam models is that almost anything you can think up that has wing area and a correctly located CG will fly. My biplane design came about just that way; it’s exactly what I wanted.
The original Zactly had been available from Midwest Products as a free full-size plans download. At the time of its release, it was a great-flying foamie for outdoors or indoors. With more than 400 sq. in. of area, you could build it from blue foam at 16 ounces or 5mm Cellfoam 88 at 12 ounces.
The Zactly is a blast to fly and is exceptionally good at Harrier, hover, and constant rolling maneuvers; the RC pilot can do a rolling circle without losing an inch of altitude, just by their holding in right aileron (no elevator or rudder corrections required) and roughly half throttle.

Hovering isn’t flying, but it’s an aerobatic maneuver in the F3P schedule nonetheless—and the Zactly can do it with grace.
The lightest model built had the 5mm wings and stabilizer exchanged for 3mm Cellfoam 88, and carbon-fiber crossbracing rods were substituted for full-length wing spars. That version’s flying weight was 10 ounces; the Zactly just kept getting better.
Conversations with friends who had built the original Zactly brought up the question of how well it would perform F3P-style aerobatics. All the rage in Europe and spreading quickly in the US, F3P is essentially flying precision RC Aerobatics within an indoor envelope.

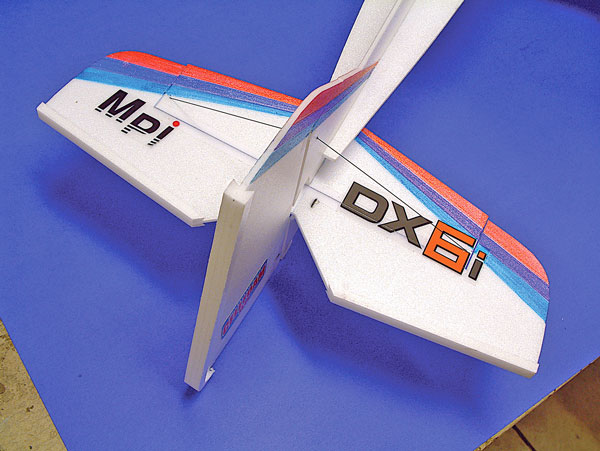
The Zactly F3P is a 2D profile model that can perform 3D and fly the FAI Indoor Aerobatics schedule very well.
The flying space is more confined in F3P, but patterns have been developed, taking into consideration the foamie airplanes’ seemingly effortless maneuverability, that adapt traditional forms of precision to the habitat and still keep an audience from falling asleep. The result is sequences that are performed quickly and show off the foamies’ modern abilities. The “Sources” list at the end of this article includes the address of a Web site that explains F3P and shares downloads of the three skill-level maneuver schedules.
The Zactly’s original shape conforms to how I thought an F3A RC Aerobatics (Pattern) biplane should look. It was also an experiment in surface-area ratios and wing-stagger variations. However, it was a fat pig compared to the current models flown in F3P, and it had coupling issues that I thought needed to be designed out of the airframe before it could be an honest contender.
Besides flying the model on my own, I learned a lot from studying experienced designers such as Jason Noll, David Payne, and Quique Somenzini. Their ideas about airplane dimensions, thrustlines, and incidences, plus the addition of drag devices, changed the Zactly in subtle ways, but enough each time to easily see what the model liked or didn’t like.
That was all because I was simply asking it to roll axially, pull straight corners, and do every maneuver at 5-10 mph of airspeed. Sheesh, we RC pilots just want the model to fly itself, don’t we?
The slower the airplane could fly, the less intense an adjustment needed to be for it to fly the desired way. That was a time-consuming lesson. Something as simple as locating the 300 mAh 2S Li-Po battery on top of the fuselage instead of the bottom made one of the most dramatic improvements; almost all the pitch coupling went away in knife edge with that fluke change.
One might call the Zactly F3P “the new and improved Zactly.” It’s 93% of the original’s size and has a bit less than 360 square inches of area. Made entirely from 3mm Cellfoam 88, the F3P incorporates a large amount of 0.02-inch carbon-fiber rod for structural rigidity. It has a 6-ounce flying weight, which is still relatively heavy by some F3P standards; 5 ounces is the goal.
With the right motor choice and routing out, the Cellfoam 88 would produce an airframe that is in the optimal weight zone. Depron is slightly lighter and less dense, so building the Zactly F3P from that material would surely trim this model up. Prototypes have been built that weighed 8 ounces, and there’s nothing wrong with the thrill factor those models offered.
Power-system choices vary, depending on the builder’s taste. I’ve done all my testing with the Himax 2805-1430 outrunner, which is essentially a 275-class motor. I run only a two-cell pack; the new Thunder Power V2 300 mAh has spoiled me.
Almost any micro radio system will work in the Zactly for sport-flying, but micro digital servos such as the Futaba S3153 (and newer) and the JR DS185 are optimal for F3P performance. Choose a receiver that weighs 3-5 grams.
The ESC that has worked best for me is the Castle Creations Thunderbird-6. I discard the motor connectors and solder the motor wires directly to the board of the ESC. Hey, every gram saved counts. (The modification certainly voids the warranty.)
Construction
Built exactly … : No matter what material you choose to build the Zactly F3P, follow the plans’ guidelines regarding template usage. I like to make the parts’ outside dimensions slightly larger for safety, so I cut to the outside of the heavy outline.

Cut out multiple parts at once by attaching narrow slices of double-stick tape between the layers. A 3mm flat foam material is used exclusively.
In regard to making cutouts for the horizontal fuselage, wing, and stabilizer, as well as the slots in the wings for the struts, the openings are made on the hairline or just on the inside, so they are a tight fit, or you can easily adjust them with a light scuff with an emery board. Material is easier to remove than to add.
There is absolutely no way a builder is going to make this model’s target weight if he or she uses adhesives such as hot glue and/or epoxy. I’ve found that thin, foam-safe cyanoacrylate is the best and lightest option for this aircraft. I even get more anal retentive and wipe the excess glue with a Q-tip before spraying accelerator.
I’ve built several Zactly models, so saying that nothing is simpler to put together is subjective. The fact that it’s a profile, by nature, reduces the parts count significantly, so that in itself makes the project a candidate for a Geico commercial. (I act like a caveman at times.)

Holes in the paper are covered with tape to hold the template in place; this leaves the edges clear to trace or by which to cut the part.
If you have never built from scratch, the plans alone should suffice in getting a relatively well-built model together, so I won’t insult the detailed plans by being redundant.
This will sound odd, since the topic of this article is to scratch build, but the best learning exercise I can suggest for a would-be first-time foamie builder is to buy and assemble a foamie kit from the likes of Horizon Hobby. The Zactly isn’t all that much different from those offerings and many others. I’ve learned a lot from building models from other designers, and you will too.
Begin by cutting the templates away from the plans. The top view and head-on view (cross-section A) are for reference only. I run the blade of an X-Acto knife along the outside edge. Leave the control surfaces attached; you will cut them away from the foam later.
Instead of holding the paper template around the outside edges with tape, make tape holes. Use a sharpened brass tube or a drill tool to make openings at key points. Cover the holes with tape so that the paper templates can be temporarily attached while keeping the edges free for a knife or pen to follow.

For longer-lasting templates, don’t cut out the inside shapes. Identify key points in the part with a T-pin and then create the opening in the foam after the template is removed.
The templates should be located on the foam sheets so that minimal waste is produced. The templates last longer and are less likely to distort if the cutouts and key mounting points are referenced with a pinhole rather than a complete opening in the template. Use the point of a T-pin to reference alignment points and cutout slots.
A sharp X-Acto knife does quick work of cutting through the foam; multiple shallow passes are more accurate. Once the outer shape of the part is complete, remove the template and set it aside but close by.
Use a fine-point marker to locate reference points, hinge lines, and cutouts. This is a good time to reference where the carbon-fiber bracing will attach.

The wing template is for both the top and bottom; stacking the foam so that two are cut out at the same time assures that the strut locations are identical. Note that the center-strut and cockpit-relief cutouts are on the top wing only.
Stacking blank material is a great way to save time. A few tiny strips of double-stick clear tape can hold layers of material together very well and is easy to separate later.
A good time to decorate the parts is before the control surfaces are cut away. I use Sharpie markers, which add no weight whatsoever, to add color to the model. Light coats of spray paint or details with an airbrush are extremely light as well. Kits that were from Fancy Foam Models were decorated with vibrant computer-generated schemes that are ink-jet-printed directly on the foam sheet material. Pretty sweet!
All of the control surfaces are top hinged—even the rudder, which is typically hinged on the port side. (I’m not sure if it matters.) Optimally, a double bevel produces the desired control throw. Save the rudder hinge for last, since the stabilizer needs to be mounted prior.

The aileron servo should mount between the gear legs. Cyanoacrylate hinges reinforce the gear strut mount. Digital servos are the best choice.
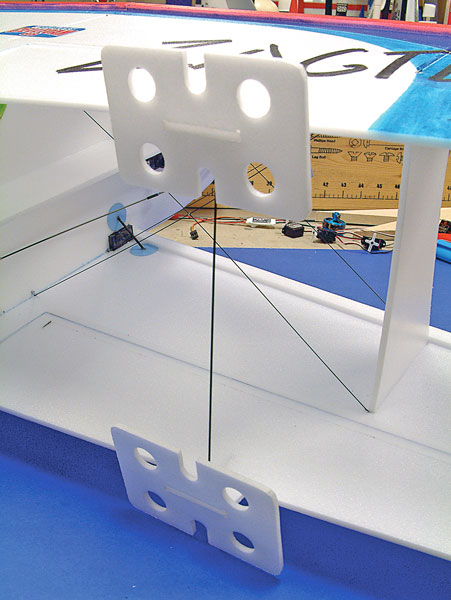
Assemble the fuselage by slipping the horizontal fuselage into the vertical fuselage. Using any means on hand, glue the two parts at the seams so that they are perpendicular. Add the gussets to the bottom and side of the fuselage front assembly, which should feel surprisingly stiff even at this point.
Slide the assembled horizontal stabilizer into the fuselage, align, and tack-glue in place; yes, just tack it for now. Lay the fuselage assembly on the work surface so that the area below the horizontal section overhangs the edge and the vertical fin is flat against the table. Weight the assembly down and hinge the rudder to the fuselage.
Cover the work surface with plastic and lay the lower wing, face-side up, on it. Position the fuselage on the wing; working with the nose pointing away has worked best. Shim the tail as needed while the wing remains flat, and confirm its alignment often. Temporarily rig the airframe as necessary to keep everything square.
Air brakes are optional for sport-flying but mandatory for F3P. Attach them to the model last. Thin, foam-safe cyanoacrylate is used throughout.
Add the struts and, finally, the top wing. At this point, the Zactly is dry-fitted except for the stabilizer.
When all looks square, squeeze thin cyanoacrylate into the joints. Wipe away the excess, as I mentioned earlier. Kicker is not required until you are totally satisfied with the alignment of the boneless (no carbon-fiber stiffening) airframe.
Now you must complete the arduous task of installing the carbon-fiber stiffening material. Bear in mind that the use of the word “arduous” is relative to the effort through which a foamie is assembled. Wiping the steamed milk foam from one’s lip is an arduous task when describing the enjoyment of a delicious latte.
You can use the plans to rough-cut these carbon-fiber pieces. Crisscrossing the bracing adds significantly to the structural integrity.
Sharpen each rod like a pinpoint for easier mounting. Tack the pieces as the process continues, confirming alignment of the airframe along the way. You can untack parts if necessary.

Support the canopy and top wing by adding a 0.02-inch CF brace. Foam-safe cyanoacrylate changes Sharpie marker color.
The wing and fuselage stiffeners work together so that this ultra-light model doesn’t wiggle violently like a fish out of water when the RC pilot’s intention is to do a single roll or snap. The Zactly F3P snaps really well too, because the finished airframe is so stiff.
The points where the landing-gear struts pass through the wing and into the fuselage are reinforced with cyanoacrylate hinge material that is cut down neatly into 3/4-inch disks. Save two of these for the wheel pants.
Notice the plans for conventional wheel or landing-skid options. The tail wheel is basically just a skid and can be attached to the fuselage or rudder.

Aileron interlink rod construction is described on the plans. Kevlar thread acts as a durable live hinge
The airframe is completed with the addition of LE and TE drag strips. Save the air brake installation as the final step. If the need for these creates some head-scratching, finish the model and fly it without them.
While flying, note especially the speed on the backsides of loops and down-lines from stall turns. Add the rudder drag strips first and observe the speed change, and then add them to the elevator and finally to the wing LE. The air brakes alone slow the model well, and tripling the horizontal and vertical cross-sections does wonders; little changes had the biggest effect.

A 6- to 8-amp ESC is required. The Castle Creations Thunderbird-6 has been holding up well to the 7-amp WOT demand.
The 1/16 plywood firewall is minimally sized, to suit the Himax, but it should work for all 250-size outrunners. The firewall butt-glues to the nose and keys into the notches in the fuselage. It’s more than strong enough for the 10-14 ounces of thrust it must endure. Add the reinforcements to the nose once the firewall is mounted.
The servo, receiver, and battery placement is based on the CG requirement. The plans reference estimated locations. Pull-pull control systems for the rudder and elevator are the lightest option, but I like the ease of carbon fiber as pushrods. I use a mix of homemade hardware and that from Du-Bro.

A 250- or 300-class outrunner is required. The Himax 2805-1430 motor is slightly larger than a 250 and provides silky-smooth power with a Thunder Power 2S 300 mAh battery.
The aileron interlink shown on the plans is made from 0.03-inch carbon-fiber rod, Kevlar thread, and heat-shrink tubing. It’s the lightest setup I’ve been able to make, and it seems to hold up well under F3P conditions and the irregular midair.
TE drag strips, mounted top and bottom, are undercut to grab flowing air. They significantly slow the model in the down-lines.
Flies exactly … : Set the control throws as noted on the plans. Dual rate is used for flying most F3P schedules, so set those to approximately half of full deflection and half the recommended exponential.
Although the Zactly F3P is fully loaded with all the drag devices, it should cruise with no trim adjustments at roughly 60%throttle. Should elevator trim be required, try to move the battery until as much trim as possible can be removed.

CF crossbracing, 0.02 inch in diameter, is used to stress the flat wings and fuselage. The system is surprisingly rigid.
The Zactly is a kite, and if you’re forced to fly in a tight area such as a school gym or an airplane hangar, sport-flying will be comfortable. This model cruises at a pace that is close to a fast walk.
One of my favorite points about this flat-foam model is that it’s pitch neutral in inverted or upright flight. The CG location has a lot to do with it, but this trim condition is a pleasing characteristic of the Zactly. I hate it when foamies need up-elevator to keep from climbing while inverted.
The Zactly flies like an airplane with airfoil-shaped wings, because the LE drag strips trick the air into thinking that there’s an actual airfoil. The trick works on foamies, so I’m not knocking it. The model should need no obscure mix for up- and down-lines; mine flies straight up and down.
What did take some getting used to was the throttle application timing. I’m not accustomed to adding power in the downlines.

Avoid heavy decorations; even stickers are heavy. Sharpies were used on this model. Apply the color prior to assembly.
Because of the air brakes, the speed literally falls off the airplane at the bottom of a loop or dive recovery; pull to horizontal and, bam, the airplane stops. Keeping the airspeed constant is the trick to flying F3P, so teaching habits that include adding power before the pull/push to level are required.
Also, while performing a roll, snap, or any maneuver really, prepare to include a bit of extra throttle with the control combination so that the airspeed is there to maintain the line or heading at the end of the maneuver.
A 2S 300 mAh battery has enough power for roughly three minutes of flying, which is plenty since F3P sequences and Artistic Aerobatics routines are scheduled for approximately two minutes.

F3P is the FAI classification for indoor RC aerobatics. The sequence is fun and incorporates the agility of this unique aircraft type.
I use a GWS 0843 propeller, because the APC equivalent (my favorite) is much heavier. Consider binding the propeller with fishing line instead of the typical rubber O-ring; input from the tail surfaces can cause the propeller to flex and bounce on the motor hub.
The Zactly F3P, as can the original Zactly, can make the RC pilot look good doing the right rolling circle to the left. How fast it rolls depends on entry speed and throttle setting. It is possible to ascend and descend, because the model will repeat the circle as long as there’s battery power and space between it and the ground.

Adjust the battery location until elevator trim is neutralized. The Zactly has strong control authority in all axes, with zero to negligible coupling.
Despite the long tail moment, the Zactly is great at performing 3-D as well. It hardly wags at all through the Harrier, and it can hover almost as if it were second nature. Outside Waterfalls are surprisingly tight, but the long tail moment probably doesn’t help it with the tail slide. I’ve never been happy performing those, but who flies backward in FAI? That’s a joke.
Advancements in this interest are happening constantly; as is the hover, backward flight will surely become commonplace. And I’m all for it.
Have fun!


Download full-size plans here.
Order Plans No. 1026 for $19 through the AMA Plans Service at https://plans.modelaircraft.org/product/zactly-f3p or by calling (765) 287-1256, ext. 507.
Sources:
Midwest Products
(800) 348-3497
www.midwest-products.myshopify.com/
Castle Creations
(913) 390-6939
Du-Bro
(800) 848-9411
BMFA Electric Indoor & UK F3P
Facebook


Comments
Add new comment