
Make the hardware you need at home
Choosing the right fasteners can have a huge impact on the functionality and serviceability of an item. Sure, a common pan head machine screw will work to hold an access panel in place on the exterior of the International Space Station; however, using a custom screw with an oversized Rosette head allows an astronaut in a bulky spacesuit to quickly remove the panel without tools. I’m sure you can imagine what a tremendous advantage that is.
I often find that specialized hardware can provide similar benefits for my RC projects. The main difference boils down to a question of availability. If the specialty fastener that I want is even manufactured, it is usually prohibitively expensive or is only sold in large quantities.
Other times, I need a special fastener "right now." Ordering online or even driving to the hardware store just won’t cut it, so I often resort to making my own unique fasteners by modifying common nuts and bolts that I already have in my workshop.
In this article, I will illustrate my techniques for creating three different types of custom fasteners.
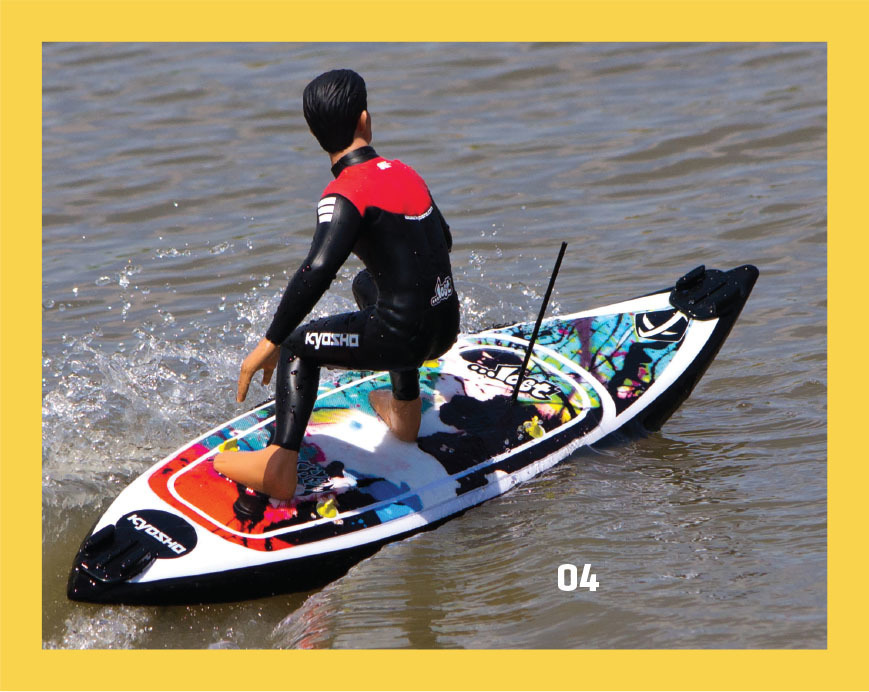 The author modified the hatch screws for this RC Surfer to ensure that he would never lose them at the lake.
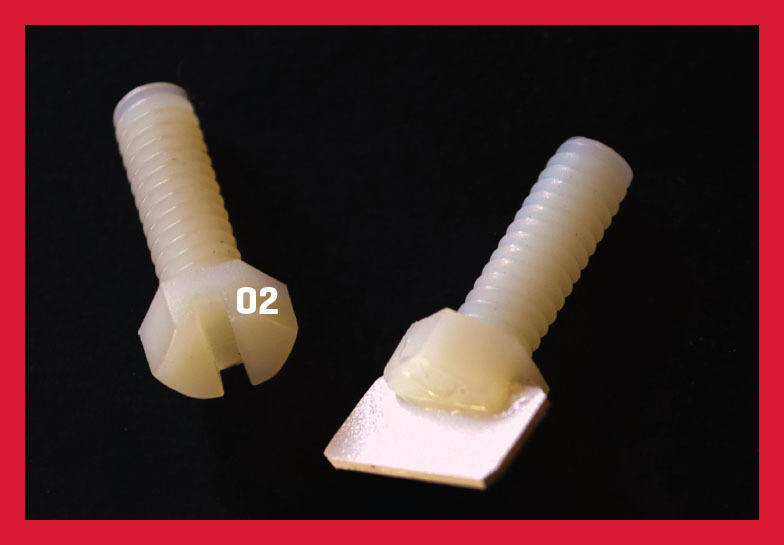
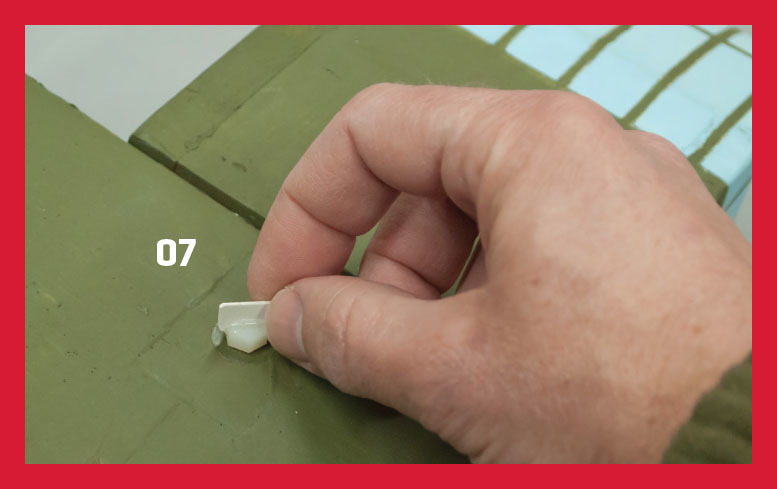
 Your plastic retainer should thread onto the screw with some resistance.
You will need a few scraps of thin, plastic sheet to make the screws captive. I typically get the ultrathin plastic I need from the vacuum-formed blister packaging found on many retail items. The specific donor in this case was the packaging for an SD memory card.
The plastic from such packaging is almost always clear, which doesn’t photograph very well, so I used thick, yellow plastic just to make it visible in the photos. The process is exactly the same with either type of plastic.
The first step is to cut a square, circle, hexagon, or other shape out of plastic that is larger than the diameter of the screw. You must then drill a hole in the plastic that is slightly smaller than the diameter of the screw. The goal is to be able to thread the plastic piece onto the screw with some resistance. Think of it as a very thin nut.
Drill bits can sometimes be difficult to use on thin plastic. If the bit is not very sharp, it will do more tearing than drilling. I have the most success making clean holes in plastic using a Du-Bro Body Reamer. Unlike my other tapered reamers, the Du-Bro unit has cutting flutes all the way to the tip. That means I do not have to drill a pilot hole first. I can start and finish the hole I need with the Body Reamer.
Your plastic retainer should thread onto the screw with some resistance.
You will need a few scraps of thin, plastic sheet to make the screws captive. I typically get the ultrathin plastic I need from the vacuum-formed blister packaging found on many retail items. The specific donor in this case was the packaging for an SD memory card.
The plastic from such packaging is almost always clear, which doesn’t photograph very well, so I used thick, yellow plastic just to make it visible in the photos. The process is exactly the same with either type of plastic.
The first step is to cut a square, circle, hexagon, or other shape out of plastic that is larger than the diameter of the screw. You must then drill a hole in the plastic that is slightly smaller than the diameter of the screw. The goal is to be able to thread the plastic piece onto the screw with some resistance. Think of it as a very thin nut.
Drill bits can sometimes be difficult to use on thin plastic. If the bit is not very sharp, it will do more tearing than drilling. I have the most success making clean holes in plastic using a Du-Bro Body Reamer. Unlike my other tapered reamers, the Du-Bro unit has cutting flutes all the way to the tip. That means I do not have to drill a pilot hole first. I can start and finish the hole I need with the Body Reamer.
 The author uses a Du-Bro Body Reamer to drill holes in plastic sheet when creating a captive screw.
After the hole in the plastic is the correct size, you place the screw into the through hole of the removable part then thread your plastic retainer all the way up the screw. That’s it. The screw should still be able to turn in the through hole but the plastic retainer will keep it from falling out.
The author uses a Du-Bro Body Reamer to drill holes in plastic sheet when creating a captive screw.
After the hole in the plastic is the correct size, you place the screw into the through hole of the removable part then thread your plastic retainer all the way up the screw. That’s it. The screw should still be able to turn in the through hole but the plastic retainer will keep it from falling out.
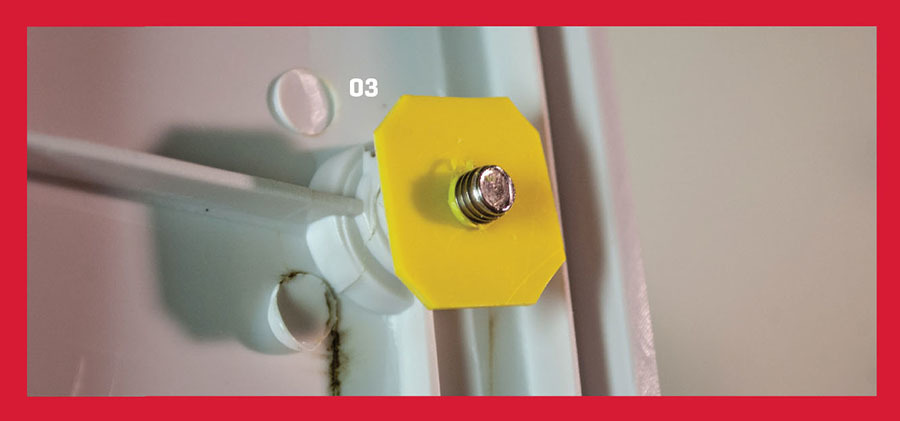 The completed retainer keeps the screw captive to the hatch while still allowing the screw to turn for securing the hatch to the boat hull.
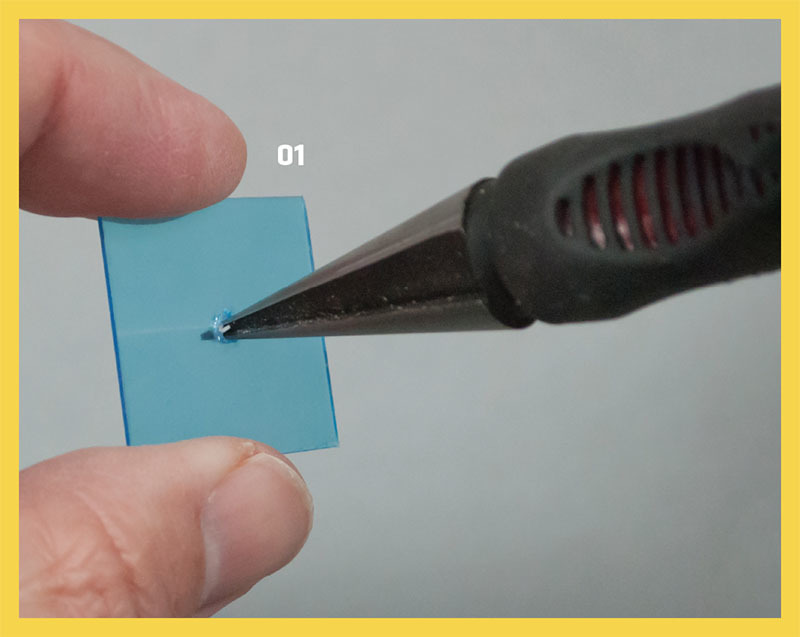
Depending on how tightly your plastic retainer fits onto the screw, it might work itself loose from time to time. You can tack it into place more permanently with a small drop of medium CA glue. Just be careful to avoid getting glue into the threads that engage the other component. I apply the CA using the tip of a needle to make sure it goes exactly where I want it.
With the hatch screws now captive, I do not have to worry about a dropped screw ruining my fun.
The completed retainer keeps the screw captive to the hatch while still allowing the screw to turn for securing the hatch to the boat hull.
Depending on how tightly your plastic retainer fits onto the screw, it might work itself loose from time to time. You can tack it into place more permanently with a small drop of medium CA glue. Just be careful to avoid getting glue into the threads that engage the other component. I apply the CA using the tip of a needle to make sure it goes exactly where I want it.
With the hatch screws now captive, I do not have to worry about a dropped screw ruining my fun.
 Transforming a slotted screw into a thumbscrew is often as easy as gluing a scrap piece of plastic into the slot.
I have a sheet of 1/32-inch thick Kydex plastic that I typically use to make tabs. I have also used craft sticks, thin plywood, and scrap aluminum for the same job. You’re bound to have something that will work. GOOP adhesive is great for gluing the tab to the slot.
When I arrive at the field, I can attach my wing in a flash with the thumbscrews. I do not have to worry about keeping track of any tools nor do I have to worry about accidentally poking a screwdriver through the wing!
Transforming a slotted screw into a thumbscrew is often as easy as gluing a scrap piece of plastic into the slot.
I have a sheet of 1/32-inch thick Kydex plastic that I typically use to make tabs. I have also used craft sticks, thin plywood, and scrap aluminum for the same job. You’re bound to have something that will work. GOOP adhesive is great for gluing the tab to the slot.
When I arrive at the field, I can attach my wing in a flash with the thumbscrews. I do not have to worry about keeping track of any tools nor do I have to worry about accidentally poking a screwdriver through the wing!
 By using thumbscrews as wing bolts, many of the author’s models do not require tools for field assembly.
You can also convert Phillips head screws into thumbscrews. It’s not much more difficult than converting slotted screws. The trick is cutting the tab with the right profile to mate with the shape of the screw head. A couple of strategically shaped notches should do the trick. You don’t have to be terribly precise. Apply glue liberally. Again, I prefer GOOP adhesive for this task.
By using thumbscrews as wing bolts, many of the author’s models do not require tools for field assembly.
You can also convert Phillips head screws into thumbscrews. It’s not much more difficult than converting slotted screws. The trick is cutting the tab with the right profile to mate with the shape of the screw head. A couple of strategically shaped notches should do the trick. You don’t have to be terribly precise. Apply glue liberally. Again, I prefer GOOP adhesive for this task.
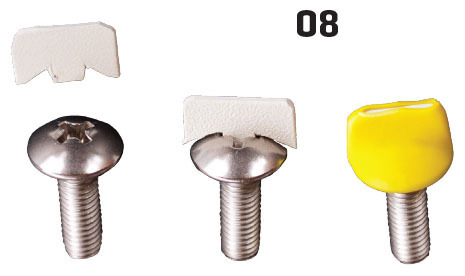 Making a thumbscrew out of a Phillips head screw requires more purposeful cutting of the plastic tab. Heatshrink tubing makes the modified screw more attractive.
In the example shown in the photographs, I modified the same RC Surfer hatch screws that I previously made captive. The homegrown appearance of my Kydex tabs didn’t really go with the otherwise clean look of the model, so I gave each thumbscrew a makeover by covering the screw head and tab with heat-shrink tubing.
I used an oversized piece of tubing and trimmed off the excess after shrinking it. Not only does the thumbscrew look better, I think the heat-shrink tubing actually strengthens the joint between the screw head and tab.
Making a thumbscrew out of a Phillips head screw requires more purposeful cutting of the plastic tab. Heatshrink tubing makes the modified screw more attractive.
In the example shown in the photographs, I modified the same RC Surfer hatch screws that I previously made captive. The homegrown appearance of my Kydex tabs didn’t really go with the otherwise clean look of the model, so I gave each thumbscrew a makeover by covering the screw head and tab with heat-shrink tubing.
I used an oversized piece of tubing and trimmed off the excess after shrinking it. Not only does the thumbscrew look better, I think the heat-shrink tubing actually strengthens the joint between the screw head and tab.
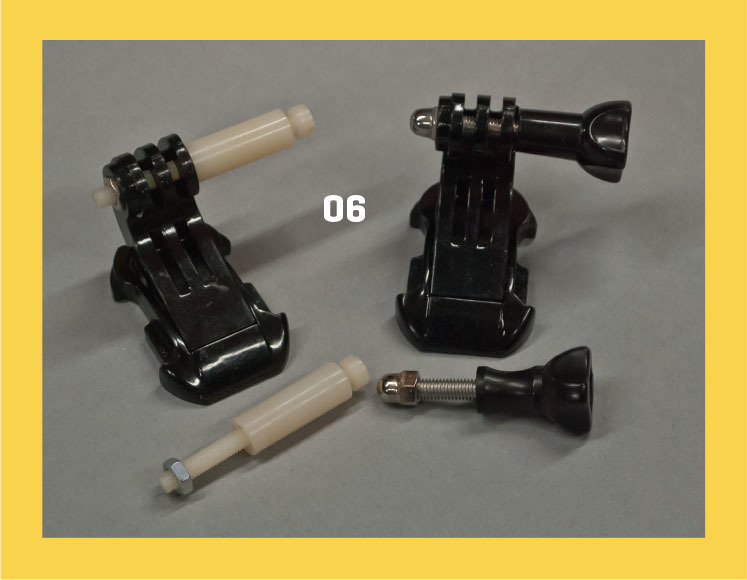 The author was able to save a little weight by replacing the stock fasteners on his GoPro camera mounts with nylon hardware.
The relatively low shear strength of the nylon bolts makes them a sacrificial part in the event of a crash. Ideally, the bolts will break on impact and lessen the energy that is absorbed by the rest of the airframe.
You can often find nylon counterpoints for standard metal hardware; however, if the hardware that you want to replace is already a specialty part, you’re likely going to be stuck making your own lightweight version. I ran into this situation when mounting airborne action cameras to my models.
No matter which action camera that I’m mounting to an RC vehicle, I almost always use the plastic mounts designed for GoPro cameras. Each of the rotating joints on these mounts is tightened using a 1-3/8-inch long 10-32 bolt with a plastic slip-on knob. The bolt threads into an acorn nut that is press-fit into the plastic mount.
Because I often use multiple cameras on my models, I wanted to shave weight from the camera mounts wherever I could. I emulated the stock bolt and knob using a 2-inch long, 10-32 nylon screw coupled with a 1-inch long threaded spacer. The spacer acts as a convenient grip to make this a thumbscrew. The spacer also provides a shoulder that presses against the interlocking parts of the mount as the screw is tightened.
I replaced the acorn nuts with standard 10-32 nuts. The weight difference is marginal; however, the primary advantage of the standard nut is that the screw passes through the nut rather than bottoming out as it does on the acorn nut. I feel that this provides me with better, more precise control over the tension of the joint as I tighten the nylon screw.
I saved six grams of weight for each replaced screw. That is, admittedly, a small amount and probably not worth the effort in most cases; however, when the savings from multiple mounts are added up, I feel that it is worthwhile. That is something you’ll want to consider each time before investing your effort and money in alternate hardware. Sometimes it makes sense, and sometimes it doesn’t.
The author was able to save a little weight by replacing the stock fasteners on his GoPro camera mounts with nylon hardware.
The relatively low shear strength of the nylon bolts makes them a sacrificial part in the event of a crash. Ideally, the bolts will break on impact and lessen the energy that is absorbed by the rest of the airframe.
You can often find nylon counterpoints for standard metal hardware; however, if the hardware that you want to replace is already a specialty part, you’re likely going to be stuck making your own lightweight version. I ran into this situation when mounting airborne action cameras to my models.
No matter which action camera that I’m mounting to an RC vehicle, I almost always use the plastic mounts designed for GoPro cameras. Each of the rotating joints on these mounts is tightened using a 1-3/8-inch long 10-32 bolt with a plastic slip-on knob. The bolt threads into an acorn nut that is press-fit into the plastic mount.
Because I often use multiple cameras on my models, I wanted to shave weight from the camera mounts wherever I could. I emulated the stock bolt and knob using a 2-inch long, 10-32 nylon screw coupled with a 1-inch long threaded spacer. The spacer acts as a convenient grip to make this a thumbscrew. The spacer also provides a shoulder that presses against the interlocking parts of the mount as the screw is tightened.
I replaced the acorn nuts with standard 10-32 nuts. The weight difference is marginal; however, the primary advantage of the standard nut is that the screw passes through the nut rather than bottoming out as it does on the acorn nut. I feel that this provides me with better, more precise control over the tension of the joint as I tighten the nylon screw.
I saved six grams of weight for each replaced screw. That is, admittedly, a small amount and probably not worth the effort in most cases; however, when the savings from multiple mounts are added up, I feel that it is worthwhile. That is something you’ll want to consider each time before investing your effort and money in alternate hardware. Sometimes it makes sense, and sometimes it doesn’t.
Captive Screws
There are few things more frustrating than searching for a dropped screw when that screw is vital to making something work. It’s amazing how easily such a screw can just vanish from sight and never seen again. I like to mitigate this situation with commonly used screws on my models by making them captive whenever possible. Basically, this means that the screw stays physically attached to the component that it is intended to fasten. In my example shown here, the loose component is the top hatch of my Kyosho RC Surfer. I’ve used similar methods on battery hatches for my RC airplanes. On the RC Surfer, four screws are used to fasten the hatch to the upper deck of the boat. The hatch must be removed every time I swap in a fresh battery. Losing one or more of those hatch screws would quickly make a fun day at the pond turn sour!Image
Image
Image
Image
Thumbscrews
I like to travel light when I head to the flying field. If a specialty fastener lets me assemble my models without tools then I’m game. That’s why I often modify my nylon wing bolts into thumbscrews. I do the same thing for certain screws on my RC boats and RC cars as well. If you’re unfamiliar with thumbscrews, they are fasteners that are designed to be turned by hand rather than with tools. Thumbscrews are super convenient as long as you don’t have high torque requirements—which we almost never have for RC applications. Converting a common slotted machine screw into a thumbscrew is easy. You just make an appropriately-sized tab out of scrap material and glue it into the slot of the screw. The tab becomes your grip for turning the screw.Image
Image
Image
Lightweight Screws
Weight is almost always a consideration with my models. I try not to get crazy about shaving weight, but fractions of an ounce can be significant in some cases. One way that I am able to reduce weight is by replacing steel fasteners with nylon substitutes. I think it goes without saying that you do not want to use nylon fasteners for any high-stress or high-torque applications. Nylon fasteners have been popular on RC airplanes for a long time, but not necessarily for the weight reduction that they provide. The nylon parts can lessen the damage caused by a crash. These fasteners are most often used to attach a model’s wing and/or landing gear to the fuselage.Image


Comments
Add new comment