


VQ Warbirds P-39 Airacobra .46 EP/GP
Written by Andrew Griffith Stand out with this unique fighter aircraft Product Review As seen in the July 2018 issue of Model Aviation.
Specifications
Model type: Semiscale Skill level: Intermediate Wingspan: 62.2 inches Wing area: 582 square inches Wing loading: 30 ounces per square foot Airfoil: Semisymmetrical Length: 45.6 inches Weight: 6 to 6.5 pounds Power system: .46 two-stroke glow engine; .70 four-stroke glow; or .46 electric equivalent Radio: Five-channel minimum; six with optional retracts Construction: Built-up balsa and light plywood Covering/finish: Heat-shrink covering with printed-on markings and details Price: $239.95Test-Model Details
Power system: Dualsky XM5050EA-10 430 Kv brushless electric motor; Castle Creations Talon 90 ESC; Venom Fly 50C 5S 5,000 mAh LiPo battery Propeller: APC 14 x 12 Radio system: Spektrum DX18 and AR9020 receiver; Hitec HS-225MG servos Ready-to-fly weight: 7 pounds, 8 ounces Wing loading: 29.3 ounces per square foot Flight duration: 6.5 minutesPluses
• Great-looking warbird with a detailed matte finish. • Optional retractable landing gear. • Supports both electric and glow power systems. • Unusual model that will stand out at your flying field.Minuses
• Long nose wheel strut has slop, making ground handling adventurous. • Panel lines and details aren’t printed on the hatch.Bonus Video
Proper landing flare is important because of the airplane’s long nose strut. The flaps slow the Airacobra nicely, and if you touch down on the main wheels first, you can nail the landing every time.
Product Review
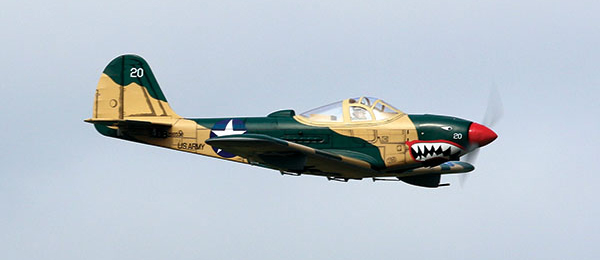
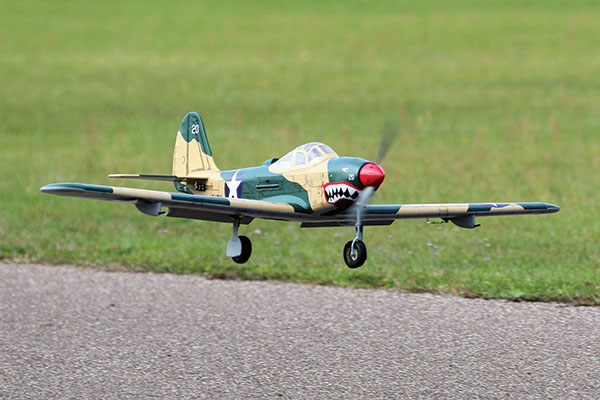
Much ado has been made about the A-10 Thunderbolt being designed around the GAU-8/A 30 mm cannon, and the F-14 Tomcat for the Phoenix missile system. But maybe the earliest aircraft designed primarily with its armament in mind is the Bell P-39 Airacobra. Previously, fighter aircraft design was primarily driven by the intended powerplant. Designer H.M. Poyer was impressed by the Oldsmobile T9 cannon and pressed for its incorporation in the P-39’s design. The T9 was positioned in the center of the nose and fired through a hollow barrel in the center of the propeller hub. With the gun taking up the front end, the engine was mounted just behind the pilot. The propeller was turned by a long driveshaft that passed right under the pilot’s feet. When it worked, the 37 mm T9 was a devastating weapon, but it was prone to jamming and carried a limited quantity of ammunition. Despite what I think would have been a maintenance nightmare, the long driveshaft worked well. The P-39 was also one of the first fighters with tricycle landing gear. The resulting design has a unique, narrow, and sleek fuselage that any warbird lover should instantly know by sight. The VQ Warbirds Airacobra is constructed of balsa and light plywood. The covering has a matte finish with many details such as panel lines, rivets, and even weathering printed on the covering. The P-39 is available in two schemes: a traditional olive drab and white, and the one I will be reviewing, the shark tooth-bedecked summer camouflage. The Airacobra requires eight mini-style servos (nine if you run a glow engine) and a five-channel or better radio system (six channels for retracts). In addition to the primary flight controls, the Airacobra features functional flaps and optional retractable landing gear.Construction
The P-39 arrived well packaged and despite some apparent mishandling en route, the kit was packaged well and free of damage. After a quick inspection of the parts for damage, I sat down to examine the instruction manual. You have some decisions to make before assembly. Instead of glow power, I elected to go with a 5S electric power system for the Airacobra, utilizing a Dualsky brushless motor, Castle Creations Talon 90 ESC, and a Venom LiPo battery. The undercarriage can be fixed, mechanical retractable, or electric retractable. I opted for the electric retract set with a functional nose strut. Provisions to accomplish either retractable or fixed landing gear installation are included with the kit.
The optional retracts required some fitting and testing to get everything working smoothly, but they are worth the money and effort when you see the airplane in the air with its wheels up.
I assembled the Airacobra using Zap thin and medium CA, and Z-Poxy 15- and 30-minute epoxy. Whenever working with modeling chemicals, ensure that you have adequate ventilation. The assembly sequence starts with the main wing. Dry fit the wing joiner and sand for a good fit if needed. When I was satisfied with the fit, I scuff sanded the surface of the joiner and the surfaces of the root ribs. A batch of 30-minute Z-Poxy was mixed up and applied deep into the joiner pockets with a bamboo skewer and to the gluing surfaces with a brush. The wing halves were assembled, clamped, and set aside to dry. Straight alcohol can damage the printed covering, so VQ Warbirds recommends cleaning up excess epoxy with kerosene.
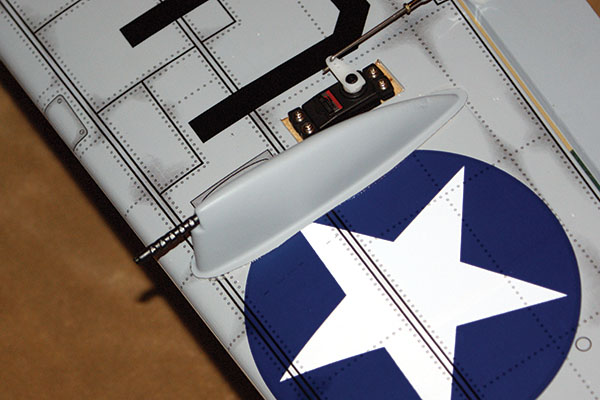
The author mounted the gun pods using RC-56 canopy glue. You can also see the panel lines, rivets, and weathering printed on the covering.
I used the glue drying time to program my Spektrum DX18 and bind the AR9020 receiver. The wing-type menu allows me to easily choose two aileron servos, two flap servos, and two elevator servos. While I was at it, I set up a programmable mix to run the nose wheel steering, a throttle-cut switch for the electric motor, and voice callouts on the gear, flap, throttle cut, and rate switches. When the wing was done, I installed the HS-225 metal gear servos. All servos were installed by prethreading the hole and hardening the threads with thin Zap CA. RTL Fasteners servo screws were used to mount the servos in the wing. The servos were slightly too large, so the servo cutouts had to be enlarged. One thing that isn’t clear in the instruction manual is the flap linkage. With the servo centered, the linkage should be sized so that the flap is in the middle of its throw. The flap menu that becomes active when a wing type with flaps is assigned, is a one-stop shop for all of your flap needs. With the servo set up as described, you can then use the flap menu to set the full up, takeoff flaps, and full down positions, along with setting the servo speed and elevator compensation. I set the flap speed to four seconds for realistic appearance and to minimize pitch changes during flap deployment. Of the three landing gear choices, I find electric retracts to be the easiest and most reliable. A kit that includes the tricycle gear and a functional nose strut is available. These are pretty much a drop-in fit and other than some play in the nose strut, which I expected given the length, functioned perfectly. Landing gear blocks and a retract servo mount are included if you wish to use fixed or mechanical retracting gear. The motor is mounted next. Like the landing gear, parts are supplied for a variety of configurations. I mounted a Dualsky electric motor using a combination of parts provided with the motor and in the kit. I applied Zap Z-42 Thread Locker to all fasteners. While I was at it, I installed the Castle Creations ESC under the battery compartment and ran the motor for a moment to ensure it was spinning in the correct direction.
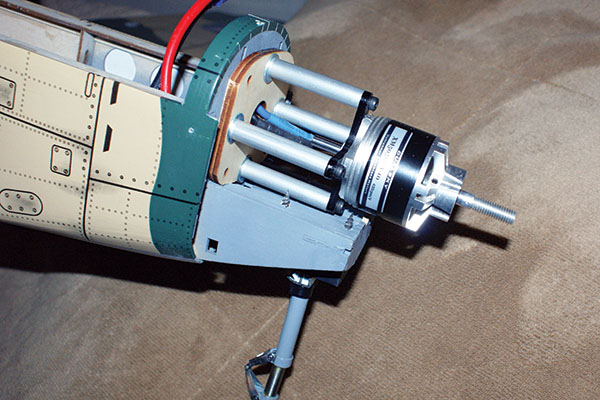
The Airacobra’s long nose requires standoffs to mount the Dualsky brushless motor.
The main wing gets installed so that it can be used to align the horizontal stabilizer. Instead of using a knife to remove the covering from the gluing area, use an old soldering iron tip. It won’t cut into the wood and it seals the covering at the same time. Although I often prefer to use epoxy to install these critical pieces, the instructions say to use thin CA, so that is what I used. The vertical stabilizer was attached in the same fashion. After everything was aligned and installed, the elevator halves and rudder were attached using the supplied CA hinges and thin Zap glue. The elevator and rudder servos were installed as described in the wing section, using thin CA adhesive to harden the threads and RTL servo screws.

The elevator and rudder servos are mounted in the tail for a simple and direct control system installation. Despite the weight of the servos in the tail, the long nose and generous battery compartment mean no additional weight is required to balance the Airacobra.
The fiberglass cowl was installed using the supplied hardware. An electric installation means little cowl hacking! I added bonded washers to the cowl mounting screws, which were also obtained from RTL Fasteners. Although there’s little vibration in an electric setup, the rubber-backed washers help protect the fiberglass. I use them routinely. A drop of thin Zap glue was used to harden the threads of the self-tapping cowl screws. The final radio setup was completed by adjusting the throws to the recommended ranges in the manual and adding 25% exponential to all surfaces. The battery compartment is large and easy to access, and the center of gravity was easily obtained by moving the battery and marking its proper location. The final markings were applied by floating them in place using dish soap and warm water. After they were positioned, the water was squeegeed out using a paper towel, and the markings were left to dry for a couple of hours. The Airacobra certainly looked the part with its iconic shark tooth scheme! I performed a wattmeter check. The power system was running close to 750 watts while pulling 45 amps at full throttle. This should make for a nice, cool battery and ESC, while providing roughly 100 watts per pound for spirited performance. The total assembly time was 10 to 12 hours.
Flying
Assembling the P-39 at the field is easy. It requires connecting five servo extensions and installing two wing bolts. The hatch is held in place with two small nylon thumbscrews. The top-mounted hatch makes battery changes easy and there is plenty of room in the fuselage for battery or fuel tank placement. As I mentioned, the long nose wheel’s strut has some play in the steering linkage, so ground taxiing was loose but manageable. The takeoff run required some rudder correction and the electric power system has plenty of zip. The Airacobra broke ground in less than 50 feet and at slightly above half throttle. The gear retracted cleanly and everything was going well. A couple of laps at half throttle revealed the need for a little trim. With a couple of clicks of up and one or two clicks of aileron, the Airacobra was flying hands off. At full throttle, the airplane wanted to climb a little, so it might need a few degrees of downthrust. Stall testing revealed that despite being a “warbird,” the P-39 had sport airplane manners. Reducing throttle to zero and adding elevator, the Airacobra finally stalled, but it was extremely slow. It dropped a wing and recovery consisted of relaxing the up-elevator and adding some power. With full flaps and the gear down, the Airacobra slows quickly and requires approximately a quarter throttle to maintain an appropriate sink rate and overcome any headwind. I was surprised that the flaps needed no elevator compensation, even at full flap deployment. One thing that I had to think about when landing the Airacobra was the length of the nose strut. It needs to be considered when flaring. If you hit the nose wheel first, it will bounce, and you will get grief from the peanut gallery. A proper flare where the main wheels touch first, and holding the nose up until it slows, will make it look like you know what you’re doing. After a quick postflight inspection, the airplane was back in the air for me to wring it out. The Airacobra performs most basic aerobatics well. There is plenty of power for large, graceful loops. Rolls are quick on high rate and very scalelike in low rate. Low, simulated strafing passes at full throttle are where it’s at. The shark mouth on the front makes it look menacing!Conclusion
Despite its warbird appearance, the Airacobra flies like an intermediate sport airplane. Because it isn’t a commonly modeled airplane such as a Mustang or Corsair, the P-39 often gets comments and long stares because it’s a unique project. The panel lines and printed details really add to its scalelike exterior, and the pilot and instrument panel give it a finished appearance. I plan to spiff it up a bit by installing a three-blade propeller for scale looks, drilling the center point of the spinner, adding some brass tubing to simulate a cannon, and using a fine-tip marker to extend the panel lines to the covering on the hatch.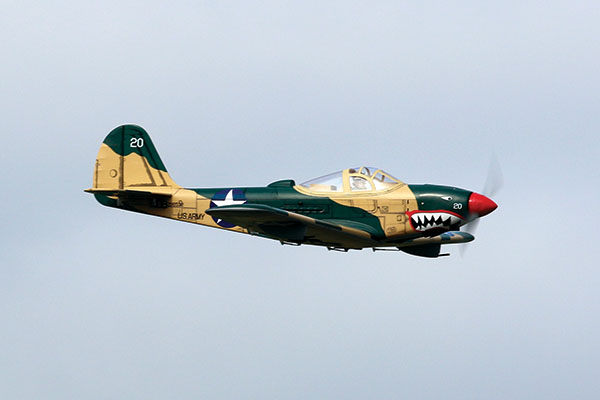
The Airacobra doing what it does best—looking mean! Despite the camouflage covering, the contrast between the colors allowed the P-39 to present well visually, no matter what the background was.
—Andrew Griffith [email protected]
Manufacturer/Distributor:
VQ Warbirds [email protected] www.vqwarbirds.comSources:
Spektrum (800) 338-4639 www.spektrumrc.com Hitec RC (858) 748-6948 www.hitecrcd.com Venom (800) 705-0620 www.venompower.com Zap (863) 607-6611 www.franktiano.com Castle Creations (913) 390-6939 www.castlecreations.com RTL Fasteners www.rtlfasteners.comThis Month's Issue

Join the AMA
![]()


1 comments
electric retracts for vq warbirds airacobra
Add new comment