
Written by Don Slusarczyk
Free Flight Indoor
Column
As seen in the July 2017 issue of Model Aviation.
I have flown with batches of 10/97 and 3/02 Tan II rubber for many years, and my reserves are running thin. I wanted to do some comparison tests between the old Tan II and the current batches of TSS to see how rubber has changed throughout the years.
Fred Pearce published two articles in the March and April 1979 issues of Model Aviation about his method of pull testing rubber. I have followed his method with one exception: I increased the 430 factor to 480 in his second equation, to adjust for the better quality of modern rubber.
Fred’s method was rather easy. A loop is made, stretched to a certain force, and held for five minutes. It is then stretched to a new force and the data recorded as it is relaxed. Fred’s testing device was rather large, so I decided to use shorter loops so I could test it in my model room.
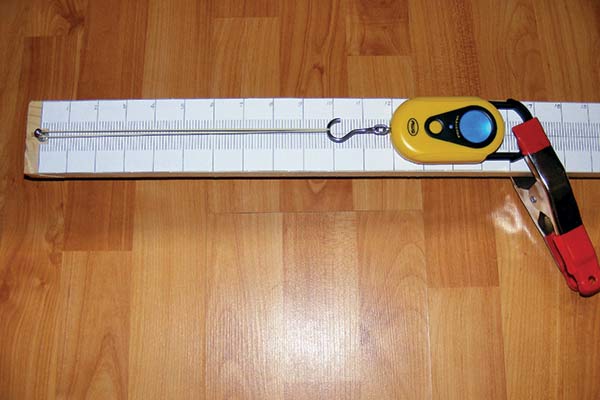
Taking force and distance readings during a pull test.
For these tests, you will need a digital scale that will weigh up to 1 milligram. Knowing the exact weight of the rubber loop and knot is crucial for accurate results (see my past columns for scale suggestions). You will also need a pull scale to measure the force. I used the American Weigh AMW-SR-20 digital pull scale that reads up to .02 pounds. Next you will have to make a measuring board. I printed some rulers I drew up in CAD with graduations every 1/10 inch and glued them to a 6-foot x 1-inch x 4-inch pine board. The peg to loop the rubber around is a piece of 1/8-inch brass tube with a bolt inside to attach it to the board. The last item you will need is a spring clamp to hold the scale in position during the testing. Start by making up some motors to test. I set my rubber cutter to approximately .055 inch wide for all of the batches of rubber that I tested. Cut a 12-inch strip from one batch, weigh the strip, record the weight, then tie a knot in the loop using hemostats to clamp the rubber (commonly used in making F1D motors). I found that three knots, each the opposite direction of each other, were needed for this kind of pull testing. The resulting loop should be 5.8 inch long. Now pull the loop to a specified force based on the following formula: F1 (pounds) = 45 x weight in grams/initial loop length
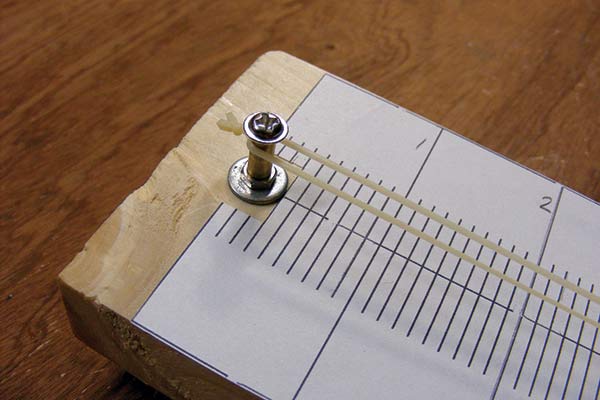
The smooth tubing keeps the rubber from breaking during the test.
My 5.8-inch loop weighs .475 grams (minus .025 gram for the knot), so it has a rubber weight of .450 grams, which means the F1 force needed is 3.49 pounds. Now pull the rubber until 3.49 pounds is reached on the scale then hold it at that length for five minutes (using the spring clamp to hold the scale), and record the stretched length (L1). After five minutes, relax the motor and let it rest for at least an hour to recover before performing the next test. You will see the loop is now longer than before.
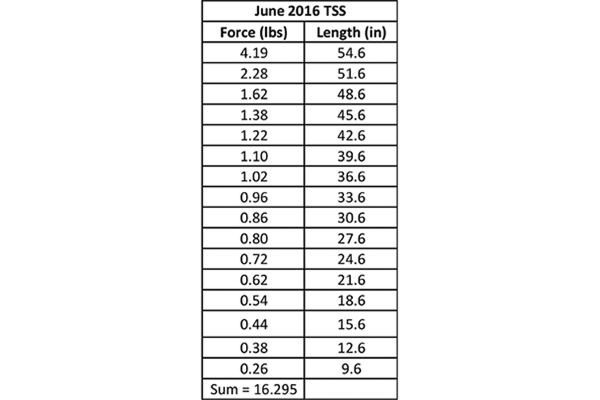
This is the collected data for June 2016 TSS rubber. Remember that the first force value must be divided in half before adding to the rest of the force values.
The next step is to pull the rubber to a slightly higher force based on the data collected during the break-in stretch. This new force is based on this formula: F2 (pounds) = 480 x weight in grams/L1 During the break-in process, the rubber was stretched to a length of 51.6 inches to achieve the 3.49 pounds, so using 51.6 as the L1 value in the formula, the F2 force is 4.19 pounds. Stretching to this final value puts a lot of stress on the rubber and knot, so I suggest that you pull slowly during the last 10% or so when you are getting close to the force value. After you stretch to this force value, the data collecting begins. First, record the stretched length of the rubber at this force; the L2 length is used to calculate the rubber stretch ratio. Now move the rubber in 3 inches and measure and record the force at this new location. Move in another 3 inches and record the force, then another 3 inches and record, and so on until the motor is relaxed. The data you have collected can then be used to calculate the stored energy of the rubber. The energy is calculated by first taking half of the F2 force and adding that to all of the other force values measured at the 3-inch intervals.
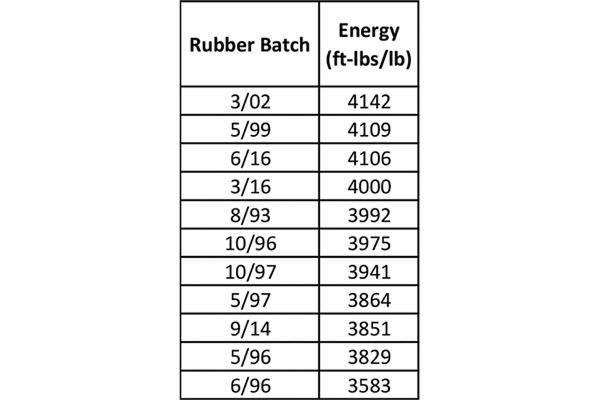
Total energy test results of various Tan II and TSS rubber batches, as tested by the author.
For my motor example, the force values were summed up to 16.295 pounds. Because I used 3-inch intervals, the energy formula can be simplified as follows: Energy = 113.4 x summed forces (pounds)/weight in grams. Using the sample motor, energy = 113.4 x 16.295/.45 = 4,106 feet-pounds/pound. Stretch ratio = L2/initial loop length. Using our data, that equates to 54.6 inches/5.8 inches = 9.41. The stretch ratio can also be used to approximate how many turns the rubber loop will take. Maximum turns: 4.7 x stretch ratio x loop length x square root of (loop length/rubber weight in grams). Maximum turns = 4.7 x 9.41 x 5.8 x square root of (5.8/.45) = 921 turns.
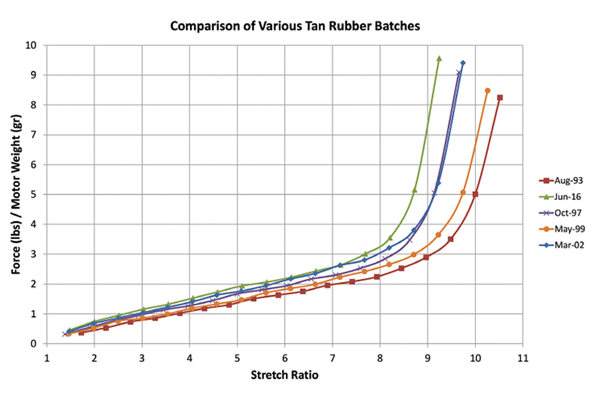
A pull-test comparison of various common batches of Tan rubber.
I have included a graph showing various batches of Tan II compared with some of the latest TSS rubber. You can see some batches of older Tan II rubber had stretch ratios of more than 10 compared with TSS, which was slightly more than 9. The June 2016 TSS rubber, however, has an energy total similar to some of the better Tan II batches. Because the total energy is similar, but the stretch ratio is 10% to 12% less, to get similar turns as Tan II, the TSS needs to be approximately 10% to 12% longer for loops of the same weight. Until next time, keep the weights down and the times up! -Don Slusarczyk [email protected]


Comments
Add new comment