
Written by Terry Dunn
Tips for using Velcro with model aircraft
As seen in the September 2018 issue of Model Aviation.
Image

Have you ever had the hook-and-loop tape peel off of the battery in your electric model? There are some simple techniques to help prevent such mishaps. Hook-and-loop tape, also known as Velcro or “touch fastener,” is a great material for securing the batteries in our electric-powered models. We might debate over which side should go on the battery (hook, obviously!), but you cannot deny that it is often the perfect tool for this particular job. There are times, however, when things do not go as planned. Have you ever removed the battery from your model and realized that instead of the hook and loop material separating, the loop tape has peeled off the airframe and is still clinging to the hook tape on your battery? I have. I’ve also experienced the opposite scenario, where the hook tape delaminated from the battery. It’s a frustrating way to halt a flying session. That’s why I have developed
a few strategies and techniques to help prevent
these annoyances.
Image

Applying self-adhesive hook tape on top of stickers on your battery might cause the tape to peel away. Remove any stickers and clean the surface.
Separation Anxiety
A good starting point is to consider how much holding power you really need. In my experience, standard-strength hook-and-loop tape in .75 to 1-inch widths is entirely adequate for most fixed-wing applications. I’ve used it for models ranging in size from park flyers up to Giant Scale.Although “industrial strength” varieties of hook-and-loop tape do a super job of keeping the battery in place, they can actually provide too much grip. You might have a hard time removing your battery from the model. With all of that concentrated force, you’re bound to break something sooner or later. You have to balance holding strength with ease of removal.
Another element to consider is how much hook-and-loop tape is adequate for each specific application. Is it really necessary to have a strip of self-adhesive hook tape along the entire length of the battery and a matching length of loop tape on the airframe? Would half of that length suffice?
The less Velcro you use, the easier it will be to remove your battery without drama. You should definitely use what you need, but try to not overdo it.
Bare Batteries
Addressing the problem of hook tape peeling off of your battery is a straightforward process. I always use self-adhesive hook tape on the battery. Those instances where I’ve had the tape come off were because of improper battery surface preparation.Many batteries have stickers and warning labels on the outer surface. If you apply your hook tape on top of one of those stickers, its bond to the battery is only as strong as the sticker itself. Some stickers are really tenacious, while others seem eager to fall off or delaminate.
My policy is to remove any stickers from the battery where my hook tape will be located. I peel off the sticker and remove every trace. Wiping with a rag and isopropyl alcohol will help you remove any sticky residue. Even if you don’t have to remove any stickers, it’s a good idea to clean the area with alcohol. You can then apply the self-adhesive hook tape to the battery and be confident that it will stay put for a while.
Just Cinch It
One strategy that I use to minimize the amount of hook-and-loop tape between the airframe and battery is to also use a strap around the battery. A strap provides tremendous holding power but does not put any stress on the airframe when it’s time to remove it.A small square of hook-and-loop tape between the airframe and battery will prevent any shifting while the strap does most of the hard labor. It is often a simple matter to incorporate a battery strap into your model, even if it is not designed to use one. You might have to cut slots in the floor of the battery mount. Just make sure that the structure holding the strap is tough enough to handle the job. I usually add some type of reinforcement if I’m unsure.
Purpose-built battery straps are readily available at many hobby shops. You can even make a strap by mating a strip of sew-on (no adhesive baking) loop tape with a strip of hook tape. I often prefer to use two-sided hook-and-loop tape. It is easy to work with and comes in several sizes. I find the precut straps that are sold as household electrical cord organizers are especially handy for
my projects.
Image

Using heavy-duty hook-and-loop material might seem like a good idea, but it puts stress on your airplane when trying to remove the battery.
Image

Image

The author cut slots in the battery mount floor of this foamie to incorporate a strap. It provides super grip and the battery is easy to remove after a flight.
The Right Tool
There are times when the only sensible option is a stout layer of hook-and-loop tape between the airframe and battery. In those cases, I omit separation-induced stress in the airframe by using a tool to split the two sides. A common plastic putty knife often works well. You simply insert the end of the putty knife between the two tapes and slide itdown until you have disengaged
the entire length.
The battery compartments for some of my smaller park flyers are too cramped to fit an off-the-shelf putty knife. You can easily modify the knife by narrowing the blade or by bending the handle (after softening it with a heat gun) to make it fit. I’ve also made my own custom separation tools using scrap plastic sheet or thin plywood.
Image

A simple plastic putty knife can be used to separate hook-and-loop tape without overstressing the airframe.
Bonding Loop Tape to a Wooden Structure
Regardless of your specific battery-retention strategy, you still need a way to firmly attach the loop tape to your airframe. That can be slightly tricky with traditional balsa and plywood models. Self-adhesive loop tape simply doesn’t stick well to bare wood, so it needs a little help.In most cases, the floor of the battery mount is made of light plywood. Some modelers like to coat this area with a thin layer of epoxy, providing a smooth, nonporous surface for the adhesive to stick to. I take a slightly different approach.
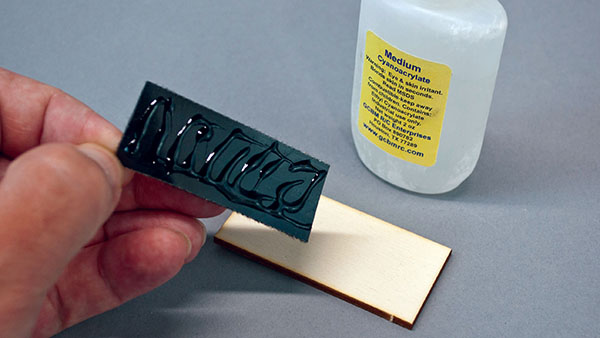
My method is to apply medium CA glue to the sticky side of the loop tape before pressing it in place on the bare wood. I use a craft stick to spread the CA into a thin coat that covers the entire surface of the tape. Spritzing a little CA accelerator on the wood before applying the loop tape helps to speed up the curing process. Now the loop tape should be solidly stuck to the battery mount!
Bonding Loop Tape to Foam Structures
As with wooden airframes, applying adhesive-backed loop tape directly to a foam airframe can cause headaches. Sooner or later, the tape is going to peel off. I’ve never had much luck using CA or epoxy to bond loop tape to foam. The problem is that those glues are brittle when they cure, while foam tends to be flexible.I have had some success using flexible glue such as GOOP to bond loop tape to foam. You merely have to make sure that the foam is compatible with the solvents in GOOP. EPO- and EPP-type foams that are used in many modern ARFs tend to work well. Polystyrene foams such as blue insulation foam and Styrofoam will dissolve with GOOP. Always test a small patch in a hidden area if you’re not sure.
I’ve had the best success anchoring loop tape to foam when I add a thin, rigid plate between them. This plate can be light plywood, sheet plastic, fiberglass, or whatever you have on hand. Many materials will work. The stiffness of the sandwiched material helps to distribute the stresses of separating the hook-and-loop tape when removing a battery.
My usual process is to first attach the loop tape to the plate with medium CA. I then adhere the plate to the foam with GOOP or epoxy. You can even route a thin strap beneath the plate when you glue it into place.
Image

The author adds medium CA to the sticky side of loop tape when he applies it to a wooden structure.
Image
GOOP adhesive works great for bonding battery mounting rigs into EPO and EPP foam models.
Image

Adding a thin, rigid plate to the battery mount of a foam model will prevent the loop tape from delaminating. In this example, the author added a section of scrap prototyping board.
Stay Sticky My Friends
Hook-and-loop tape is incredibly useful stuff for electric fliers. It just needs a little extra help now and then to make sure that it properly does the job. The tips I’ve outlined should help you avoid Velcro-related frustrations and allow you to fully enjoy your time at theflying field. By Terry Dunn | [email protected] SOURCES: Velcro Brand
www.velcro.com Amazing GOOP
(800) 349-4667
www.eclecticproducts.com


Comments
Hook and loop
Thank you for a great article on a subject that bugs us all yes is rarely discussed!
Securing a battery with velcro
On my planes that I build I always use a strap (or 2) around the battery and a strip of non-slip shelf material tack glued (with compatible glue) to the battery tray. That secures the battery and prevents any sliding in case the strap does not get secured tight enough.
Fuzzy Fuselage
I agree with your comment "We might debate over which side should go on the battery (hook, obviously!)" but my phrase for this is "Fuzzy Fuselage"
Cheap sources for self adhesive Hook & Loop tape
Great article! I would like to add that using really thin hook & loop self adhesive tape reduces the strain on the airframe through which the wrap around tape is threaded. This also allows me to use the tape on both sides of the battery - the lower side is held stable against the airframe, and the upper side keeps the wrap around portion secure. An good source of thin hook and loop tape is available (in the U.S.) from dollar stores in the automotive section.
I always put the loop side on
I always put the loop side on the battery. The loops seem to wear out before the hooks so if I have 4 batteries for a plane I spread the extra wear by 4:1. I have a couple of planes that have gone through several sets of batteries and those hooks just do not seem to give up.
To fasten velcro and velco
To fasten velcro and velco straps to foam airframes I use polyseamseal clear adhesive caulk. This adhesive is super strong and flexible and won't melt any foam surface. Polyseamseal comes in a standard caulking gun size, so I seal the tip of the tube with a small patch of aluminum duck tape so it stays fresh for the next use. The main draw back is the slow cure time. It is still tacky after a hour, and take 24 hours for full strength.
Add new comment