


Flyzone A6M2 Japanese Zero Select Scale Rx-R
Written by Terry Dunn A friendly foam-constructed warbird Product review Photos by the author As seen in the March 2016 issue of Model Aviation.
Specifications
• Model type: Semiscale warbird • Skill level: Intermediate • Wingspan: 45.1 inches • Wing area: 307 square inches • Length: 37 inches • Radio: Tactic TTX850 2.4 GHz transmitter; Tactic TR825 receiver (in lieu of the included TR624); six micro servos (included) • Components needed to complete: 6+-channel SLT-compatible transmitter and basic assembly tools • Price: $229.98 Rx-R (receiver-ready); $319.98 RTF • Power system (included): 1,000 kV outrunner brushless motor; GWS 10 x 6 x 3 propeller; 40-amp ESCTest-model Details
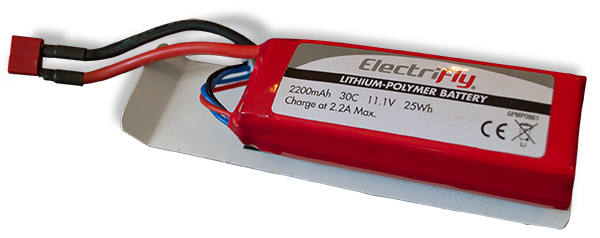
(With ElectriFly 3S 2,200 mAh 30C LiPo battery) • Power output: 22.8 amps, 261 watts • Flying weight: 37.7 ounces • Flight time: 8 minutes • Wing loading: 17.7 ounces per square foot (With FlightPower 4S 2,450 mAh 30C LiPo battery) • Power output: 32.4 amps, 491 watts • Flying weight: 40.7 ounces • Flight time: 6 minutes • Wing loading: 19.1 ounces per square footPluses
• Good performance with three-cell or four-cell batteries. • Accurate scale appearance. • No stickers.Minuses
• The Zero is a seven-channel airplane, but includes a six-channel receiver. • Battery access is somewhat difficult with 2,200 mAh batteries.Product Review
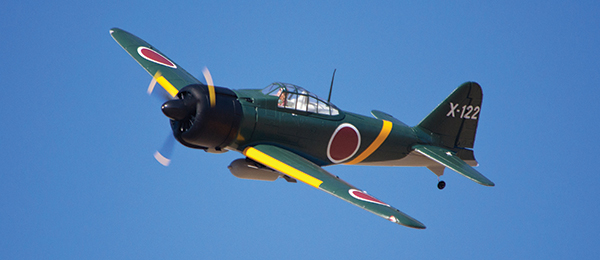
The A6M2 Zero is the third warbird in Flyzone’s lineup of “Select Scale” models. Like the FW-190 and Corsair that preceded it, the Zero is a molded-foam airplane that features an accurate scale outline, a brushless power system, and retractable landing gear. This newest model, however, takes things up another notch by including features that enhance its scale appeal, durability, and performance. In the scale arena, the Zero has several things to admire, such as its painted cockpit and pilot figure. What I like most are the model’s factory-applied insignias. All of the markings are matte-finish waterslide decals. Unlike self-adhesive stickers, the decals conform to the panel lines beneath them and closely match the sheen of the surrounding paint. The Zero is the first Flyzone model to include electric retracts. This setup is simpler and more durable than the servo-driven mechanical retracts seen on other models. These units have worked flawlessly so far, and I expect that they will continue to do so for a long time. The stock power system on the Zero can accept 3S or 4S LiPo batteries. You don’t even have to change the propeller to use either battery. This is a unique capability, and one that gives the Zero a wide performance range.Assembly
The Zero is an ARF with little assembly required. It even has a receiver that can be linked to a transmitter using SLT protocol (found on Tactic and some Hitec radios). Mine was ready to fly within a few hours of opening the box. The kit included a printed manual as well as an addendum with various updates and corrections.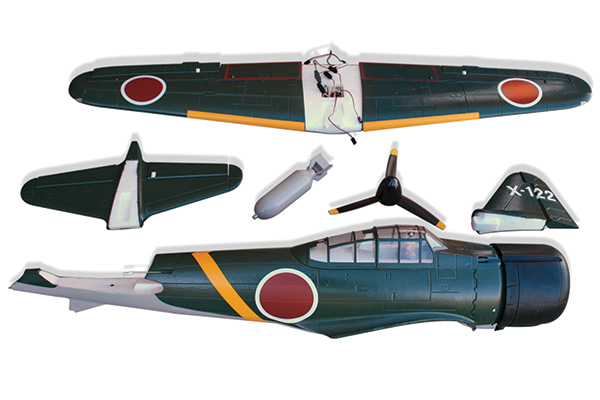
The Zero is prefinished and mostly prebuilt at the factory. Mine was ready to fly after one evening of assembly work.
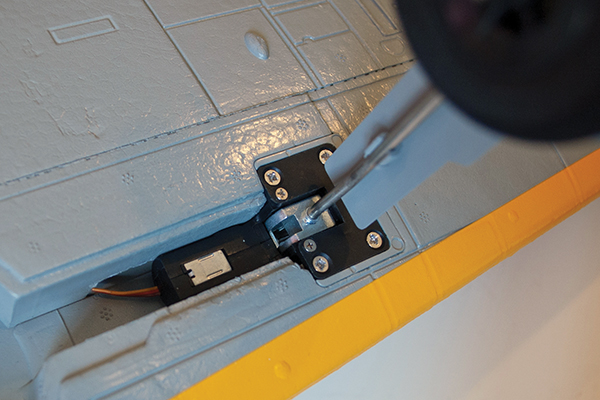
The Zero includes stout electric retracts that work well and require no setup.
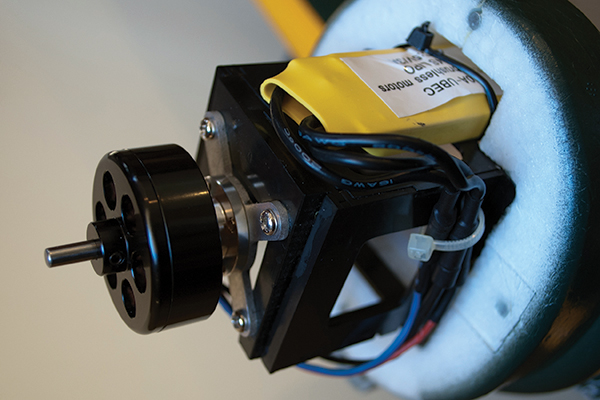
The stock brushless power system can be used with three-cell or four-cell LiPo batteries. This gives the Zero a wide performance range.
A single screw is used to attach the tail feathers to the fuselage. I was impressed with how well the molded-foam components fit together. The completed assembly feels solid and has no visible gaps. When configuring the flaps on the Zero, having too much servo throw could damage the servo or control linkages. Using the “Travel” menu on my Tactic TTX850 radio, I set the end points for the flap servo at 10% in both directions. I then gradually increased these values until I achieved the desired flap deployment. I couldn’t quite get the flaps to sit flush with the wing when they retracted, but the difference is hardly noticeable. A neat feature of the Zero is that it includes a simple bomb-release mechanism and a dummy bomb. The only problem is that once you tally up the flight controls, retracts, flaps, and the bomb release, you need seven channels to operate everything. The Tactic TR624 receiver that is included with the Zero has only six channels, so you have to choose between flaps or the bomb release. The manual provides an option to use a Y harness to combine the flaps and bomb release, but to avoid this dilemma, I replaced the TR624 with a Tactic TR825 eight-channel receiver and paired it with the Tactic TTX850 eight-channel transmitter previously mentioned. The magnetically attached canopy lifts off to access the radio and battery compartments. There is plenty of room inside for all of the necessary equipment. Because of all of the model’s servos and other gadgets (did I mention the LED lights in the wingtips and tail?), there are several wires routed to the receiver. Invest a few minutes in tidying the wires and keep this area neat.
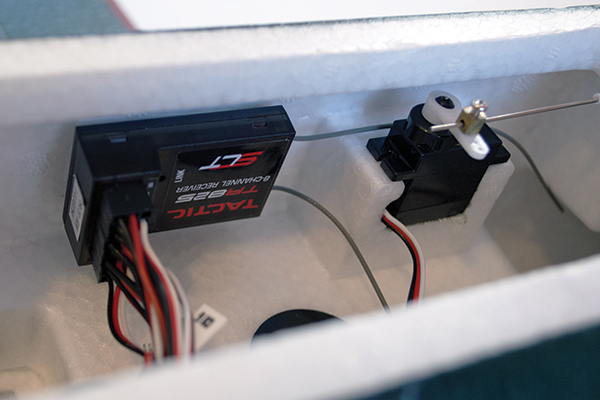
The eight-channel Tactic TR825 receiver fits in place of the stock TR624 receiver and allows all functions of the model to be utilized.
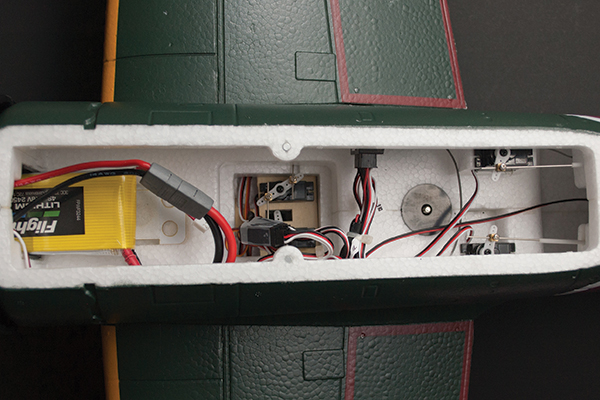
There is plenty of room in the radio bay for all of the required equipment.
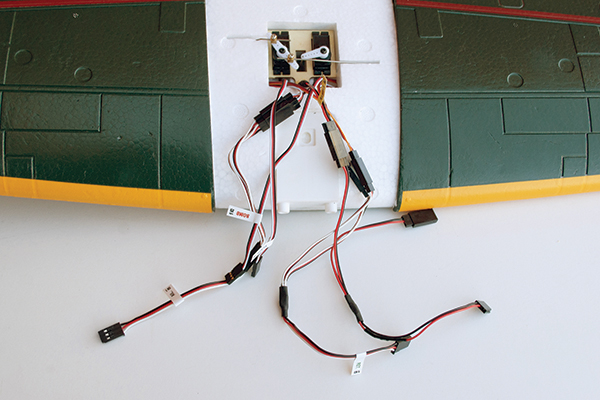
With flaps, ailerons, retracts, and lights in the wing, there are many wires to manage. Try to keep them organized and tidy.
I configured the radio per the manual’s suggested control throws for high and low rates. The TTX-850, however, offers triple rates for the control surfaces, so I assigned the lower two rates to the values in the manual. For the highest rate, I set the ailerons, elevator, and rudder to 100%, 100%, and 125% respectively. I also added 35% exponential for every control surface and rate setting. The kit includes adhesive hook-and-loop tape that goes between the battery and its mount inside the fuselage. There is also a hook-and-loop strap for extra security. When using 2,200 mAh batteries (three-cell or four-cell LiPos), they must be mounted fully forward. This places the battery ahead of the anchor point for the strap. The good news is that the battery stays in place without the strap. With the battery placed all the way forward, it can be difficult to access for removal. I followed the lead of my club mate, Scott Grissman, and created a small tray that makes it easier to install and remove the battery. One side of the tray has hook-and-loop tape to adhere the battery. The opposite side has hook-and-loop material for mounting the tray into the fuselage. Scott used 1/8-inch plywood for his tray, but mine is made from sheet Kydex plastic. The material type isn’t important. Make sure you have the tray roughly an inch longer than the battery to provide a convenient handle.
I made a simple battery tray to streamline the job of swapping out 2,200 mAh batteries.
Even with my ElectriFly 3S 2,200 mAh LiPo battery placed all the way forward, I had to add 1/2 ounce of lead in the nose to achieve the suggested CG. The foam cowling has a molded-in chin scoop that snugly holds two 1/4-ounce weights. I also used a FlightPower 4S 2,450 mAh LiPo to power the Zero. The nose weight was unnecessary with this heavier battery. I also found that the longer FlightPower battery negated the need for my battery tray. With the three-cell battery, my Zero was comfortably within the suggested weight range for this model. Even with the four-cell battery, it was slightly outside of this range. Both batteries posted encouraging values for the wing loading and power loading, so I departed for the maiden flight full of confidence.
Flying the Zero
With a wide landing gear stance and steerable tail wheel, the Zero is stable on the ground. If there is much wind, the model tries to weathervane and you may not have enough steering authority with the tail wheel to taxi crosswind. The Zero requires rudder correction to track straight as you begin the takeoff roll. I found this easy to manage when I gradually increase the throttle. An interesting thing I discovered while flight testing the Zero is that it has two personas—both are fun, but in different ways. With a three-cell 2,200 mAh battery, it is a well-mannered sport aircraft that is suitable for flying at small fields. It feels light on the wing and changes direction quickly without snapping or stalling. It behaves more like an aerobatic Sunday flyer than a warbird. With the added power and mass of a four-cell battery, the Zero takes on a more aggressive demeanor. Top speed and climb rate are both much higher. The airplane also seems to track more solidly at these high speeds. This is the battery to use when you want to fly low, strafing passes over the runway while making fake machine gun sounds. Because no changes are required to use either the three-cell or four-cell battery, you can readily show either side of the Zero’s split personality. Choose the battery that suits your mood.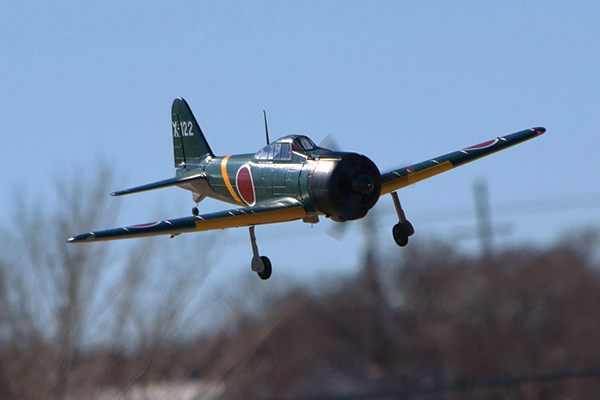
The Zero is a great slow-speed flyer so it lands easily, with or without the flaps deployed.
The Zero is capable of all four-channel aerobatics with either battery. The four-cell option allows climbing maneuvers such as hammerheads and loops to be much bigger. High-speed snap maneuvers are especially fun. I’m still working on getting my snaps with this airplane to only one rotation. I tend to overshoot. The one maneuver that requires special attention is knife-edge. The airplane has almost enough rudder authority with the suggested rates to hold knife-edge at full throttle. Upping the throw to my 125% super-high rate provides the additional leverage it needs, but there is a little pitch coupling toward the canopy. If you only want to make long, banked photo passes over the runway, the stock rudder throws are fine. I’ve found that the suggested throws for elevator and aileron suit my tastes well. In fact, I leave both in the high-rate settings for most of my flights. My 100% throw high rates are only useful when I want to get crazy with this model. The bomb drop is a fun thing to do. It’s too bad that the pilot doesn’t get to watch it fall all the way to the ground! The bomb weighs an ounce and it must create significant drag, but I honestly can’t tell any difference in the airplane’s performance whether it is or isn’t attached. There is only a small amount of pitch coupling when I drop the flaps. In fact, I have not felt compelled to mix any elevator adjustments with the flaps. I merely make sure that I’m at a moderate speed when I take the flaps to the first notch, and then get settled before dropping them further. The flaps aren’t necessary for landing the Zero, but they can be helpful for making short-field landings on windless days. With or without the flaps, the Zero slows down well for landing. Sometimes I’m amazed by how slowly it will fly without stalling. The landing gear is stiff, so it can be challenging to settle onto a paved runway without any bounce. Maintaining a few clicks of throttle all the way to touchdown helps.
Conclusion
The Zero has become my favorite of the Flyzone warbirds. The fit and finish of this model are excellent, while the electric retracts and three-cell or four-cell power options make it user-friendly. I also find that the Zero is an excellent canvas for experimenting with weathering techniques. I sprayed mine with a coat of flat clear coat and I am gradually adding weathering details with charcoal pencils. The results are encouraging. If you decide to get a Flyzone Zero for yourself, it’s ready for the details that will make it uniquely yours. —Terry Dunn [email protected]Bonus video
Manufacturer/Distributor:
Hobbico (800) 637-7660 www.towerhobbies.comSources:
Tactic (800) 637-7660 www.tacticrc.com FlightPower (800) 637-7660 www.flightpowerbatteries.comThis Month's Issue

Join the AMA
![]()


Add new comment