Refinishing Your Model
Written by Walt Moucha. A little time and money is all it takes. Full tutorial in the August 2015 issue of Model Aviation.
I’ve been involved in modeling since the age of four with Free Flight, Control Line, and eventually RC. It has been a learning curve. There are always new products to learn about. Don’t be afraid of asking for help because most modelers are always willing to help in any way they can. Florida is graced with good weather most of the year and there are plenty of swap meets to attend. It is possible to get some outstanding deals, as I did a few months ago. Both of the models that I purchased—a Dynaflite Super Cub and a Jodel Robin ARF made by Graupner—needed some tender loving care. The Super Cub had Sig Coverall and was originally painted with enamel. Repainting was not a problem; it simply needed cleaning with a household detergent such as Simple Green. I tested it on a small spot to make sure the finish was not affected. After I cleaned it up, I used 16-ounce cans of automobile lacquer primer in rust or gray then I lightly sanded the entire model with 320-grit sandpaper. If necessary, you can fill in any dents with automobile lacquer putty. There is no problem with any of the paints on the market not bonding to primer. For the past 10 to 15 years, I have been using spray cans of ColorPlace enamel paint from Walmart. It’s a little on the pricey side at 99¢! You can also use any of the Rust-Oleum products. Check the drying times on these enamels. Some brands require eight hours while others require seven days. If you do not follow the suggested drying time, the final coat can attack the paint like paint remover. A few light coats are better than one heavy coat. Always paint lighter colors first and darker colors last. For masking, I use Frog Tape, also sold at Walmart. It comes in widths from 3/4 inch up to 2 inches and is roughly $5 a roll. I only use this tape for the paint lines because it has an edge that seals itself as soon as paint touches it. For all other masking, I use the cheapest masking tape I can find. When I refinished the Super Cub, I was lazy. I left all of the surfaces on the model and didn’t even remove the Zenoah G38 engine. I did remove the floats to make handling easier, leaving me with the fuselage and two wing panels. The cowl needed to be strengthened. I used 3/4-ounce glass cloth and epoxy resin. I applied only one layer of cloth on the inside and outside, plus one additional coat of resin. The cowl is now much stronger. Next came a few coats of lacquer primer, along with a light sanding between the coats, and the cowl was ready for paint. The model’s stars and bars are from Major Decals. They go on easily with warm water and a drop of dish soap, allowing you to easily position the decal. I used a paper towel to blot it dry, working from the center outward. This removed the bubbles and excess water and then I let it air dry. If you need to use lettering on your project, you have a few choices. Staples sell a variety of letters ranging from 2 to 6 inches in size and are available in several colors for roughly $10. Using stencils is another way to go. Stencils come in sizes up to 6 inches in height for approximately $6. When using stencils, tape them together and position them on the model. If the stencils do not lie flat, use a hole punch on double-sided tape to punch out a few circles to stick on the back side of the stencil. Peel off the other side of the tape and gently press the stencil down on the model. When using this method, the paint line will not be crisp and fine. It is important to spray paint down directly on the stencil and not at an angle to avoid paint bleeding under the stencil. Light coats of paint are the way to go. Do not remove stencils until the paint is completely dry or the paint edges might smear. Lettering with the stencil method was popular during the early years of aviation. Its scalelike effect is close to the real McCoy. After stenciling US NAVY on the top of the wing, it was time to select the numbers and letters on the fuselage. Why not use my wife’s and my initials, along with the year we were married? I used our anniversary date for the numbers. I tried a different technique to finish the floats. If you do a lot of float flying, as I do, sooner or later floats will take on water. I purchased a product called FlexSeal, which is a rubberized sealant. The 16-ounce spray cans are available in black or white. Only one can was needed to seal the floats. The finishing coat was silver enamel from Walmart. After I completed the model, I took the Cub out to my club field. People found it hard to believe that it cost roughly $18 in paint and tape to refinish it!
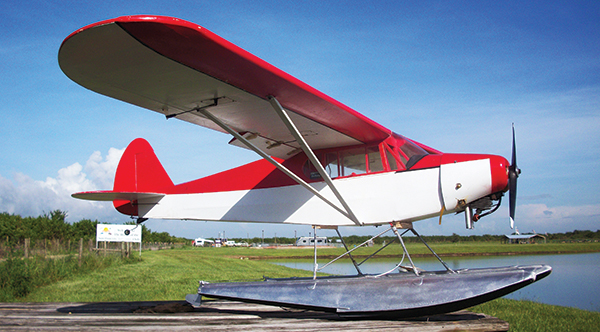
This shows how the Dynaflite Super Cub looked when it was purchased at a swap meet.
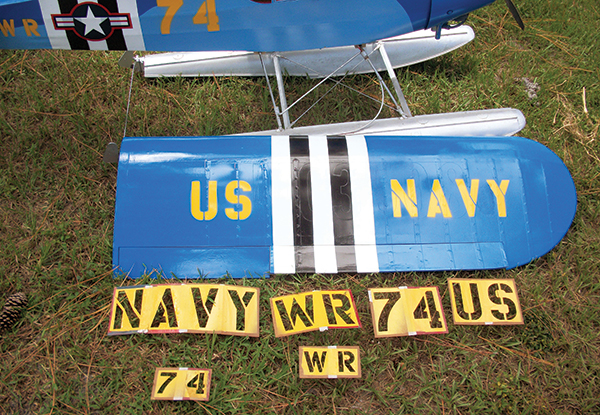
Stencils were used on the Cub. When using stencils, spray directly at the stencil, not at an angle, to help prevent paint from bleeding under the stencil.
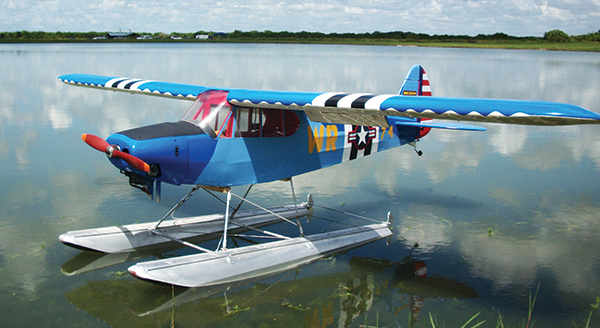
The Cub only took a little time and approximately $18 in supplies.
Jodel Robin
My second project, the Jodel Robin, definitely required a face-lift. Refinishing it would be more intensive than the Super Cub, but it was too pretty not to redo. The Jodel is a European homebuilt aircraft with polyhedral tips and a huge bubble canopy, which sets it apart. The full-scale version is built like a large model airplane with plenty of plywood and hardwood. I found a few photos of it online, which made choosing the paint scheme simple. My 1/4-scale model was a kit that was manufactured as an ARF by Graupner several years ago. It has a 94-inch wingspan and is designed around smaller gas engines. The original covering was SolarFilm and the Jodel sported tricycle landing gear. Removing the covering was no big deal. I detached the control surfaces along with the powerplant. The entire model received a light sanding and I filled in all small nicks and dents with automobile glazing and spot putty. Now was the time to put new clothes on the Jodel. All of the wood surfaces were given one coat of Balsarite to allow the material to bond better to the airframe. It’s a good idea to go over the entire model with tack cloth to eliminate any foreign objects under the covering. The Jodel Robin required two 15-foot rolls of covering material. I used a new MonoKote iron from TopFlite. Take your time when covering a model. It took me 16 hours to complete the job. I used Chevy Orange Dupli-Color engine enamel from an automotive store. One 16-ounce can at $4.99 was enough for the entire model. Always read the instructions for proper application. I used two rolls of black 1/8-inch pin-striping tape from Great Planes. I also did something on this model that I seldom do. I applied a clear coat to the entire model, using two cans of Rust-Oleum at $3.69 a can. This helps keep the pin striping from lifting and prevents Coverite 21st Century Fabric from absorbing any gas residue. I had one small problem with the covering adhering to the balsa around the engine area because of gas and oil that had soaked into the wood. This problem was quickly fixed by using 3M General Purpose Spray Adhesive #45. A 10-ounce can was $6. The wood and fabric received one light coat. I let it set up for 10 minutes, per the instructions. The fabric must be carefully positioned because you cannot move it again. I was surprised how easy it was to use an iron on low heat to remove any wrinkles. I switched the landing gear from tricycle gear to a tail-dragger with a dorsal fin. These two simple changes made this a sporty-looking model. The cost of refinishing the Jodel was approximately $150 and it was more time-consuming. Many years ago someone coined the phrase “variety is the spice of life.” In this refinishing case, it is the truth.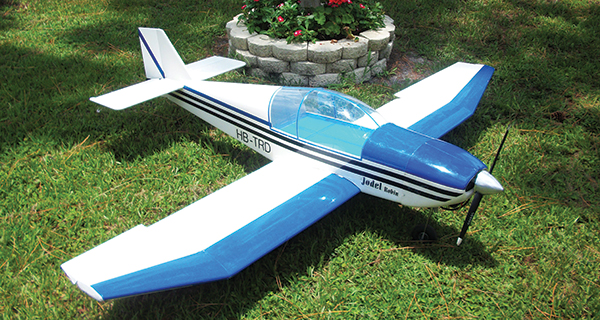
The Graupner Jodel Robin was also purchased at a swap meet.

Beyond refinishing the Jodel Robin, it was also modified from tricycle landing gear to a tail-dragger.



9 comments
Finishing EPO foam.
epo foam
Removing oil from balsa when refinishing.
help repairing turbo timber landing gear
re finishing models
RustOleum
Oil Removal when Refinishing
Fuel Proof
Fuel Proof
Add new comment