


Harlock RC Viper Jet 140
Written by Andrew Griffith An EDF or Turbine-Powered Sport Jet Product Review As seen in the November 2018 issue of Model Aviation
Bonus Video
Specifications
Model type: Sport scale turbine/EDF Skill level: Advanced Wingspan: 55.1 inches Wing area: 448 square inches Wing loading: 50 ounces per square foot Airfoil: Semisymmetrical Length: 49.2 inches Weight: 9 to 12 pounds Power system: 6S electric 90 mm EDF or 45-newton turbine Radio: Full-range eight-channel with eight micro servos Construction: Full-composite Airex and fiberglass Covering/finish: Painted-in-the-mold composite Price: $629.95Test-Model Details
Motor used: KingTech K-45v2 turbine Receiver battery used: LifeSource 2,200 mAh LiFe Turbine ECU battery: KingTech 3S LiFe 2,500 mAh battery Radio system: Spektrum DX20; AR9020 DSMX receiver; MKS HV-69 digital micro servos Ready-to-fly weight: 10 pounds dry; 12 pounds fully fueled Wing loading: 51 ounces per square foot Cube loading: 29 Flight duration: 8 minutesPluses
• Impressive construction usually found in larger, expensive models. • Optional retractable landing gear is drop-in fit. • Supports both electric and turbine power systems. • Slick-looking, flawless finish that’s highly visible in bright red or green.Minus
• Published CG seems nose-heavy.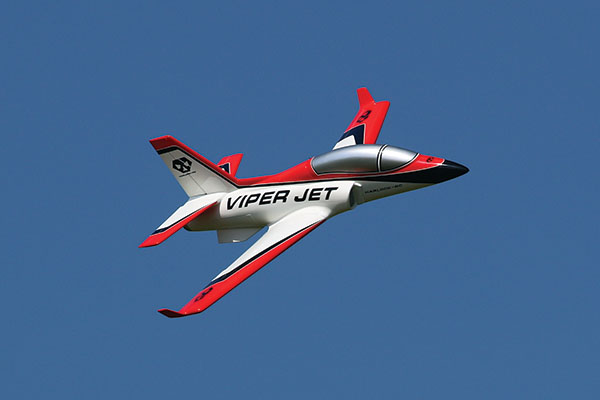
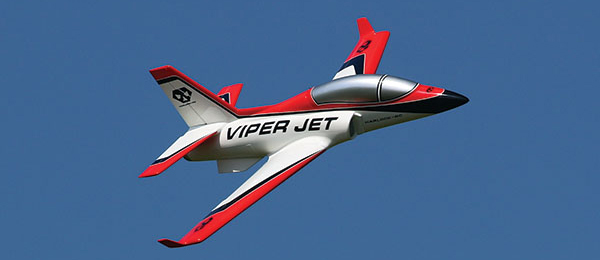
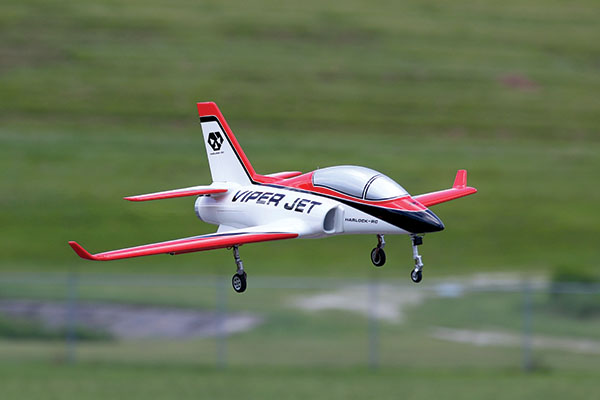
Doing what it does best, the Harlock-RC Viper Jet looks great performing a full-speed air show pass. Despite the short-coupled fuselage, the Viper felt locked in.
Product Review
I spoke with Model Aviation Editor-in-Chief Jay Smith not long after Florida Jets and we reached the conclusion that it’s been a while since Model Aviation had featured a review of a turbine jet. Having recently lost my longtime favorite turbine jet, I was looking for a replacement home for my KingTech K-45. After looking over the choices, I settled on and purchased the Harlock-RC Viper Jet 140. The Viper is a scale model of the Viper Aircraft Corporation’s homebuilt jet by the same name. The Viper Jet made its public debut at EAA AirVenture in Oshkosh, Wisconsin, in 2000. If you have $600,000 and change, and 3,500 hours on your hands, you can build your own! If you’re on a somewhat tighter budget, the Harlock-RC Viper Jet can be airborne in much less time and for a significantly smaller investment. I’ve flown Viper models from 3S foamies through large, turbine-powered models, and all of them have a couple of things in common. They look better than most sport jets (in my opinion), they all seem to fly well, and they all have good low-speed characteristics. The wide gear stance and comfortable flight envelope allow an aspiring fighter jock to fly a transitional scale model without worrying about the narrow gear track and higher wing loading found in many of the fighter-style models. The Harlock-RC Viper Jet is available in the US from JAG RC. The company also carries fans, ESCs, landing gear, and brakes, along with stocking a full line of spare parts. Because not every modeler has the desire or a waiver to fly a turbine, the Viper 140 can be equipped with an electric ducted-fan (EDF) power system utilizing a 90 mm fan and a 6S power system with plenty of room for larger cell-count setups. The model comes with carbon-fiber wing and stabilizer tubes and an EDF thrust tube. Because EDF-to-turbine conversions require sourcing a fuel tank and metal tailpipe, I was extremely pleased to see a turbine conversion kit offered by JAG RC. The conversion kit includes a fuel tank with all of the required hardware that is the proper size for the fuselage. A metal tail pipe and some additional support structure to mount the fuel tank are also supplied. I ordered the turbine conversion and the recommended landing gear and brakes. I’ve been around the hobby long enough that it takes a lot to impress me, but when I unpacked the Viper I had to step back and say wow! Not only did the Viper meet my expectations (which were high because I have friends who are already flying them), but it handily exceeded them. The high-gloss, painted-in-the-mold finish was flawless with the graphics preapplied and clear coated. I know people will want to do their own schemes. The website indicated that in addition to the great-looking stock schemes offered, custom schemes are available at an additional cost. The entire model appears extremely well built. Unlike several similar-size models on the market that have a fiberglass fuselage and built-up wings, everything on the Viper is composite—wings, tail, control surfaces. Two hatches are provided: one on the top for the radio system and flight battery access, and another on the bottom at the rear for turbine or fan/motor access. The surfaces are all hinged in the mold so there are no CA hinges in use, which will make for a solid control system.Assembly
I assembled the Viper with Zap thin and medium CA adhesive and Z-Poxy 15- and 30-minute epoxy. Metal-to-metal fasteners were secured using Z-42 threadlocker. These products are available from Frank Tiano Enterprises. Supplemental hardware, such as hex-head servo-mounting screws and bonded washers, was sourced from RTL Fasteners. Construction begins by mounting the wing servos to the servo covers with integrated servo mounts. The MKS 69HV micro servos are slightly larger than the cutouts, so each was opened slightly and the servos were mounted with RTL servo screws. The screw holes were threaded then treated with a drop of Zap thin CA adhesive to harden the threads. It is worth noting that the flap servos are mounted in opposition, as are the aileron servos, meaning you need to reverse one flap servo. This can be accomplished (in order of my preference) by a single channel per flap servo, a reversed or programmable servo, or an inline servo reverser. The Viper comes with a complete hardware package that is appropriate for the expected rigors of a high-performance jet. Carbon-fiber control horns are installed at the factory, and ball links are provided for the servo arm and control horn end of each pushrod. I dug into my RTL Fasteners kit to add washers on the outside of each ball link for ensurance.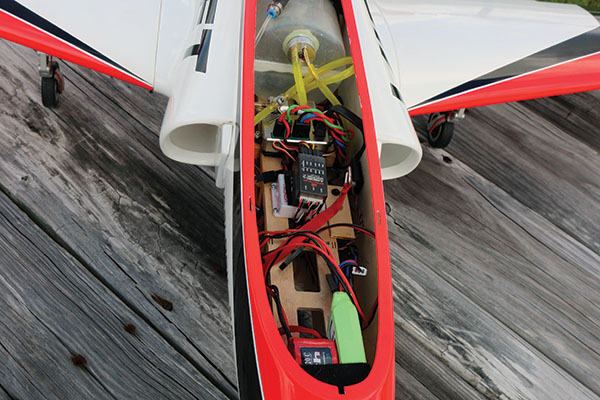
A lot goes on in a turbine that you don’t find in an EDF. From back to front, there is the optional fuel tank, KingTech turbine ECU, AR92020 receiver on top of the HSDgo landing gear controller, LifeSource receiver battery, and KingTech turbine battery, all operated by a pin/flag Booma RC switch.
In addition to the turbine conversion kit, I purchased the HSD landing gear option with electric brakes. AMA turbine operations require brakes, but even if I were building an EDF, I would probably opt for this gear set. It’s an excellent choice because they are nicely machined and drop right in with no tinkering.
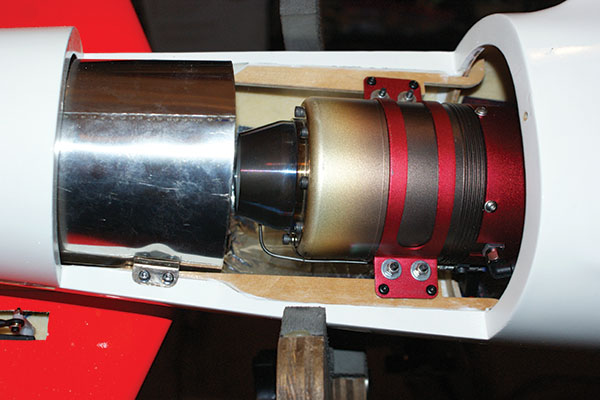
The KingTech K-45G2 turbine is a perfect fit in the Viper. The turbine conversion kit is as well, with its purchase price including a proper-fitting tail pipe and fuel tank.
The main landing gear was installed in the same manner as the servos and servo covers. Each hole was drilled with a pilot hole, prethreaded, the threads hardened with thin Zap CA, and everything was installed when the CA cured.
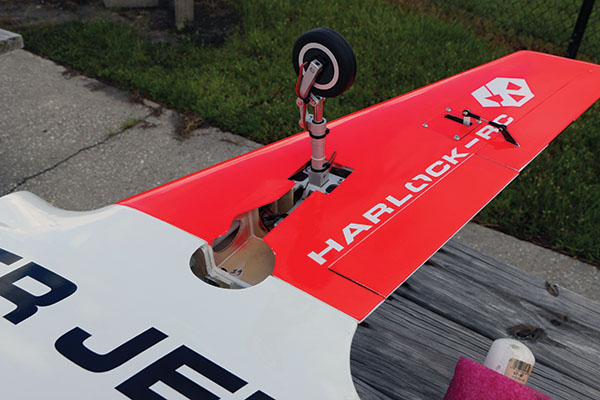
The HSDgo trailing link landing gear fit perfectly and is available with electric brakes. The oil-filled struts really smooth out the landings.
With the wing complete, the nose gear was installed in the fuselage. One of my biggest peeves is jets that have sloppy nose wheel steering. I have seen them rigged in any number of ways, including sliding pushrods and pull-pull cables. The HSD nose gear uses a micro servo mounted directly to the retraction mechanism using a short pushrod. More importantly, there is no slop. The rudder servo was installed in identical fashion as the wing servos. The elevators each get a servo mounted in the corresponding stabilizer. The ball link ends and short pushrod runs inspire confidence. Even with a turbine, we won’t have to worry about airplane-destroying control surface flutter. The same issue presents itself with the elevator servos as the flap servos—they need to be on their own channel or one needs to be reversed. Modern radios make this mostly a nonissue. The turbine installation is documented in a supplemental manual that was included with the conversion kit. Turbine operation really isn’t difficult, but it demands that you pay rigid attention to details. I added some aluminum duct tape around the turbine area to provide heat shielding for the fiberglass. The K-45 turbine was a drop-in fit and was installed using self-tapping screws with RTL Fasteners’ bonded washers. There is plenty of room in the rear hatch to work, no matter what power system you install. The tank is the perfect size for the Viper and should allow for 7- or 8-minute flights. Du-Bro medium Tygon fuel line was used to plumb the fuel tank and UAT (small air trap tank) with the KingTech-supplied fuel line running from the fuel pump to the motor. Turbines have come so far and all that is needed with this kerosene-start engine is a fuel connection and data connection at the engine. The fuel pump plugs into the turbine electronic control unit (ECU) as does the data cable from the engine. The ECU connects to the throttle channel and a plug-in, touch-screen, ground-support unit programs all of the features in the ECU, which controls the interaction between the radio, pump, and engine. A 3S LiFe battery powers the ECU and the starter motor, which also spins the turbine after shutting down, until it reaches its proper cutoff temperature. I was excited to receive a set of preproduction HV-69 micro servos from MKS USA. These are designed for small electric-powered 3D airplanes, helicopters, and jets that require a high-voltage servo with metal gears. With an HV radio installation, they provide 140 ounces of torque. These were used throughout the Viper and performed flawlessly. Radio installation consisted of installing a Spektrum AR9020 DSMX receiver. The 10-channel receiver allows individual channels for the elevator halves, each flap, and the nose wheel steering. Taildragger RC heavy-duty servo extensions were used throughout the project. I also ordered a KingTech telemetry unit so that I can receive telemetry data directly from the turbine’s ECU via a TM1000, although I had not received it as of the review flights. Custom programmable mixes were created to activate the brakes using down-elevator, starting at mid-stick progressively to full brakes at full down-elevator. Nose wheel steering was also accomplished by using a mix giving roughly 65% nose wheel steering at full rudder deflection. Both mixes were assigned to the gear switch so that they are disabled when the landing gear is retracted. Voice callouts for the landing gear, flap position, timer, and rate switch were also created. I didn’t know what I was missing until I had this feature. Wing installation requires a long, ball-tip hex wrench. I don’t find it easy to remove the wing halves but it sits comfortably in the back of my SUV, so I didn’t spend a lot of time trying to find the best way to remove and install them. The manual suggests placing the center of gravity (CG) 90 mm from the leading edge at the wing root. After speaking to a few Viper owners, I went with 95 mm. After flight testing I plan to slowly move it to 100 mm.
Flying
The Viper, on final approach with the gear down and flaps fully deployed, has no problems landing in the confines of a club field.
Despite making a lot of maiden flights at my club, I was feeling the jitters that only a jet or large warbird maiden flight can bring. After priming the turbine and going over a thorough preflight inspection, I fired up the powerplant and turned some kerosene into noise. With a few tweaks of the nose wheel steering and servo subtrim until it taxied straight, off I went to the end of the main runway to position and hold. Setting the flaps to takeoff, I tested the brakes one last time, took a deep breath, and slowly throttled up. The Viper quickly gathered speed and stayed straight as an arrow as it lifted off in 250 feet or so (roughly two-thirds of the runway). I cleaned it up by retracting the gear and raising flaps and settled in for a few trim passes. My initial impression was that the Viper was nose-heavy and needed some up-trim. After a few laps to settle my nerves, I got into a groove and starting testing control throws, exponential, and rates, and getting a feel for the power settings to apply in various flight regimes. Other than what I considered a conservative forward CG, the Viper was quite nimble. Rolls were crisp and stopped immediately when the stick was centered. In high rates, the rolls were quick, and the high-visibility scheme ensured that I knew which end was facing up. The K-45 turbine is a great match regarding power output, and there is plenty of vertical—so much so that the Viper can get small in a hurry! Much of my flying was done at half throttle with full throttle being applied only on uplines, loops, and takeoff. Oh, and what is the point of owning a jet without a wide-open, full-speed pass or two down the runway! Large loops tracked nice and straight, with corrections only required to account for a crosswind on test day. Inverted flight required some down-elevator induced by both the airfoil and the slightly forward CG, but it otherwise held the line nicely. I throttled back to explore the slow speed characteristics. The Viper bled off speed but remained stable. Half flaps indicated that a few points of up-elevator would be required to keep the elevator in trim, but otherwise it locked right in for a few low approaches. With the gear down and the flaps fully deployed, the Viper required roughly 40% throttle in level flight to prevent it from showing some stall buffet. On final approach, I let the Viper descend to the runway, fully chopping the power when it was approximately 50 feet from the end of the runway. The trailing link struts work well and the Viper touched down on the main landing gear. After the nose came down, I applied full down-elevator to activate the brakes. After rehydrating my dry mouth, I did a complete fastener and control system post-flight inspection. Finding no issues, I fueled it up and was flying again. Subsequent flights were used to fine-tune the exponential and control rates. I also added a touch of aileron differential to get rid of a little wobble during fast rolls. The CG was comfortable at 100 mm back, with maybe enough room to try moving it a little farther as I become more comfortable.
Conclusion
The Viper makes a great jet project. It allows me to have a turbine jet that I consider to be a weekday flier. It can go in my truck fully assembled and at the field, it’s in the air quickly without the fuss that goes with assembling and prepping a large jet model. The Viper is equally at home with a 90 mm EDF setup. From what I have been told, it will have similar performance albeit with roughly half the flight time as a fuel version. Performance has been everything I had hoped and more. I’m looking forward to getting in a lot of flights on my new Viper!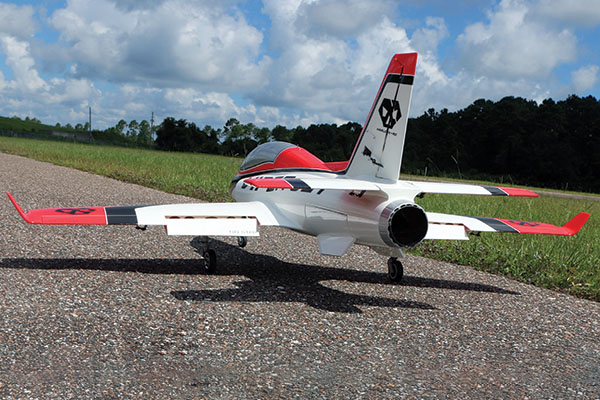
The flaps are hinged in the mold and extend enough to slow the Viper for gentle landings.
—Andrew Griffith [email protected]
Manufacturer/Distributor:
JAG RC, LLC [email protected] www.jag-rc.com Harlock-RC [email protected] www.harlock-rc.comSources:
KingTech Turbines (626) 793-4677 www.kingtechturbines.com RTL Fasteners (800) 239-6010 www.rtlfasteners.com Du-Bro (800) 848-9411 www.dubro.com Spektrum RC (800) 338-4639 www.spektrumrc.com MKS Servos (832) 287-2371 www.mksservosusa.com Taildragger RC (270) 749-5814 www.taildraggerrc.com LifeSource Batteries (800) 637-4989 www.towerhobbies.com Zap Adhesives (863) 607-6611 www.franktiano.com HSDgo www.hsdgo.com Booma RC www.boomarc.com/enThis Month's Issue

Join the AMA
![]()


Add new comment