


Horizon Hobby Hangar 9 Ultra Stick 30cc ARF

Written by Andrew Griffith Fun to fly from land or water Product review As seen in the May 2017 issue of Model Aviation.
Bonus video
Specifications
Model type: Sport Skill level: Intermediate Wingspan: 80.75 inches Wing area: 1,360 square inches Wing loading: 22.02 ounces per square foot Wing cube loading: 7.4 Airfoil: Symmetrical Length: 74 inches Weight: 12 to 14 pounds Power system: 30cc gas or Power 160 electric Radio: Full-range eight-channel minimum Construction: Built-up balsa and light plywood Covering/finish: UltraCote and paint Street price: $299.99Test-Model Details
Motor/engine used: Evolution 33cc two-cycle gas Receiver battery: Two Spektrum 2,000 mAh 2S LiFe receiver batteries (radio and ignition) Propeller: 18 x 8 Xoar wood (wheels); 18 x 8 Falcon Carbon (floats) Radio system: Spektrum DX18G2; AR9350 receiver; eight Spektrum A6180 digital servos Ready-to-fly weight: 13 pounds, 8 ounces Flight duration: 20 minutesPluses
• New take on a popular design, with a striking new color scheme. • Enlarged and double-beveled control surfaces for extreme flying. • Supports a variety of fuel- and electric-based power systems. • Hard points installed so you can add the optional 1/5-scale float kit for even more operational flexibility.Minus
• None of the advanced programming for crow and full-span ailerons is documented in the manual.Product review
When I heard that Hangar 9 was releasing another Stick model, I will admit my initial reaction was, “Another Stick?” My interest level increased when I saw the release show up on the company’s social media feed and I noted that the new design supported a number of power systems, including gas and electric. However, when I saw one at AMA Expo West in Ontario, California, I knew that I was destined to own one. The large control surfaces, optional float kit, and striking color scheme had me at hello. On the gas side, the Ultra Stick is designed for the popular 30cc-class power systems. These airframes feature big airplane flying qualities in a modest size that offers affordable components and airframes that fit in a wide range of vehicles. I elected to run an Evolution 33cc two-cycle gas engine on the review model. I have several of these engines in use and they have proven to be strong and reliable after they’re broken in. Lacking an engine cowling offers several advantages. If you’re new to gas power, you won’t have to deal with cooling issues. The exposed choke and needles are easy to operate and adjust. The lack of a cowl will also make engine selection easier for those who want to experiment. If electric power is your preference, an E-flite Power 160 brushless motor that uses a pair of 5S batteries in series is available. The large hatch provides easy battery access. Swinging an 18-inch propeller, this setup should be plenty spirited if you plan to go with electric power. A quick kit inspection reveals several enticing features. The two-piece wing is equipped with both large ailerons and flaps. Each surface is double beveled for maximum throw. The programming capabilities of modern radios such as my DX18 allow a plethora of programming options, including traditional flaps, full-span ailerons, and crow or airbrake mixing (ailerons up and flaps deployed down).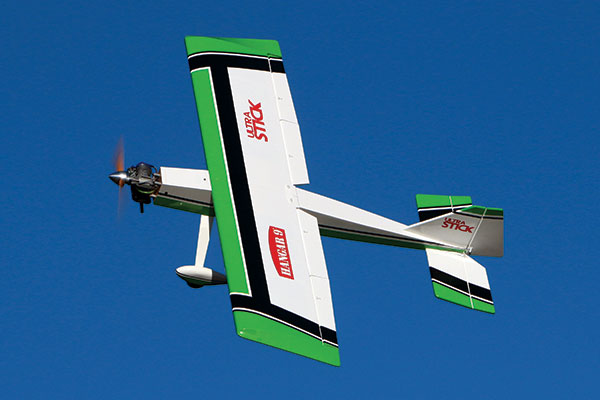
The double-beveled flaps allow a number of programming options, including crow and coupling down flaps with up-elevator for tight flips. As shown here, when high rates are activated, the flaps coordinate with the ailerons to produce a thrilling roll rate.
Unlike many Stick designs, the Hangar 9 Ultra Stick is configured as a tail-dragger instead of the traditional tricycle landing gear arrangement. While on the subject of the landing gear, the main wheels are hidden beneath a set of fiberglass wheel pants that are painted to perfectly match the bright green and white UltraCote covering.
Construction
The Ultra Stick arrived well packaged and after I opened everything, I sat down to spend some quality time with the manual. The manual is comprehensive, well written, and multilingual. It includes clear photographs and diagrams. Center of gravity (CG) and control throws, as well as support and spare parts information are all clearly documented. Although the Hangar 9 Ultra Stick is designed for sport flying, make no mistake—this is a Giant Scale aircraft and for your sake and that of others, it should be carefully assembled using techniques appropriate for this size model. I assembled the Ultra Stick using Zap thin and medium CA adhesive, Pacer Z-Poxy, and Pacer Z-42 threadlocker, all of which are available through Frank Tiano Enterprises. I spent some time with a covering iron and heat gun to get the wrinkles out of all of the surfaces. It’s a large model, so it took a fair amount of time to get everything looking good, but it was well worth the effort. To save time later, before I started the wings I wanted to do a little additional fuelproofing. I mixed up a batch of Z-Poxy finishing resin and treated the outside firewall and the interior bay where the fuel tank is installed. While the resin dried, I started on the wing.
Ample room behind the firewall is provided for the fuel tank and the throttle pushrod is routed across the right side of the fuselage. Electric fliers will enjoy a nice laser-cut battery mounting plate that replaces the fuel tank. The large hatch gives excellent access to change the flight batteries.
The assembly sequence begins by installing the flaps and ailerons and their respective servos. The surfaces are hinged with CA-style hinges and the wing and surfaces are slotted. Carefully follow the instructions and don’t skip the step of drilling center holes in the hinge slots to allow the CA glue to completely saturate the hinges. Use T-pins to keep the hinges centered until they are in place and you’re ready to apply thin CA adhesive. I will be using a 2S LiFe receiver power system and Spektrum A6180 metal gear digital servos. Pull strings are provided to route the servo extensions to openings in the middle of the wing. Heat-shrink material used on the servo extension connections ensure that they stay connected to the servos inside of the wing. The servos are mounted to their access hatches using the provided screws. Spektrum has answered the wishes of modelers and provided hex-head bolts and star washers for the servo arm screw, as well has hex-head wood screws for mounting the servos. Take the time to harden all of the threads with thin CA glue where a wood screw is used. A stout aluminum joiner tube is used to join the wing halves. They mount with alignment dowels on the leading edge and a pair of 1/4 x 20 nylon wing bolts at the trailing edge. With the wing bolted in place, the horizontal stabilizer is fitted and measured for proper alignment. I use a soldering iron with an old tip to remove the covering from the gluing area. This removes the covering without cutting into it and potentially weakening the wood and it seals the edge of the covering at the same time.
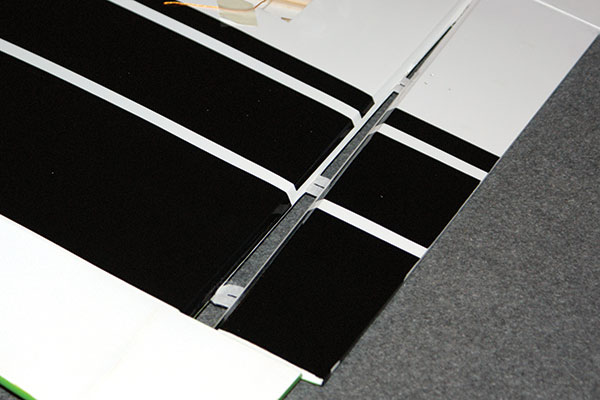
CA hinges are used throughout the control surface installation. Thin CA glue was used to install the hinges.
I have built many models that require some sanding and shimming of the horizontal stabilizer to get it level with the wing, but the Ultra Stick was right on. It was simply a matter of cutting the covering and gluing the stabilizer in place. The horizontal and vertical stabilizers were installed using 30-minute Z-Poxy, and the excess glue cleaned up with alcohol-soaked paper towels. The elevators were installed using CA hinges in the same manner as the flaps and ailerons. If you’re using a heavier-than-recommended engine, the elevator servos can be installed in the rear of the fuselage. Mine were installed in the servo tray under the wing, but both installations are documented in the manual and cutouts are provided for moving the servos to the tail. The tail wheel was glued to the rudder using 30-minute Z-Poxy after roughing up the shiny wire with 80-grit sandpaper. The rudder was hinged with CA hinges as before. The dual elevator servos and the rudder servo were installed in the fuselage using the supplied hardware. After binding the receiver and centering all of the servos, I installed the pushrods. When all of the pushrods were properly sized, the jam nuts were installed with a drop of Z-42 threadlocker. The aluminum landing gear is painted white to match the color scheme, and the painted fiberglass wheel pants complete the installation. The landing gear mounting bolts and all of the setscrews in the wheel collars were tightened and finished with a drop of blue Z-42 threadlocker. With the Ultra Stick on its wheels, it was time to install the engine. A drilling template is included for the supported motor installations, and the Evolution 33 markings even show you where to drill the hole for the throttle pushrod. With the engine bolted in place, the optional Evolution Pitts-style muffler was attached. Hangar 9 recommends the pointy-style spinner used on the SR-22, but I went with a more classic-looking P-51-style spinner. If you do this, you also need to purchase a separate spinner adapter. The SR-22 spinner includes an adapter. Either way, a polished aluminum spinner looks great on the Ultra Stick. The fuel system was plumbed using Du-Bro Tygon fuel line. The fuel tank was assembled with the included fuel clunk and I added a second clunk to the fill line to facilitate complete defueling at the end of the flying day. The fuel lines were secured with small zip ties to keep everything from slipping off. A Hangar 9 fuel filler and overflow set completed the fuel line installation and the black fuel dot blended into the black-trimmed color scheme. I finished the assembly by installing the ignition. Because I will be running a telemetry receiver, an rpm sensor was installed as shown in the engine instructions. I always recommend and encourage the use of a kill switch on a gas engine, so I installed an Evolution optical kill switch so that the ignition can be cut from the transmitter. This will kill the engine at the flick of a switch or in the case of a lost signal, lost receiver power, or a mechanical failure of the throttle servo or linkage.

This nice, laser-etched engine mounting template is provided so that engine mounting holes can be located on the firewall for the various engines that product developers recommend.
I set the control throws per the manual’s recommendations using a Hangar 9 control throw meter. Curiously, although the information is relatively easy to find elsewhere, the programming steps for things such as crow and full-span ailerons isn’t present in the Ultra Stick manual. The CG was set according to the manual’s specifications. My DX18 radio was programmed for normal flight mode as well as air brake mixing (ailerons up and flaps down), along with coupling the ailerons to the flaps for full-span ailerons in high rate. The Ultra Stick’s total build time was approximately nine hours, including cleaning up the covering.
Wheel Flying
The Ultra Stick will be getting floats, but with a gas engine installed, I find it easier to break in the engine with the airplane on wheels, if possible. In this case, it was not only possible, but I suspected it would be quite fun. It’s also easier to walk out in the field to retrieve a dead-stick landing than to row out to retrieve it from a lake. The Ultra Stick was fueled using my RC Fueling Systems gas can that was filled with ethanol-free pump gas and 40:1 Red Line racing oil. The engine popped quickly with the choke on, and with the choke off, it was running with the bump of a starter. After a few needle tweaks, it was time to fly! The Ultra Stick can taxi comfortably on either paved or grass runways. With a bit of right rudder, I slowly added power and the Ultra Stick was flying before it rolled 20 feet. A few clicks of up-trim and a click or two of right had the model flying hands off. I flew a few easy tanks through at a comfortable height just to get some gas through the engine. During the break-in, I checked the airplane’s low-speed handling. The wide wing chord and thick, fully symmetrical airfoil make for an extremely docile-flying aircraft. Stalls are a nonevent, into even the slightest wind, when flying level at idle and full up-elevator. The Ultra Stick will fall straight down while remaining level. With the flaps down and the nose up and a tiny bit of throttle, the airplane will nearly stop in midair. With my confidence in the engine building, it was time to throw the Ultra Stick around a bit. I first tried hovering. In high rate, the control surface area is plenty to maintain a hover and perform torque rolls. Full-speed, high-rate rolls showed some wobble, but I’m sure some experimentation with aileron differential will cure that. With the flaps engaged as ailerons, the roll rate increases substantially. Stops are good in point rolls and were very crisp when the AS3X was enabled. The rudder is highly effective and stall turns and rolling harriers required me to take some throw out of the rudder. Knife-edge pulls slightly to the gear and exhibits some opposite roll depending on the speed, although I suspect this might be corrected by adjusting the CG. Manufacturers nearly always recommend a safe, but slightly forward, CG for initial flights. Crow—where the ailerons deflect upward as the flaps are fully extended downward—is fun to play with. With crow on, you can land with almost zero rollout. I could also dive the Ultra Stick straight down without building up much speed, aim for the big X at the end of my club’s runway, pull into a hard flare, and land in only a few feet.Float Conversion
Life in Florida means there is water nearly everywhere you turn, so it is only natural that I would become addicted to float flying. I have everything from a UMX to a 1/4-scale gas model on floats, and was delighted to find out that my review kit included a 1/5-scale float kit. The floats are constructed of laser-cut balsa and light plywood that’s reinforced with fiberglass on the bottom front and covered in silver UltraCote. Although they are made for the small Carbon Cub, the floats can be adapted to the Ultra Stick by purchasing the strut kit (HAN236519), as well as a pair of water rudder servos and some servo extensions. The Ultra Stick has hard points with blind nuts built into the fuselage to attach the float mounts. The floats should be assembled by keeping the hardware loosely tightened until everything is squared up. When the alignment looks right, the fasteners can be tightened one at a time, making sure everything stays square. As with the pushrods, the jam nuts should all be treated with a drop of Z-42 threadlocker. Clear packing tape or clear silicon should be used to waterproof the hatches and pushrod exits, as well as where the crossbraces enter the floats. Note that while the floats come with dual water rudders, I only had one servo that fit the cutout and was capable of high voltage. Previous experience told me that one water rudder would be more than sufficient, so I went with what I had. The floats add slightly less than 4 pounds of weight, but I was surprised to see that after the floats were installed, the CG hadn’t changed and no weight was required in the floats to balance the model. My experience with many float installations has been that all required lead and epoxy in the nose of the floats. The floats took roughly 2.5 hours to assemble and mate with the Ultra Stick. Approximately 15 minutes is required to switch between conventional landing gear and floats. Water spray quickly tears up wooden propellers, so I removed the Xoar wooden propeller and installed a carbon-fiber 18 x 8 Falcon propeller.Float Flying
I am fortunate to have a 3,000 x 500-foot pond available for flying larger, float-equipped models. The first day that I arrived to test-fly the Ultra Stick on floats was windy, so I enabled the AS3X functionality on the AR9350 receiver. With the flaps lowered to half, I pointed the Ultra Stick into the wind and smoothly advanced the throttle. The airplane quickly got up on step despite the relatively rough water and lifted off smoothly. Despite a fairly breezy day, the AS3X kept things nice and stable. The trim was pretty close to the flight trim with the wheels on, but I needed a few more clicks of up-elevator.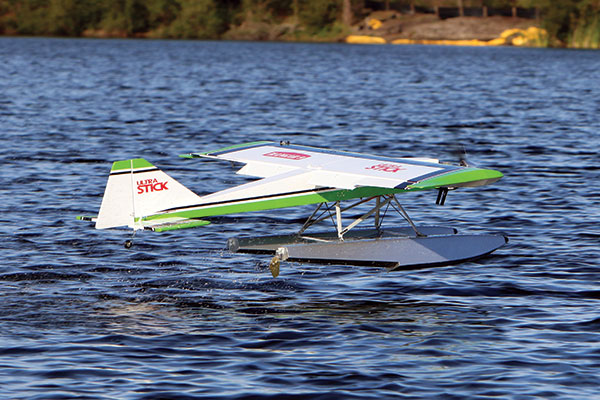
Despite the wind, the integrated AS3X gyro allowed the author to bring the Ultra Stick in level for a perfect water touchdown.
The Ultra Stick is fun to fly with the floats on, but with the additional weight and the fact that everything was happening over water, I was much more sedate in my flying style. Loops, rolls, and stall turns all worked well and looked great. I didn’t try anything crazy though. What the Ultra Stick does excel at is touch-and-go water landings. The extra weight seemed to have almost no effect on the landing speed. With the flaps deployed either fully or at half, the Ultra Stick approaches the water at slow speed. As the throttle is decreased, the steps will kiss the water and the airplane will settle right in. Landing properly in water is being able to properly set up the attitude of the airplane. You want only enough flare to keep the tips of the floats out of the water; too much will make the back hit first and set up a skipping that almost always ends in a boat trip.
Conclusion
Why are there so many Stick designs? Because they fly well! If you’ve flown a Stick and you asked me how the Ultra Stick flew, and I replied, “It flies like a Stick,” you would know exactly what I meant. That said, the Giant Scale size, larger control surfaces, flexibility in power system choice, and being float ready, set the Hangar 9 Ultra Stick apart. Throw in the striking and highly visible color scheme, and I suspect I’ll be seeing quite a few of these at our field and at events this year. If you don’t know how a Stick flies, picture an airplane that makes you grin every time you fly it. It’s at home doing most aerobatic maneuvers, as well as slow touch-and-go landings. Its simple construction and lack of a cowl would make this an ideal first gas airplane. If you want to see this one in person, look for me at the float pond during Joe Nall Week! —Andrew Griffith [email protected]Manufacturer/Distributor:
Horizon Hobby (800) 338-4639 www.horizonhobby.com Hangar 9 (888) 959-2305 www.hangar-9.comSources:
Spektrum (800) 338-4639 www.spektrumrc.com Du-Bro (800) 848-9411 www.dubro.com Frank Tiano Enterprises/Zap www.franktiano.comThis Month's Issue

Join the AMA
![]()


3 comments
Engine placement on the UltraStick
Engine mounting
ultra stick 30 cc
Add new comment