Written by Tony Stillman
Horizon Hobby Hangar 9 CubCrafters XCub 60cc ARF
As seen in the FEBRUARY 2020 issue of Model Aviation.
Bonus Video
Other Remote Video URL
Pluses
Well designed with excellent detail.
Quality hardware included.
Nice aluminum struts.
Detailed interior.
Easy assembly.
Minus
Articulating landing gear must be purchased separately.
Manufacturer/DistributorHorizon Hobby/Hangar 9
(800) 338-4639
www.horizonhobby.comI RECEIVED WORD that Model Aviation Executive Editor Jay Smith wanted me to review this airplane for the magazine. Hey, everybody loves a Cub, right?
When I received the Hangar 9 CubCrafters XCub, I was impressed with its size and the pretty lines and color scheme! This is not just another Cub! In fact, this is an officially licensed XCub with cool, tundra-style tires that is designed for great Short Takeoff & Landing (STOL) performance.
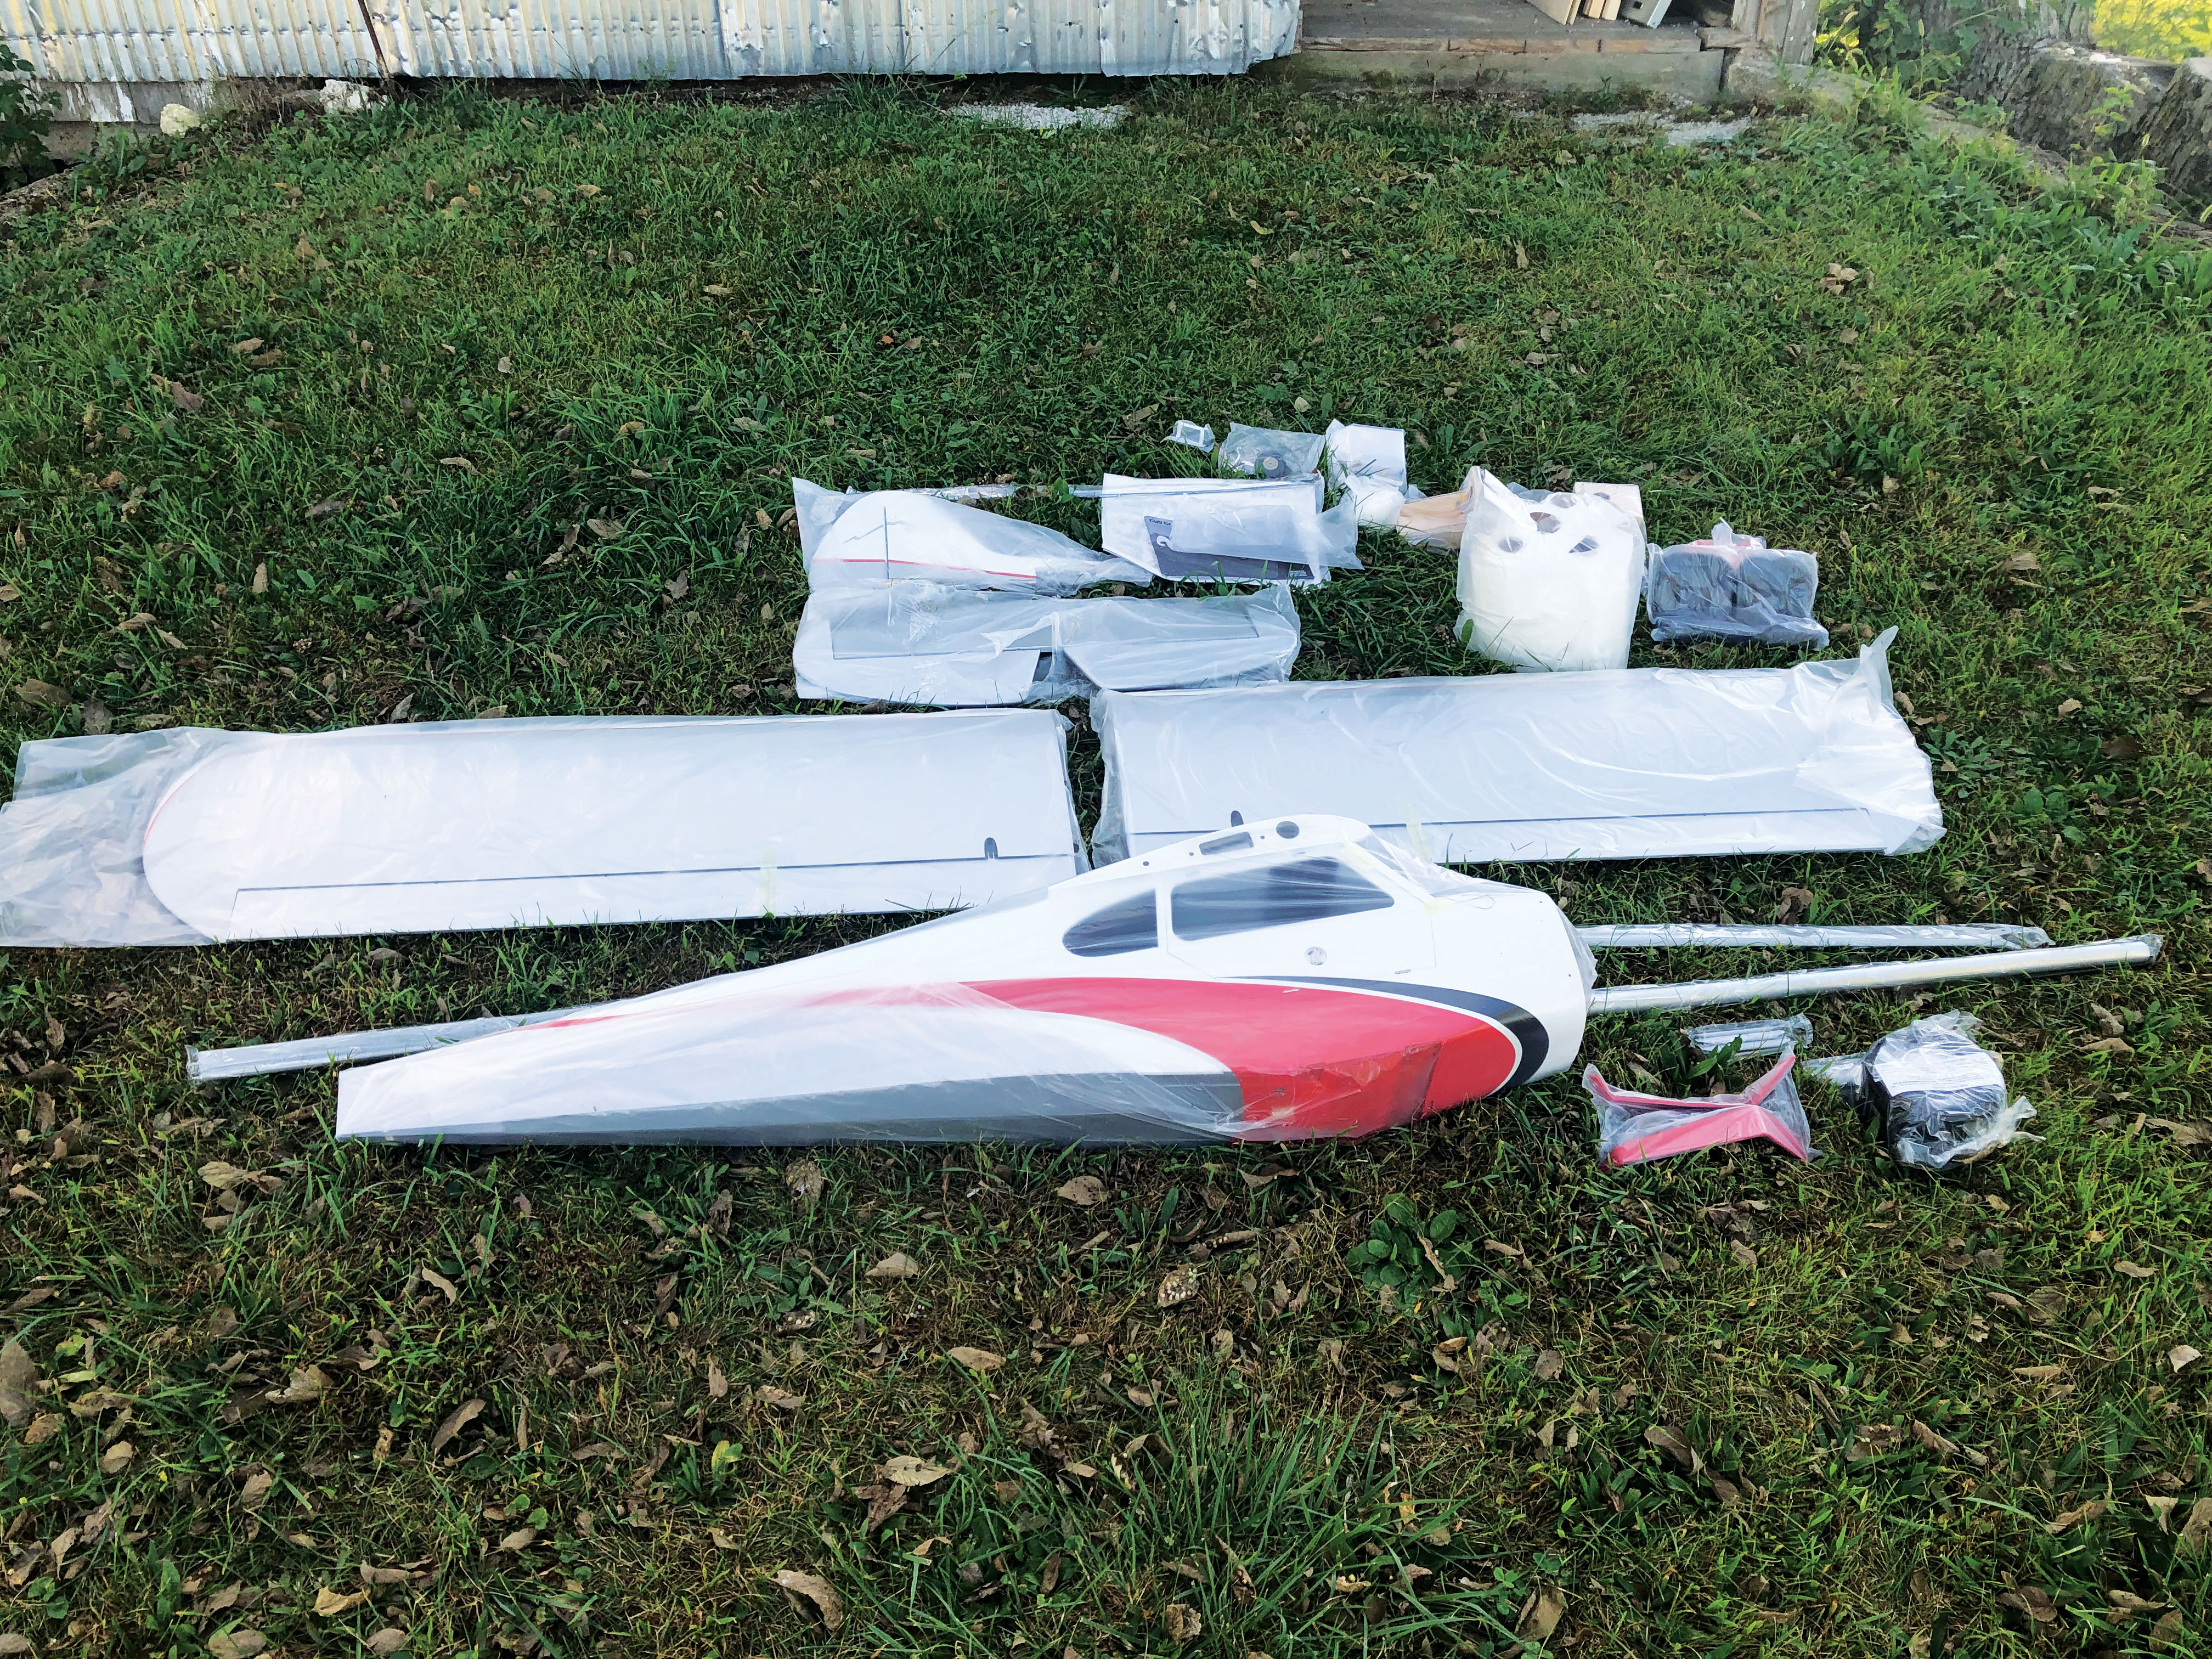
Upon opening the box, it was apparent that this is a really big airplane! It is actually 1/3.5 scale. In order to lay out all the items for pictures for this review, I had to take it outside of my building shop. There is not enough open space in my shop for all of these big pieces!
Each component was individually bagged and carefully placed in the box to eliminate shipping damage. The kit box was inside a heavy cardboard shipping box to reduce damage.
I started by unwrapping the items and inspecting them for damage. All of the parts checked out great with no damage and little need to reshrink covering … just a few spots in the corners. After verifying that all of the items were included, it was time to assemble this model!
The instruction book is large, but it is in multiple languages, so you are only using roughly a quarter of the manual. It includes the recommended items you will need depending on whether you choose to power it with gas or electric. My airplane was supplied with an Evolution 62GX engine, so gas was my choice! I prefer gas on my larger aircraft.
I suggest that you plan what you are going to need for your airplane. Because I was using a gasoline engine, I ordered a propeller, an optical ignition kill switch, and made sure that I had all of the recommended glues and adhesives on hand.
Image
The XCub is capable of more aerobatic qualities than an average Cub. The airplane tracks well, rolls nicely, and turns without using coordinated rudder. In fact, it flies much like an aerobatic model!
Image
The kit contents as they come out of the box—this is one big airplane!
I used a Spektrum 2S 4,000 mAh LiPo battery receiver pack and a 2S 2,700 mAh LiPo battery pack for the ignition. If you are using electric power, make sure that you have the motor and other extra items that you need.
You will need some extensions for the aileron and flap servos. These are noted in the manual, so you can check your stock, or order what you need. You might also need some nose weight. I added the recommended 1.5 pounds of lead to the nose to balance the aircraft.
In reading ahead in the manual before starting the build (you do that, don’t you?), I found that the XCub offers an optional set of sprung landing gear. The stock gear would work fine, but after looking at these, I had to get them. They are only $59.99. Believe me, you will want these!
Assembly
The manual starts with epoxying the fiberglass control horns into the slots in the ailerons, rudder, and elevator halves. Remove some paint from the horns where the glue will be applied before assembly.
The aileron servos mount on prebuilt trays that screw into the wing. Install the long extensions on the aileron servos then install the correct length heavy-duty servo arm, being sure to first center the servo with your transmitter. After you screw these plates in place, add the control horns to complete the step.
Now move on to the flaps. The flap horn is internal in the leading edge of the flap, so you install the servos onto the mounts, again being sure to set the flap servo arm properly with your radio before final assembly.
Add the flap pushrod and verify proper operation. The flaps and ailerons were already prehinged at the factory to reduce your building time! Add the flap pushrod cover on the top of each wing half then mount the lenses to the landing lights on each wing half using canopy glue. Set the assembly aside to cure.
Now move on to the landing gear. Because I purchased the optional sprung undercarriage landing gear, I followed those assembly instructions. The supplied wheels have a great-looking metal hub.
Installing the wing struts requires installing the wing on the fuselage then attaching all of the strut mounting components and strut fairings on the wing and fuselage. Quite a few steps are involved, but the process is straightforward.
Make sure that you use the correct bolts and locknuts where required because several sizes are included in the kit. After the struts are installed, you only have four 2.5 mm bolts to unscrew from the bottom of the airplane to remove the wing struts.
Assembly and disassembly take approximately 10 minutes at the field.
With the wing on the fuselage, it’s time to install the horizontal stabilizer. Slip it into place and mark the stabilizer where it exits the fuselage on both sides, top and bottom, so that you can remove the UltraCote, giving the epoxy something to grab onto.
Use a heat iron to reattach the UltraCote to the stabilizer. This will keep the film from hanging onto the fuselage when you slide it in to glue it permanently. Carefully check the alignment of the stabilizer to the wing. Using a ruler, ensure that it is square to the fuselage and parallel to the wing.
Next comes assembling the fin to the fuselage. Test-fit the fin and mark where to remove the film and reattach it. Do a final test-fit, ensuring that all is square with the stabilizer and wing before you epoxy it in place.
Hinging the elevators and rudder is standard procedure, but if you have not used this type of hinges, follow the instructions closely and you will do a fine job. Don’t forget about the navigation light in the rudder. Make sure you test-fit the light before installing the hinges on the rudder.
My kit required me to slightly enlarge the hole for the light. Check yours then install the light into the rudder and set it aside. Let it cure before hinging the rudder. After the glue has set, you can move on to the radio installation.
The two elevator servos, along with the single rudder servo, are installed on the bottom of the fuselage under a hatch. Install the grommets in the servos and mount them according to the instructions.
The receiver also mounts in this area. The radio switch has several options. You can mount it on either side of the airplane using the precut mounts, or it can be installed inside the cockpit between the seats. This way you can open the door on the airplane to operate the switches and you won’t see anything on the outside of the aircraft. With the servos, receiver, and switch installed, it’s time to assemble the pushrods.
Hangar 9 supplies some nice hardware with this kit, including ball links on all of the pushrods and the pull-pull rudder. This yields solid control with no slop. It’s nice to not have to replace poor hardware!
For the rudder, assemble the ball links to the provided threaded studs and attach them to the control horns on the rudder and on the servo arm. It’s important for the arm to be the recommended length for proper geometry. Otherwise, you will have issues with the cable becoming loose or tight when you move the servo.
After the ball links are installed, run the steel cable through the tubes and attach to each ball link end. I recommend that you turn the radio and receiver on, powering the servo at neutral while you pull the cables tight. Make sure you have some adjustment left in the ball links to tighten the cables if necessary. Using crimping pliers, firmly crimp the sleeves. Check your work and make any needed adjustment in the cables.
For the elevators, assemble one ball link onto the provided threaded rod and slide it into place from the servo end. Connect the ball link to the servo horn then thread the other ball link onto the elevator end. Slip the elevator horn onto the servo, ensuring that it is at neutral. Again, with the radio on, adjust the elevator ball link so the elevator is at neutral. Do this for both elevators.
With the rudder and elevators done, it’s time to install the tail wheel. Follow the instructions and attach the spring as shown to allow the tail wheel to absorb shock while taxiing and landing.
While still working at the back of the model, install the tail bracing using the steel cable and clevises. Crimp the sleeves using crimping pliers.
Horizon Hobby supplies motor mounts for both gas and electric powerplants, so simply follow the instructions to build up your mount for your specific type. The mount includes a built-in fuel tank mount or a battery mount, depending on what your setup is. After you complete the installation, the motor mount assembly bolts into the airplane with four bolts and blind nuts.
If you are installing a gasoline engine, add the throttle servo, pushrod, and the choke pushrod. You can install a choke servo if you like. Horizon Hobby designed the airplane so that the choke pushrod can come through the instrument panel, and you can easily access it through the airplane’s door.
Final touches include installing the supplied seats and windows. After that is completed, install the cowl and attach the spinner to your choice of propeller. Make sure that you have everything tight and use Loctite where recommended.
Image
Here are the elevator and rudder servos, along with the Spektrum AR12310T receiver. These are nicely tucked away under a panel on the bottom of the fuselage behind the cockpit area.
Image
Note the aluminum wing struts! They are a nice touch and are functional.
Image
The wing is attached to the fuselage with four 1/4-inch nylon screws. Access is through the removable hatch on the top of the fuselage, making installing it quick and easy.
Because this is a big airplane, many of you might want to use it as a glider tug. Horizon Hobby included the fittings that are needed to rig the model for that task, including a towhook. If you use this option, simply follow the instructions. Make sure you have the extra servo needed to operate it!
Finally, install the scale antenna mast and decals to complete the model. Make sure you check the center of gravity and all of the connections before your test flight. Follow the recommended control throws, especially for the first flights.
Flying
I followed the manufacturer’s recommendations for breaking in the Evolution 62GX engine, so it was ready to go when I installed it. I knew I would be test-flying the airplane late in the year, so I was looking for a good weather window in which to fly. I found an opening in early November when the temperature was in the mid-50s with mild wind.
After fueling the XCub, I rechecked all of the controls then fired up the Evolution 62GX. With it running reliably, I set a nice, low idle and started my taxi. The tail wheel works well, and the nice, wide landing gear stance made taxiing easy. I turned into the wind and applied power. The XCub jumped off the ground in approximately 30 feet! I was slightly surprised at how quickly it got into the air, but it is designed as a STOL model!
I quickly powered back to roughly half power then put in a little trim. I found later that the right flap was down a bit, which caused the need for the trim. I corrected that on subsequent flights and removed nearly all of the trim.
What can I say? It flies like a Cub, but with more aerobatic qualities than an average Cub! The airplane tracks well, rolls nicely, and turns without using coordinated rudder. In fact, it flies much like an aerobatic model! Rudder is positive, and knife-edge flight is quite easy. Loops are nice and round, and inverted flight only requires a touch of down-elevator.
I made several low-speed passes for pictures and videos, and the model is steady. Unfortunately, the engine quit at the bottom of a loop on the test flight, so I set up for an unscheduled landing. The aircraft was predictable and showed no bad habits as I landed a little farther away than I had planned.
Conclusion
In closing, this is a fantastic model! I have nothing but praise for Hangar 9 and Horizon Hobby’s effort to bring this latest evolution of the Cub family to the RC market. It was fun to build, and it is a great-flying airplane. I have not always been a Cub fan, but this one has changed my mind!
I am looking forward to spring and the opportunity to make many more flights on the Horizon Hobby Hangar 9 CubCrafters XCub 60cc ARF. I suggest that you get yours right away and be the first one at the field with it! It will attract lots of attention!
Image
The Hangar 9 CubCrafters XCub is finished in an authentic trim scheme with scale detailing that makes this model stand out.
Written by Greg Gimlick Start down the RC path in style Product Review As seen in the May 2018 issue of Model Aviation. The Carbon Cub S+ is capable of being flown by people with varying skill levels
Horizon Hobby E-flite Carbon-Z Cub SS 2.1m BNF Basic With AS3X and SAFE Select Written by Jay Smith Review As seen in the April 2020 issue of Model Aviation. Bonus Video At a Glance Specifications


Comments
Add new comment