


FlightLineRC Spitfire Mk.IX
Written by Greg Gimlick Fly the famous fighter Product review Photos by the author As seen in the November 2016 issue of Model Aviation.
Specifications
Model type: Sport scale warbird, PNP version Skill level: Intermediate pilot Wingspan: 47 inches Wing area: 394 square inches Airfoil: Semisymmetrical Length: 42.7 inches Weight: 49.4 ounces (airframe only) Power system: 3748-580 Kv brushless outrunner motor (installed); 60-amp brushless ESC (installed); 4S 2,500 to 4,000 mAh LiPo battery (required); 12 x 7 four-blade propeller (included) Radio: Nine-gram standard servo with 550mm lead: left and right aileron (installed); nine-gram reverse servo with 300mm lead: left flap (installed); nine-gram standard servo with 300mm lead: right flap (installed); nine-gram metal gear standard servo with 300mm lead: rudder, elevator (installed) Needed to complete: Six-plus-channel transmitter and receiver; 4S 2,500 to 4,000 mAh LiPo flight battery Construction: EPO foam Street price: $199.99Test-model details
Power system: 3748-580 Kv brushless outrunner motor (preinstalled); 60-amp brushless ESC (preinstalled) Battery: Zippy Compact 4S 4,000 mAh LiPo Propeller: 12 x 7 four-blade (included) Radio system: Spektrum DX9 transmitter; Spektrum AR6210 DSMX receiver; preinstalled servos Ready-to-fly weight: 66 ounces Wing loading: 24 ounces per square foot with 4,000 mAh battery Flight duration: 6 to 7 minutesPluses
• Electric retracts with metal trunions, metal reinforcement plate, and 4mm steel struts. • Easy construction; takes less than 2 hours. • Easily removable wing with four bolts. • Large battery compartment. • Cooling provided through spinner and firewall. • Decal options for two schemes. • Excellent finish on the foam. • Innovative propeller hub/spinner design.Minus
• CG recommendation in manual differs from distributor’s recommendation. • Some of the small decals stuck to carrier sheet.Bonus video
Product review
I have to admit, my first impression was how well packaged the pieces of the FlightLineRC Spitfire Mk.IX were for shipping. It’s nice to have a kit arrive without damage or marks from the shipping process. My next impression was how nice the finish on the foam was. I’ve opened some models in the past that looked like a cheap foam ice chest, but not this one! All of the pieces were wrapped in plastic and the parts bags were labeled. I hadn’t even started assembling the Spitfire and I was hearing airplane noises.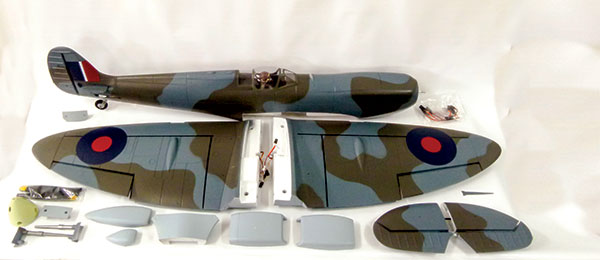
The Spitfire arrives well packaged in a sturdy foam box. The parts count is low and the finish looks great.
Assembly
Before assembling the airplane, give the manual a thorough read and check online to see if there are any changes. I found a discrepancy in the recommended center of gravity (CG) location between the manual and the website. The manual states 73mm and the website suggests 80mm. That’s not a huge difference, but a call to tech support told me that the website was correct, although it would be “okay” at 73mm. It was nice to be able to pick up the phone and actually speak with someone who had flown the model. He told me that he preferred the CG at 80mm. The Motion RC website also has a helpful build video that is well worth the time to watch. It’s approximately 15 minutes long, and offers a couple of suggestions that will save you time and effort. The biggest tip is altering the order of the first of the construction steps so you won’t have to disassemble the airplane for subsequent actions. You only need to remove four bolts to remove the wing, but first setting up the tail surfaces makes the rest go faster. One thing you’ll notice when you unpack the model is a sheet of two-piece hinge points. These are provided in the event that you either don’t trust the foam hinges or that you eventually damage them and need to make repairs. I set the foam hinges off to the side for future use (if needed) after inspecting them and determining that they were quite secure. My plug-and-play (PNP) version had all of the servos preinstalled, so I only needed to connect and center the control rods. The clevises have keepers already on them, so after you connect them to the horns, simply slide the silicone ring forward to secure them. The only necessary radio installation entailed installing the receiver and attaching the provided Y harness to the prelabeled servo ends. I reversed a couple of the servos in the radio, but that was the extent of the required programming. The glue that is provided is EPO safe and recommended for attaching the various scoops and scale details. You’ll have to decide between Commander Pierre Clostermann’s LO-D or Lt. Col. James “Johnnie” Johnson’s JE-J color schemes. Both are provided. I had some trouble with the tiniest of the decals coming apart when peeling the carrier sheet back, but a little care and a touchup here and there took care of that. The motor and speed control were preinstalled in my version, so connecting the four-blade propeller was all that it required. Be sure to hold off on this step until you’ve completed setting up your radio. Each propeller blade attaches to a keyed mounting spot on the backplate with two screws. After the backplate is assembled and on the motor shaft, it mates with a keyed recess to ensure that it won’t slip. The propeller nut is tightened and the spinner front attached with a center screw. The entire assembly is designed to allow air to pass through it and into the fuselage where the ESC is mounted. Very cool idea.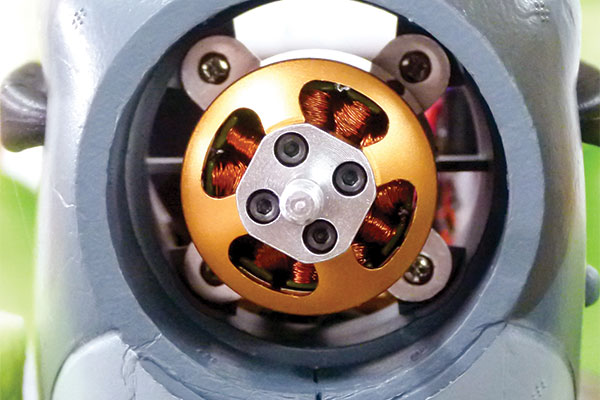
The front of the fuselage shows the cooling provisions made through the motor mount.
The sides of the horizontal stabilizer slide over a joiner and are keyed together.
Control Throws and CG
I used the recommended throws and CG (80mm), which worked well. This required me to put the 4S 4,000 mAh LiPo pack slightly back from its most forward position. There is still some room for me to adjust the balance if I want or decide to use a battery pack that is a different size or weight. Because my dual-rate switches have three positions, I set a level midway between the high and low rates in the middle position. The high-rate settings are sporty, but certainly controllable. You might want to make your test flight on low rates or at least a midway setting between the two.Flying
The moment of truth arrived on a gorgeous, 85° day with light and variable wind for the test flight. I didn’t have any trouble taking off from the grass field, but the Spitfire is a low-cut centipede and that helps. The gear seems to be raked forward enough to help prevent nose-overs, but I suggest easing into the throttle as you begin to take off, not simply firewalling it.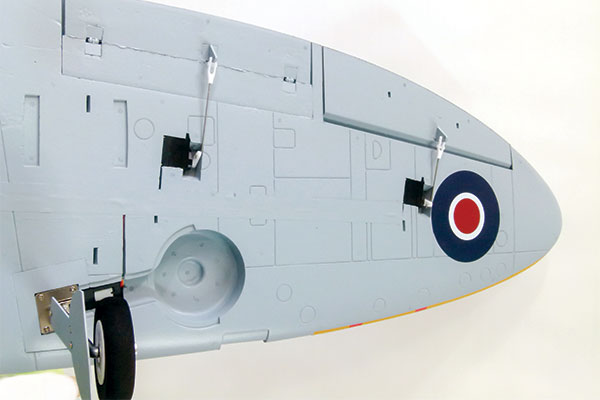
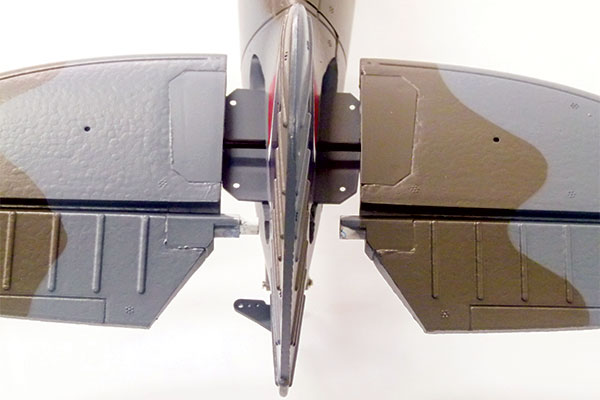
This is a view of the bottom of the wing with the wheels extended. The preinstalled retracts work well.
The Spitfire was off of the ground within a few feet and climbed out nicely. The listed CG of 73mm would definitely be nose-heavy, and I agree with Motion RC’s recommendation of 80mm. There is plenty of room in the battery compartment to adjust it to your liking. The controls were sporty on high rates and I was glad that I had used approximately 30% exponential. A little elevator trim and right aileron made me feel good enough to start testing the envelope. Stalls were a great surprise. There was absolutely no tendency to tip stall, although I expected it. The slight bit of washout in the wings seems perfect. Loops, rolls, Cuban 8s, inverted flight, and any scale Spitfire maneuver is certainly possible and enjoyable with the provided sport power package on a 4S LiPo battery pack. I’m sure the performance motor upgrade and a two-blade propeller would provide a boost in performance, but I felt that the stock package provided scalelike speed and presentation. The suggested flap settings were effective enough and I added in a slight bit of elevator mix. I will probably increase the maximum flap throw slightly, but these settings are a good start. Landings with the flaps allowed a nice speed that remained controllable all the way to the three-point landing. I will admit that some of the landings do end up on the nose after touchdown, but I blame the grass ... no, I really do.
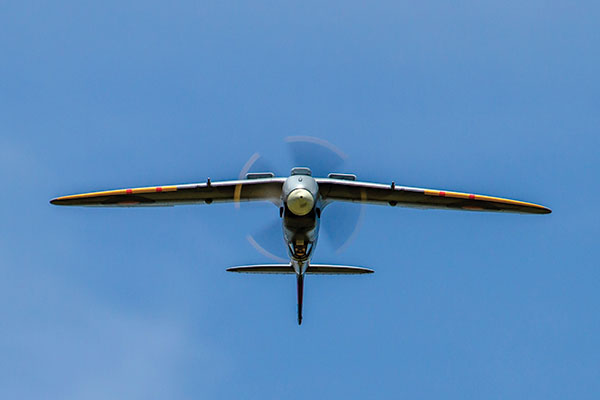
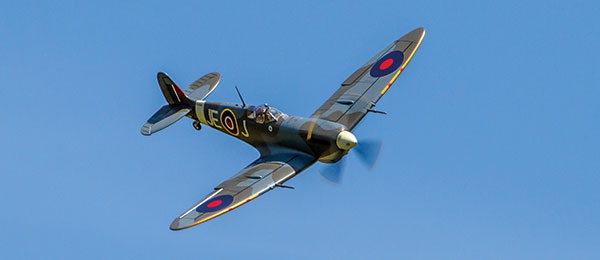
The well-detailed Spitfire looks fantastic in the air at any angle.
Conclusion
I think Motion RC has a winner with the FlightlineRC Spitfire Mk IXc. It goes together quickly and flies well with the stock package and control settings. It’s exciting to find a package deal of this quality below the $200 mark. —Greg Gimlick [email protected]Manufacturer/distributor
Freewing/Motion RC (224) 633-9090 www.motionrc.comSources
Spektrum (800) 338-4639 www.spektrumrc.comThis Month's Issue

Join the AMA
![]()


2 comments
flightline spitfire mk.ix 1200mm
Receiver installation
Add new comment