
Written by John Pomroy
How-to
Model Aviation digital exclusive.
With flying season in full swing, you’re likely spending time at the field polishing your flying skills, but yet a little envious of all of the new aircraft your friends built during the winter. You wish you had something new to show off too, right?
Well fear not, you don’t have to vanish into your workshop during prime flying weather to get that “new plane” gratification. Why not take one of your go-to ARFs and give it a simple makeover?
It takes surprisingly little time, effort, and money to transform it from “one of the many” to a unique and eye-catching masterpiece of your very own. It can be as extensive or as simple as you like—it’s totally up to you.
Because this is a scale subject, it’s desirable to find some pictures of the full-scale aircraft that you want to emulate. A simple Google search will yield a wealth of information, pictures, and often videos of a full-scale subject on which you can base your changes.
A more educational route is to purchase a book about your target subject. In this case, I already had a copy of a book from Squadron/Signal publications titled F6F Hellcat in Action. On the cover was #19 Gadget, which fit the bill perfectly. Let’s start at the front of the airplane and work our way back.

This is the image of the full-scale Hellcat that the author plans to emulate.
Propeller
I switched from an APC sport two-blade to a scale three-blade propeller. I found a Dynam 13 x 7 electric three-blade propeller on the MotionRC website, which comes in black. I painted the tips yellow with Rust-Oleum 2X Ultra Cover marigold color and added scale-appropriate surface markings that I purchased from Callie Graphics.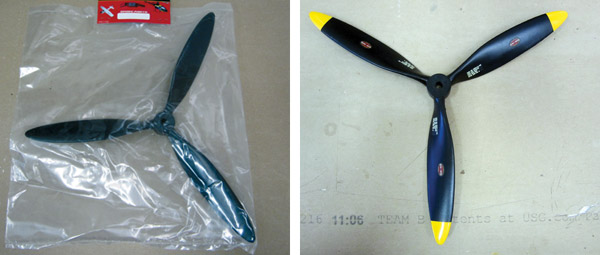
The author painted the 13 x 7 three-blade propeller tips with Rust-Oleum 2X Ultra Cover in a marigold color and added scale-appropriate surface markings from Callie Graphics.
Dummy Radial Engine
The 3.5-inch diameter, nine-cylinder faux radial engine from Park Flyer Plastics fit the Hellcat’s cowl perfectly. I cut it out with an X-Acto knife, painted it with Rust-Oleum flat black, and secured it to the inside of the cowl using Pacer Zap-A-Dap-A-Goo.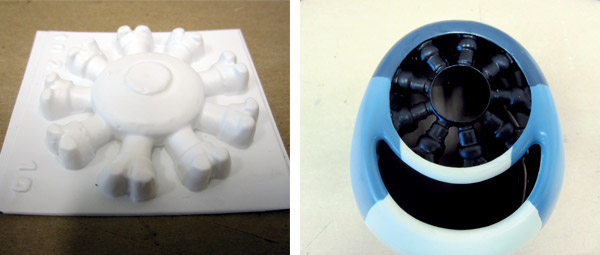
The 3.5-inch, nine-cylinder dummy radial engine from Park Flyer Plastics was a perfect fit.
Wing Machine Guns
Short lengths of coffee-stirring straws make great machine gun barrels! The Hellcat has three guns of different barrel lengths in each wing. I cut six appropriate lengths of straws, painted them with Rust-Oleum flat black, drilled small holes into the wing’s leading edge, and glued them in with medium CA.
Coffee straws can make great machine gun barrels.
Landing Gear and Wheels
The kit landing gear add-ons and wheel hubs did not come in the full-scale color of white, so I decided to mask off the tires and wings and paint them with Rust-Oleum flat white.
The wheel hubs and landing gear fairings were painted white.
Gadget 19 Graphics
I peeled off the kit-supplied VQ graphics and applied an 8.5:1 scale set of Gadget 19 graphics from Callie Graphics. Callie Graphics has several sets of Hellcat markings readily available in any size you need on its website. Alternatively, if you send images of a full-scale aircraft or other reference documentation, the company can make custom markings in the exact size that you need.
The author purchased the 8.5:1 scale Gadget 19 vinyl graphics from Callie Graphics.
Weathering
There are many ways to get a used warbird look. One of the easiest, least expensive, and trial-and-error-friendly techniques is to use artist chalk pencils. You can usually find these at craft stores, office supply stores, and even department stores such as Target. I start penciling in black where engine exhaust and machine-gun powder streaks would be on the full-scale aircraft. I use my finger or a damp rag to smear it. The great thing about using chalk pencils is that if you don’t like the outcome, you can clean it all off with Windex and start over! After you get the look that you want, spray a light coat of Rust-Oleum flat clear over the weathered area and it’s there to stay.
The artist chalk pencils came from a local box store.
I spent less than $40 and two hours creating a unique new addition to my hangar. This is a great way to give yourself that “new plane” gratification without adding to your hangar count or denting your wallet too hard! —John Pomroy [email protected]


Comments
Grumman F6F
That's a BEAUTIFUL Hellcat!!!!!
Add new comment