


Old School Model Works Robinhood 80

Written by Andrew Griffith New laser-cut kit gives a nod to the Curtiss Robin Review As seen in the October 2019 issue of Model Aviation.
At A Glance

Specifications
Model type: Golden Age sport scale
Skill level: Advanced
Wingspan: 80 inches
Wing area: 1,120 square inches
Wing loading: 23.5 ounces per square foot
Airfoil: Flat bottom
Length: 59.5 inches
Weight: 8 to 10 pounds
Power system: 20cc gas; .90 to 1.50 glow; or equivalent electric
Radio: Four channels with five standard-size servos
Construction: Balsa and hardwood frame
Covering/finish: Requires covering
Price: $199.95
TEST-MODEL DETAILS
Motor/engine used: RCGF 20cc twin
Receiver battery: 2,500 mAh A123 (one each receiver and ignition)
Propeller: 16 × 8 Master Airscrew
Radio system: PowerBox CORE; PowerBox PBR-8E receiver
Servos: Five Spektrum A6030 digital servos
Ready-to-fly weight: 11 pounds, 7 ounces
Flight duration: 15-plus minutes

Pluses
- A real kit.
- WEB-LOCK construction helps ensure a straight and true finished airframe.
- Prebent wire landing gear provided.
- Two-piece, plug-in wing makes transportation and storage easy.

Minuses
- Despite careful measuring and cutting, I came up short and had to obtain more wood for a couple of steps.
- Had to relocate elevator pushrod exit.
The RCGF 20cc twinengine from Valley View RC provides the perfect combination of power and sound for the Robinhood. The author did a lot of measuring and fitting to ensure cylinder head clearance.
AROUND THE PICNIC table at the flying field or when surfing the many online discussion groups in which I participate, I hear much about the lack of kit building or the lack of kit-built reviews. The fact is that there are kits available from several sources and one of those is Old School Model Works. This company produces a variety of vintage RC kits that are modernized with precision laser-cutting and designed to ensure success if you follow the detailed instructions.
Laser-cut kits do away with the old-school method of die-cutting parts and, in some cases, the die crushing that model builders have endured for many years when the only way to get into the air was to build their own kits.
I’ll freely admit that there is a certain convenience to assembling an ARF and having a beautiful, completed airplane in a few days, but it pales in comparison to the satisfaction gained from seeing a model airplane that you built take wing. You also have an airplane that isn’t only different in a few sticker choices, but distinctly unique in color, trim, and other options. Additionally, when building a project, you know that each joint is properly glued and that the underlying sanding has been completed to your satisfaction.
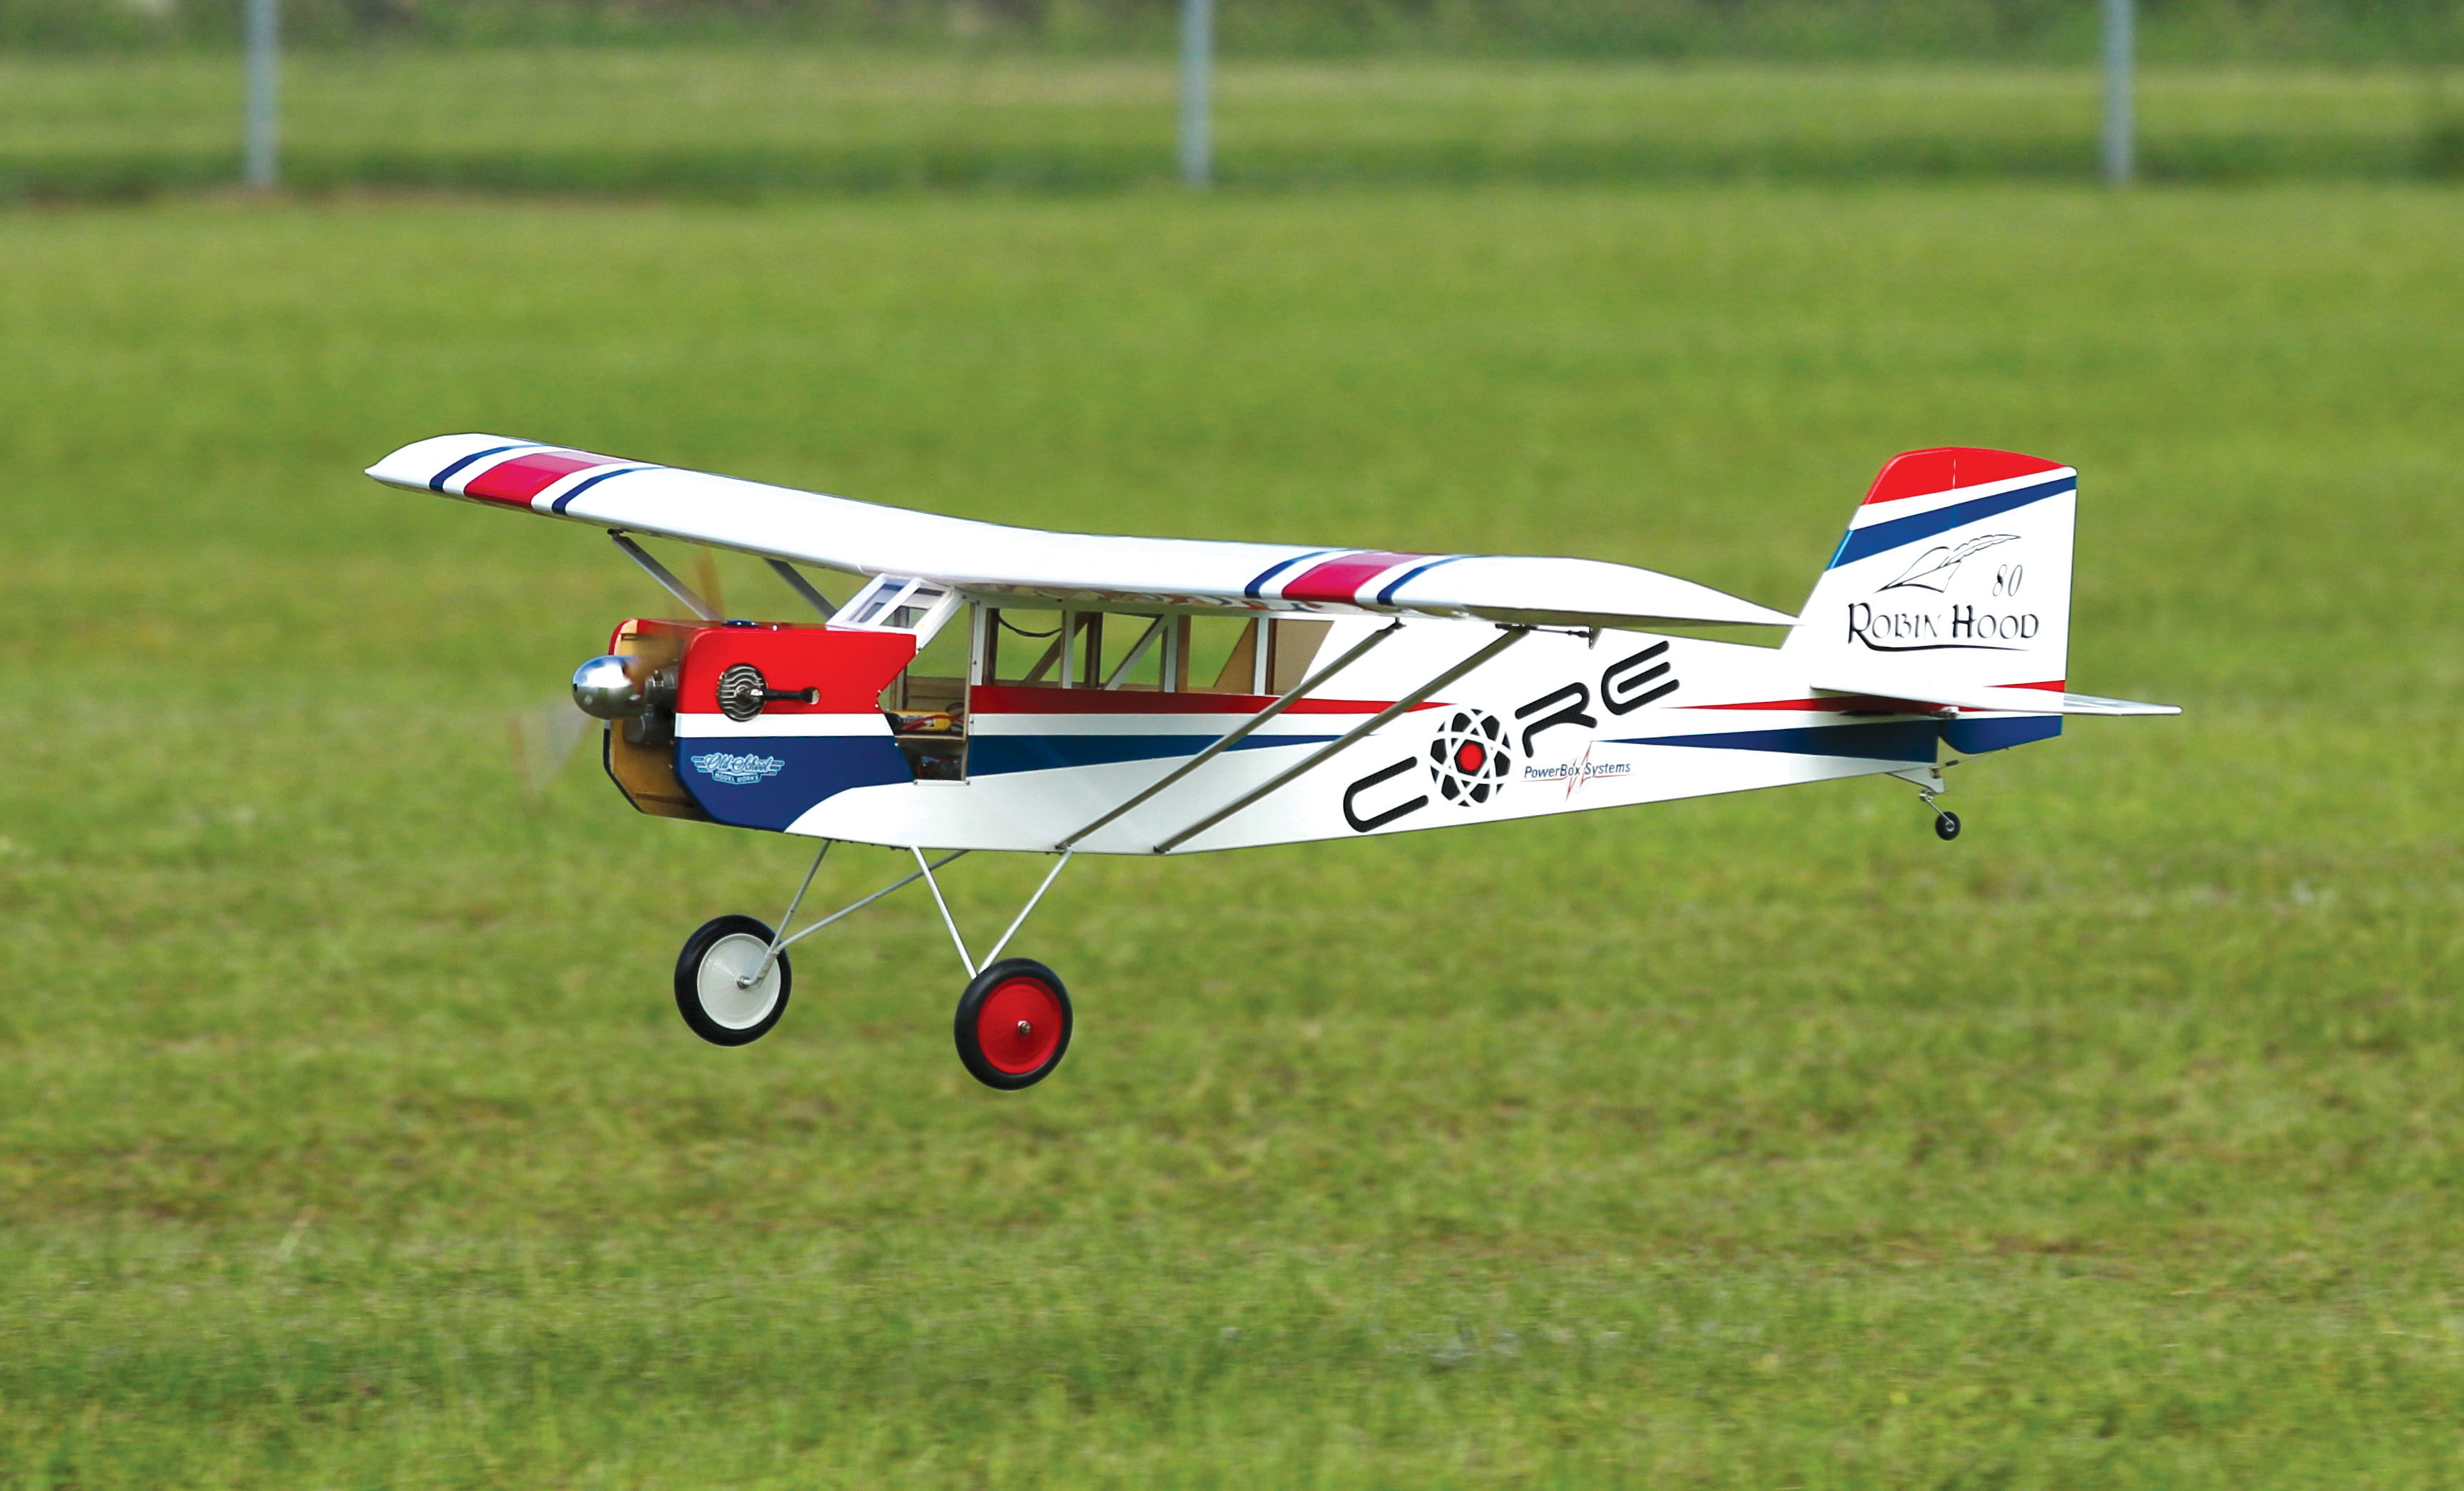
Among the many Old School Model Works kits available, one really caught my eye. The Robinhood 80 is a scaled-up version of the original Robinhood 25, which was offered in the 1980s by World Engines. The Robinhood 25 is a true classic, but its big brother has an 80-inch wingspan, making it eligible to fly in Giant Scale events that use the now defunct International Miniature Aircraft Association (IMAA) 60/80 rules.
The Robinhood’s lines call to mind the Golden Age of Aviation. It features a large, flat-bottom wing with a slight dihedral angle. The fuselage has plenty of flat areas, so it will be reasonably easy to assemble and cover. The fully built-up tail appears to be strong and lightweight.
No fancy radio or power system is required to fly the Robinhood. Gas or glow power only requires a four-channel radio system and five servos, or six channels if you want to give each aileron its own channel (handy for aileron differential but not required). I opted for individual aileron channels and an additional channel was allocated to a transmitter-activated ignition kill switch.
I’m playing with a prototype of the PowerBox CORE radio that has roughly 20 channels—more than I need for the Robinhood. PowerBox Americas provided an eight-channel receiver and Spark Switch Pro ignition kill switch. I used five Spektrum servos and a pair of Taildragger RC 2,500 A123 mAh battery packs.
An RCGF 20cc twin gas engine was used to swing a 16 × 8 propeller and a Tru-Turn aluminum propeller hub, rounding out the classic look of the front end.
One of the joys of building a kit is the flexibility to choose nearly any power system you wish. The Robinhood will accommodate a .90 to 1.50 glow motor or an equivalent electric power system. I even briefly thought about how cool a Saito 19cc gas radial would look and sound on the front. The possibilities are endless but avoid the temptation to overpower the Robinhood.
Construction
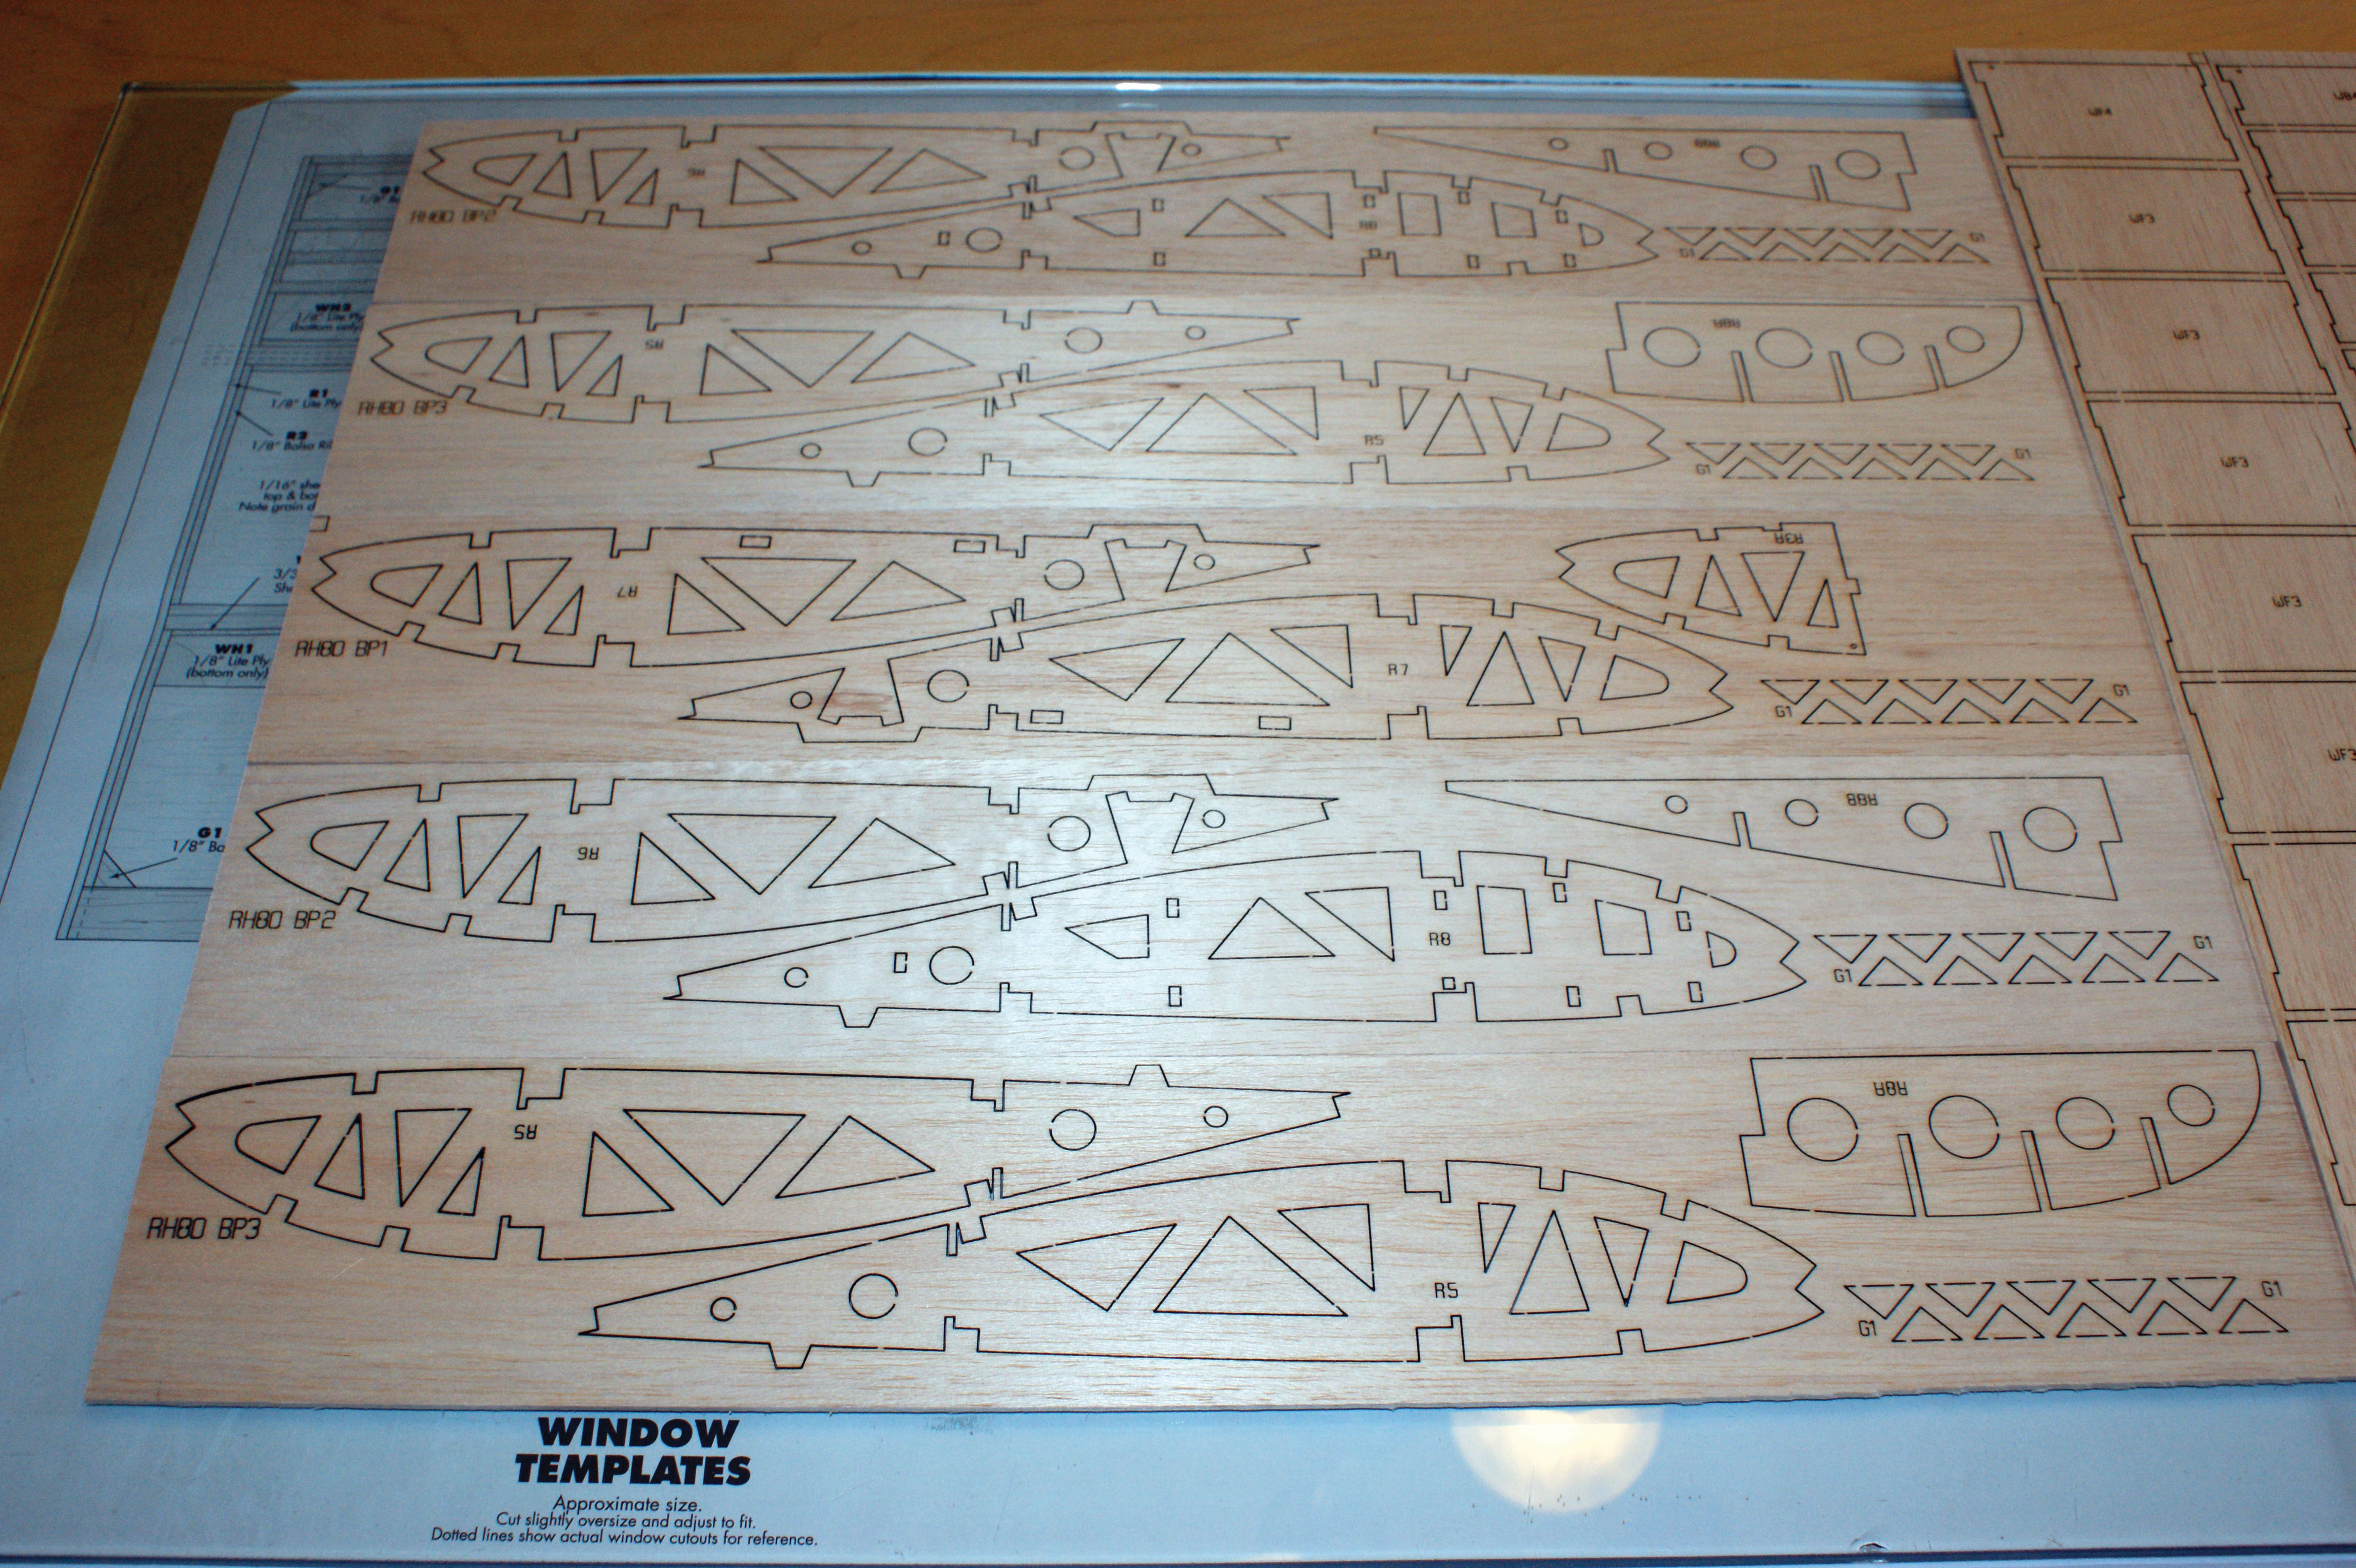
The Robinhood arrived well packaged and free of damage. There are many pieces and careful thought went into optimizing the packaging. Unboxing the Robinhood revealed the laser-cut wood sheets, prebent landing gear struts, and four sheets of rolled building plans, along with some miscellaneous hardware.
You will need more than your average ARF assembly tools to build the Robinhood. I used Zap thin, medium, and thick CA where required, as well as Z-Poxy 15- and 30-minute formula epoxies, and Z-42 threadlocker, all of which are available from Frank Tiano Enterprises. Stock up on fresh hobby blades, sandpaper, and glue. Aluminum T-bar sanders are helpful as well as a metal straightedge, covering iron, and fresh, straight razor blades.
Where any additional hardware was required, I turned to my friends at Du-Bro for a Tygon gas fuel line, a tail wheel assembly, and the company’s gorgeous vintage series wheels and tires. All of the servos were secured with RTL Fasteners servo screws.
A piece-by-piece assembly would be impossible to relate with the space allotted, but I’m going to try to cover the main points.
The Robinhood’s instructions are detailed and easy to follow. Check boxes are provided so that you can mark a step complete. Two check boxes are shown when a step needs to be done twice, such as the steps to assemble both the left and right wing halves. Pay careful attention in that regard because more than one person in this hobby has built two right wing halves at least once!
The photographs in the printed manual are converted to black and white and condensed for size, but Old School provides a link in the manual with which you can use a smartphone or computer to view the 125 photographs in high-resolution color. I highly recommend pulling these up online during the build process.
One of the tools that most builders can’t do without is a small triangle to properly align parts. These kits are provided by modelers who recognized this need and provided laser-cut triangles to use during the build process. They even include little feet to make them freestanding. They come in handy throughout the build to align parts and are a clever touch.
There are a couple of ways to build over plans, but no matter what way you decide is best for you, make sure that whichever way you choose allows you to build the assemblies straight. One way is using a wood door covered with waxed paper and having the parts either pinned or otherwise secured flat.
In the case of the Robinhood, I put the plans on a table and covered them with a thin piece of glass. In lieu of pins, I tacked the base parts such as the wing spar to the glass with a small amount of CA adhesive and built up the structures from there. When an assembly is complete, it can be carefully pulled free, any adhesive residue sanded off, and the glass scraped clean with a straight razor blade.
The laser-cut parts have small, uncut areas to retain them in the parts tree. These should be cut with a sharp blade and sanded smooth. Each part should be test-fitted and sanded as required. Only when everything is a perfect fit should glue be applied to the joint.
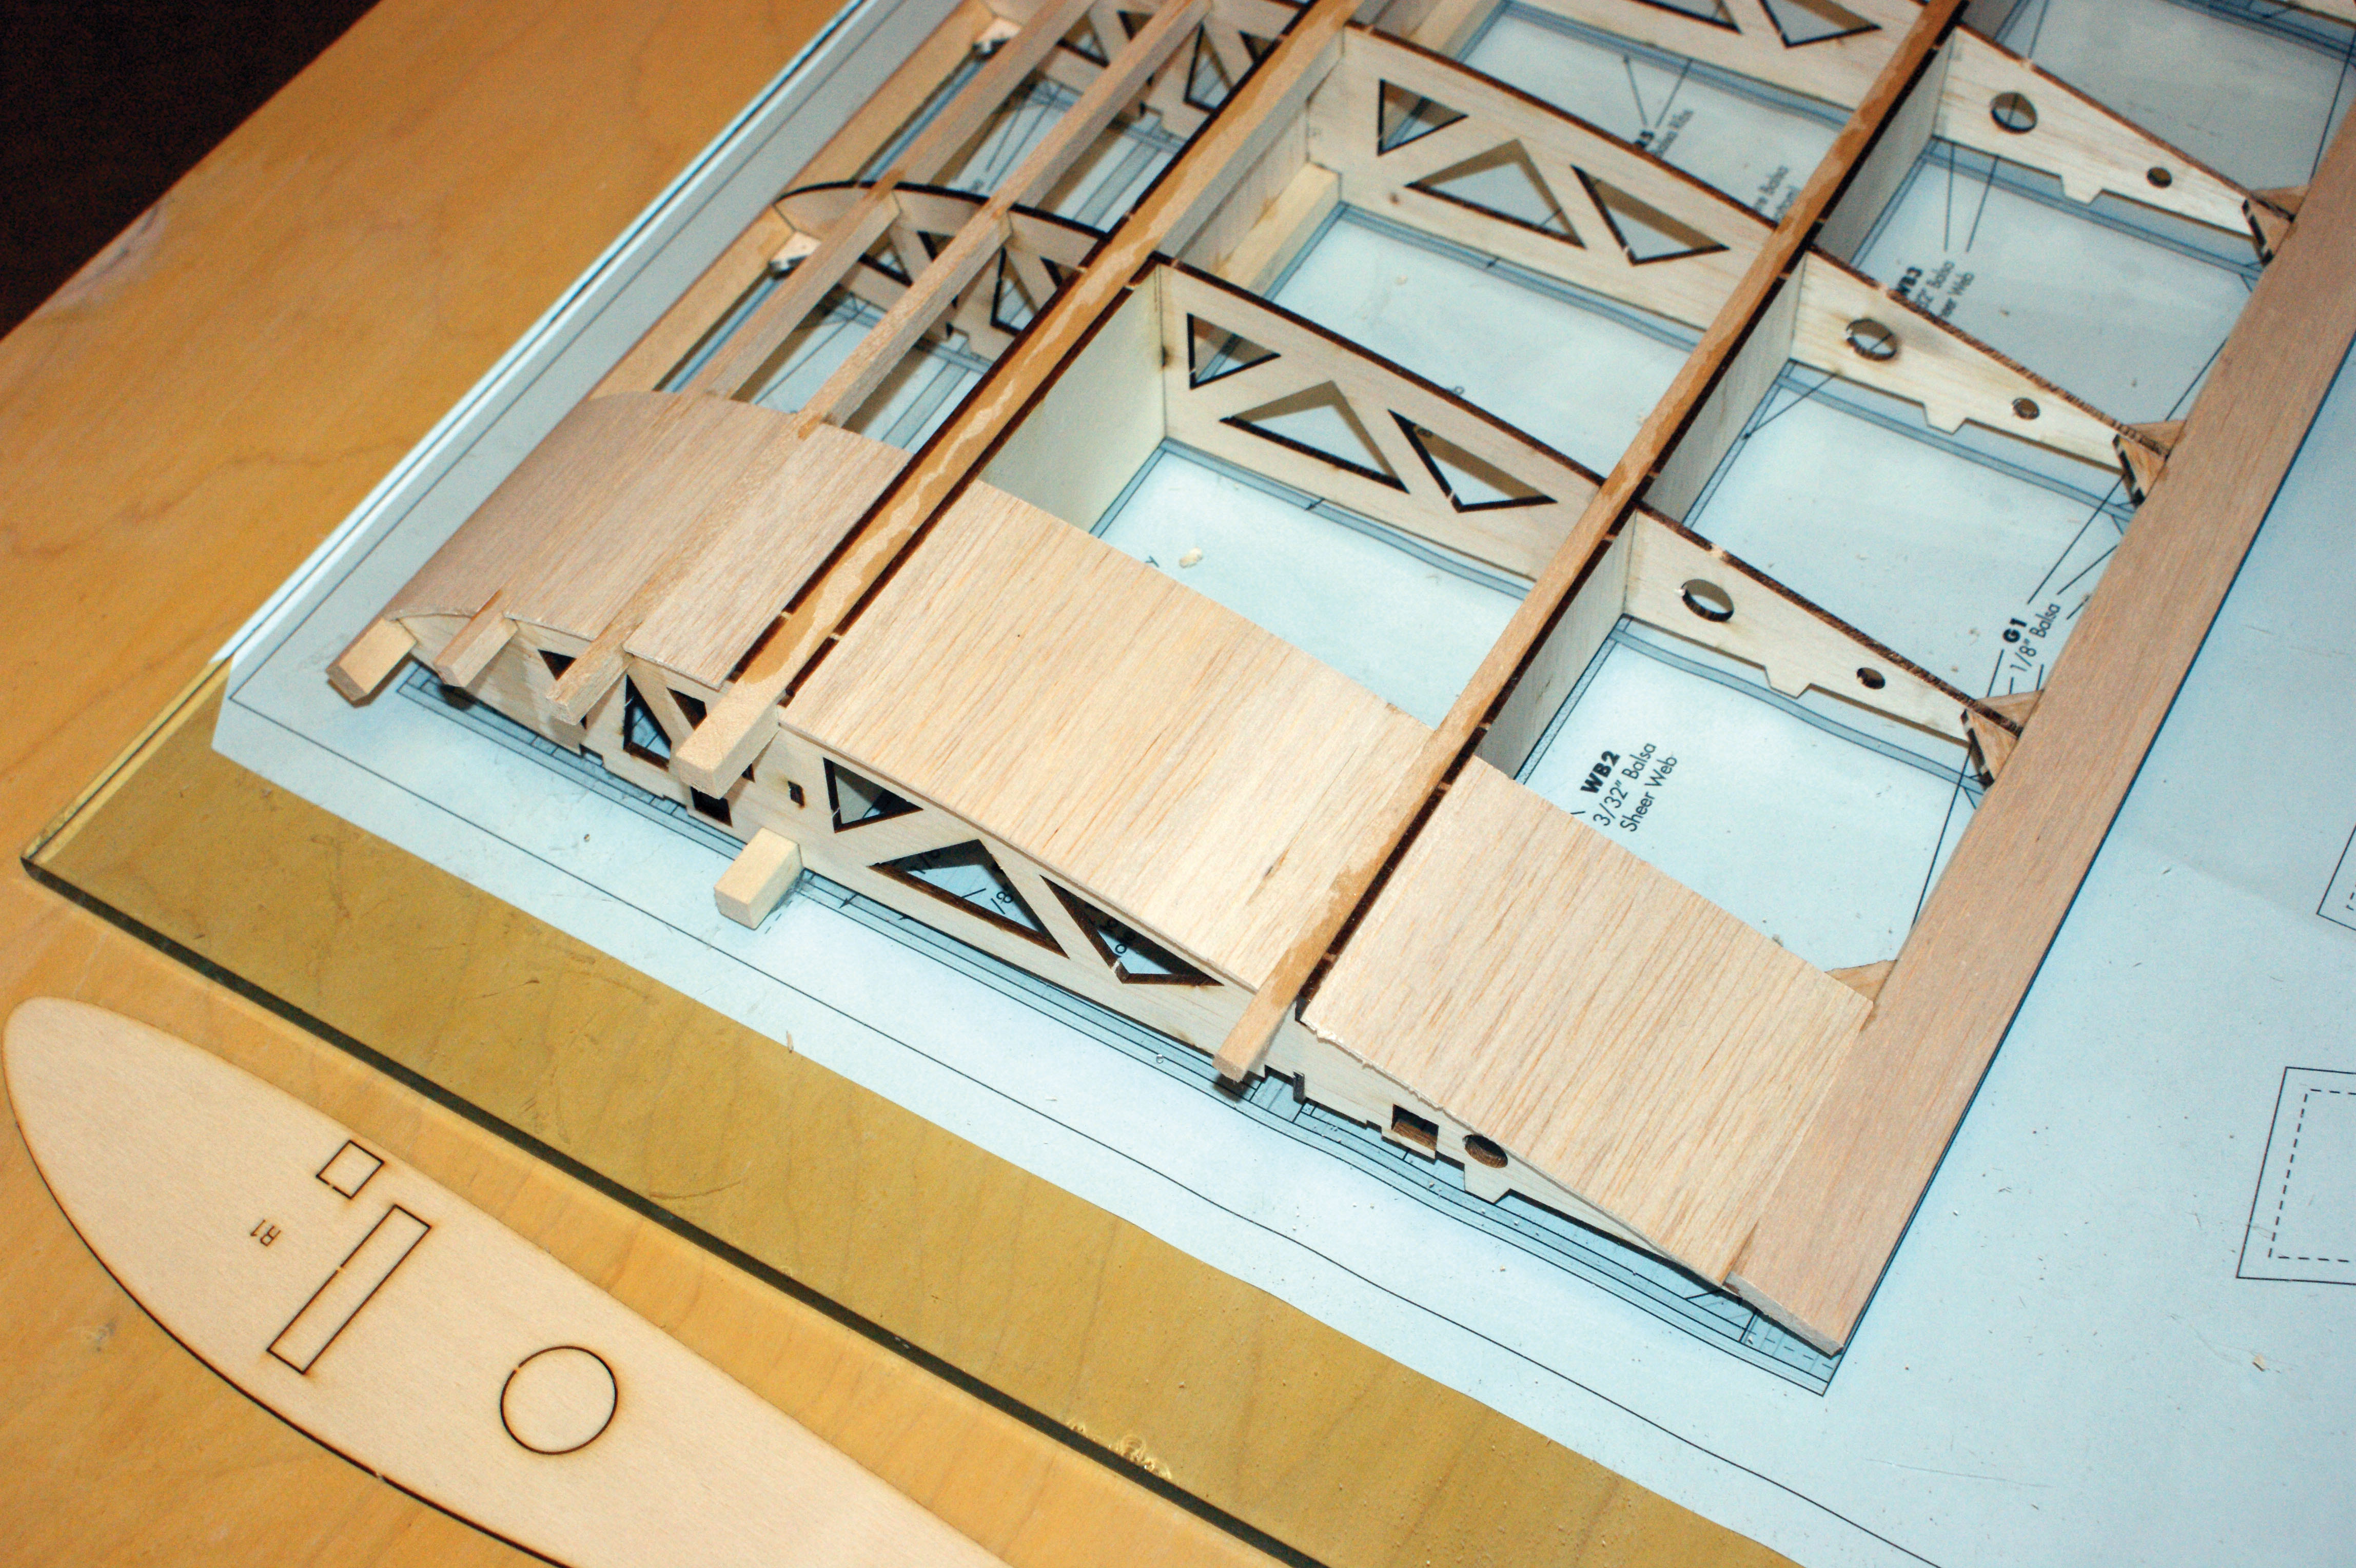
Construction starts with the wing, which is built from the bottom up and from the wingtip to the root. The wing features a main and a secondary rear spar. Both spars have shear webbing between the top and bottom ones, which will make for an extremely strong, lightweight wing. The ailerons are built into the wing during assembly, and are separated and hinged with the provided CA hinges at the end of the wing assembly step.
In addition to the dual spars, triangle gussets are provided where the wing ribs meet the leading edge (LE) and trailing edge (TE) to provide additional strength. Rounding out the wing installation is the light balsa sheeting of the center section wing bays. Everything is properly notched so that when the sheeting is installed, it is flush and requires only finishing sanding.
The LEs and TEs are made of squared-off pieces that need to be sanded to shape. This step is where a razor plane and the T-bar sanding tools come in handy. Take your time. You can always sand a little more off, but it’s a lot harder to fill and fix oversanded areas.
The fuselage is huge! Before you start, you should already have your power system planned. The front half is constructed from interlocking sheets that go together like a jigsaw puzzle. From the wing saddle back is open bay framework. As you did with the wing, make sure you build a left and right side!
After the sides are built, construct the internal structure and add the sides. When the basic structure is done, add the hatches, landing gear mounting rails, and window structure.
The main landing gear features prebent music wire struts. This saves time and ensures that they are correct, but they do need to be soldered together. I wrapped the struts with wire, heated them with a large soldering iron, and flowed silver solder though the joint.
Du-Bro classic wheels and a coat of white paint rounded out the landing gear installation. A Du-Bro tail wheel will keep the rudder out of the dirt.
Pushrods aren’t provided with the kit, but the instructions show you how to make them. Instead of dowels, I used 6 mm hollow-core, carbon-fiber rods. The ends were music rod and attached with thread wrap that was liberally soaked in thin Zap CA. After testing the elevator pushrod installation, I relocated the pushrod exit at the rear of the fuselage forward of the laser-cut location because the built-in exit hole proved to be in a poor location for a straight pushrod installation.
The RCGF twin 20cc engine I chose was purchased from Valley View RC. I have had another one in service for a couple of years. It is a great little engine and will be a perfect power match for the Robinhood. The motor was mounted on the firewall and I retained the side panels. The result was a visually pleasing front end with a great sound and the opposing twin motor will have little vibration.
The twin cylinders are wider than the front cowling. With some careful measurements and a lot of trial-fitting, holes were opened for the cylinders and ignition wires. This allowed me to retain the cowling sidewalls, yet provide proper engine clearance.
The tail surfaces were built in an identical manner. The wing and other components were going together smoothly now that I was back in the building groove. The surfaces were sanded and covered before final assembly because it’s easier to work individually with these assemblies.
The final radio installation was easy because the airframe was still bare. The servos were installed by drilling pilot holes. The holes were prethreaded and the threads were hardened with thin CA glue. The servos were installed with RTL Fasteners servo screws. Heavy-duty extensions from Taildragger RC, PowerBox Smart switches, and Taildragger RC A123 batteries (one each for receiver and ignition) completed the radio installation.


Manufacturer/Distributor
Old School Model Works
(513) 755-7494


One of the areas where many ARFs fall short on their covering jobs is surface preparation and overlaps. When shrinking wrinkles or ironing down seams, the seams often pull up, exposing bare wood. Precut covering panels are made from a template to maximize the use of the product and they often provide little overlap. When covering your model, always leave plenty of overlap and carefully cut away excess covering with a sharp, new blade.
A covering job is only as good as the time spent preparing the underlying surface. Sand the surface smooth, remove dust with a tack cloth, and sand some more. When you’re tired of sanding, take a break then get back at it. Only then is it time to break out the covering iron, trim iron, and heat gun. Patience will result in a finish that you can be proud of.
Flying
It was with a high degree of anticipation that I packed up the Robinhood and headed to the field. The two-piece wing makes transporting and storing the aircraft easy, and it will fit in most SUVs or similar vehicles. Assembly and breakdown at the flying field require minimal effort—the four wing bolts, two aileron extensions, and the two wing struts are bolted in place. I left the struts attached to the wing for storage and transport.
With a little needle tweaking, the RCGF 20 ran smoothly and generated good power. Following a thorough preflight inspection, it was time to get down to business.
The Robinhood taxis well on grass and paved surfaces, but when the wind picks up, the large rudder and fuselage sides tend to weathervane.
With a slow application of throttle, the high-lift wing was flying long before I crossed over half throttle. It needed some right rudder to keep the nose pointed straight. Climbout was authoritative, and circling the field at half throttle, it was apparent that the hours spent building the Robinhood straight and true paid off because little flight trimming was required.
The large control surfaces are effective. Like most scale or scalelike high-wing airplanes, the Robinhood requires some rudder to properly coordinate turns. Backing off of the throttle for a stall test revealed little more than the Robinhood mushing forward until it finally dropped a wing. It recovered quickly when the elevator was relaxed, rather like flying a J-3 Cub.
Aerobatics aren’t the Robinhood’s forte, but it will loop, roll, do stall turns, and perform other maneuvers of that style. I didn’t try anything aggressive, but it sure is fun to do a little old-fashioned barnstorming.
Landing is easy. The Robinhood floats right in with little power needed and settles on the main wheels. Touch-and-gos are especially pleasing and with the lighting system I installed, the Robinhood is striking while flying in the early morning still air as the sun is coming up.
Conclusion
The Robinhood is not a project to be entered into lightly. It took roughly 40 dedicated hours of building, installing equipment, sanding, and covering to produce the finished product.
If you enjoy a challenge, the Robinhood will make a great first building project. It goes together well and the finished product is a vision of personal satisfaction. Watching the Robinhood take off for its maiden flight reminded me of why I got into this wonderful hobby.
The Robinhood is a joy to fly. It handles everything well except wind. The large wing, rudder, and side surfaces tend to get pushed around in wind.
The kit price is reasonable, but as the commercial says, flying the finished product is priceless!
SOURCES:
PowerBox Systems Americas
(904) 330-0145
Frank Tiano Enterprises
(863) 607-6611
Spektrum
(800) 338-4639
Du-Bro
(800) 848-9411
Valley View RC
(253) 875-6890
RTL Fasteners
(800) 239-6010
Taildragger RC
This Month's Issue

Join the AMA
![]()


1 comments
very nice / reminds me of my
Add new comment