


The Modern Control Line Scale Model

Written by Fred Cronenwett Benefits of RC integration Technical As seen in the June 2015 issue of Model Aviation.
One of the plans I have in my collection is from the Modern Hobbycraft Products line and is dated 1946. These Control Line (CL) Scale plans show a Bantam ignition engine and a 28-inch wingspan model. The aircraft was so small that there was barely enough room for the engine and a small bellcrank. By 1947, the glow engine had made its appearance, making ignition engines obsolete. In 1961, RC proportional controls were introduced, making reed systems outmoded. Then engine manufacturers figured out how to make the glow engine with throttle control. By 1964, larger engines were available, making it possible to fly larger models. So you may ask, “What does all of this have to do with CL Scale?” CL Scale pilots began using these newer throttled engines with a three-line handle and bellcrank, but fitting an engine, fuel tank, and a three-line bellcrank into a small model proved to be difficult, so designers started making larger models. Even in the 1960s, the technology was changing the CL models that we fly today. CL Scale is all about making a scale model that flies like the full-scale aircraft. Today’s typical models are limited to throttle only, and most do not have retractable landing gear or flaps.
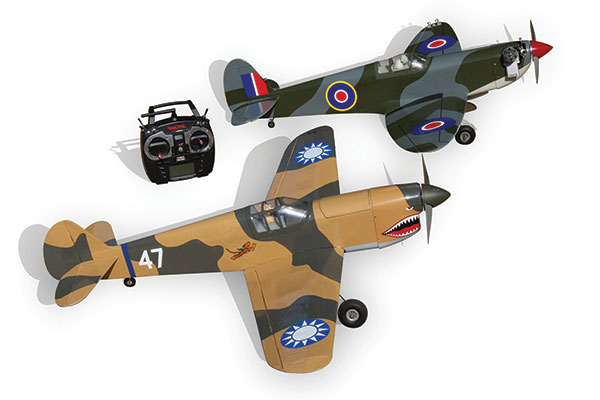
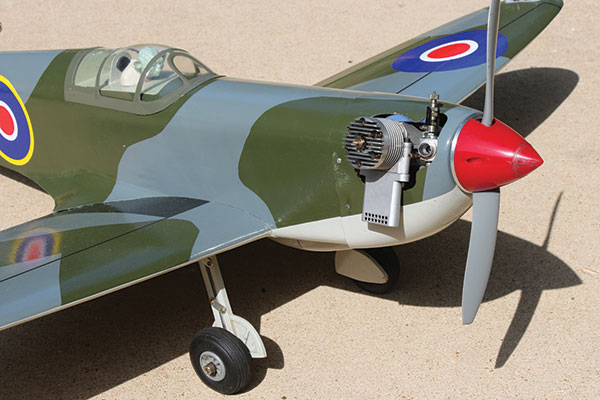
These Great Planes Combat ARF models were converted to CL Scale and use a Tactic 2.4 GHz radio for throttle control. The P-40 has iron-on film covering and electric power. The Spitfire (top) uses a traditional glow-fuel-powered engine.
What if you wanted to build a P-51 Mustang that could retract its landing gear, lower the flaps, and then maybe drop some bombs? This required several mechanical linkages and adding additional lines. What if I told you that you could build that model, install a simple two-line bellcrank, and have full control of these features? The question is how to make these features work and what controls are at the handle to make them work. For some, electric would be the power system of choice. This is often used in RC models. This article will discuss how to build for CL Scale by taking advantage of items that weren’t designed for CL. You can build for fun and never enter a competition, or build a serious scale model with the intention of entering a CL Scale competition. The growth of items designed for other events has dramatically changed CL Scale. A variety of retractable landing gear, servos, electronics, 2.4 GHz transmitters, electric power, four-stroke engines, sound modules, navigation and landing lights, and other items has made it possible to do things in CL Scale that were never done before.
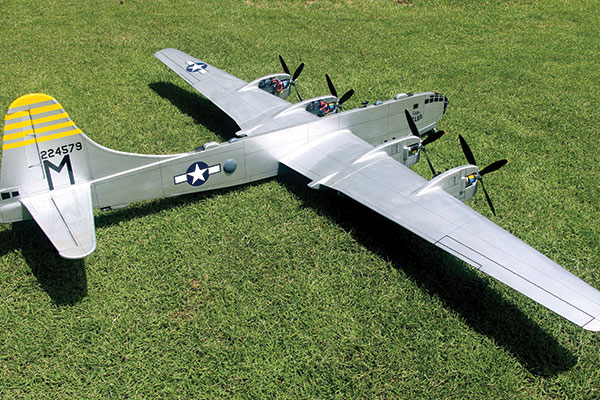
The author’s scratch-built Profile Scale B-29 has electric power and 2.4 GHz controls for the throttle. The 96-inch wingspan model weighs 13 pounds.
In the 1960s, CL Scale pilots took advantage of new technology and are now at another crossroad with electric power, electric retracts, and 2.4 GHz radio control. Using 2.4 GHz for the throttle and other features was approved for CL Scale and CL Navy Carrier in 2013. The elevator must be controlled by a bellcrank and mechanical pushrod, but all other features can be controlled by 2.4 GHz.
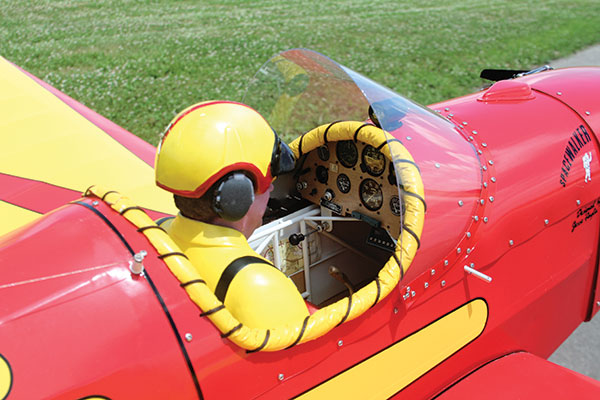
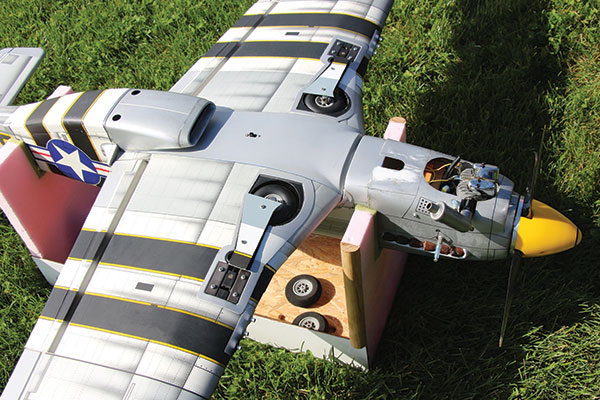
This shows some of the details you will need for Authentic Scale. The judges will look at the cockpit, surface details, and colors.
Getting Started in CL Scale
When starting a scale model, choose an aircraft that has a special meaning. The big question is what size of model you want to build. Models are traditionally built without a removable wing and generally have wingspans of 55 inches or smaller. If the wing can be removed for transportation, the model can be built larger and still fit in a car. I like to keep my models’ weight between 3 and 15 pounds. The weight limit for competition is 20 pounds. Models with a 40-inch wingspan (3 to 4 pounds) will generally have small wing areas and will be limited to throttle only. If you build a model with a 55-inch wingspan (6 to 7 pounds), the wing area can carry more hardware, such as retracts and flaps, without problems. If you are building a model with a 65-inch wingspan, it can carry even more hardware and have plenty of room for details. Models with a wingspan larger than 75 inches are more difficult to assemble and transport to the flying field, but have no problems carrying hardware to control the flaps, retracts, and other features. Smaller models are easier to handle at the field, but larger ones tend to fly better.
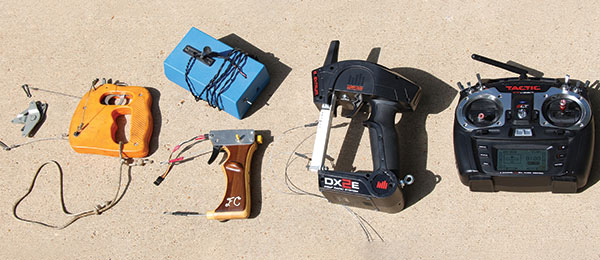
This shows the evolution of throttle control systems: a three-line handle and bellcrank, servo driver, a Bill Young handle, a converted RC car 2.4 GHz controller, and a standard 2.4 GHz RC transmitter.
I like to build CL Scale models in the 55- to 70-inch range for competition. Larger models penetrate the wind better compared with smaller models. If you have ever looked for a CL Scale kit and couldn’t find one, it’s probably because there are few available today. Because of this, pilots have been converting RC plans, kits, and ARFs to CL models for many years. If it has wings, weighs less than 20 pounds, and requires a 1.25 cubic inch or smaller engine, it can be flown in CL Scale competition. An ARF can be flown in CL Fun Scale or Team Scale because neither event has a Builder-of-the-Model rule. All other CL Scale events require that the pilot build the model. If the model will be flown for sport, it can be built from an ARF, kit, or plans and the scale markings do not need to be accurate. I use this type of model for practice and general flying at club events. In CL Scale competition, part of the score is based on the static score. The judges compare the model to the modeler-provided scale documentation and determine how well the aircraft matches the full-scale airplane. Scale documentation contains the following: three-view drawings, color information, markings, photographs, and general information about the aircraft.
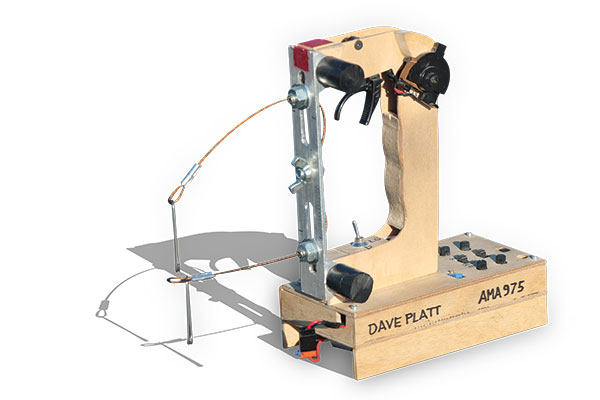
Dave Platt took the internal parts from an RC car’s 2.4 GHz system and put them into a custom-made handle for CL Scale.
A key feature is the airplane’s outline. The three-view drawing shows the correct outline, and any deviation by the scale model will result in a lower static score. In Sport Scale, the modeler is allowed eight pages of documentation, so it has to be well organized and not confusing to the judges. The layout of the scale documentation is critical in getting a good score. Only provide the information the judges need to compare the model to the full-size aircraft. Choose the three-view drawing you plan to use before you build. If the model is flown in competition, select the event in which you want to fly to determine how much scale documentation is needed and how much detail is required on the model. Fun Scale has the least amount of documentation and detail on the aircraft. Sport Scale requires more documentation, but the cockpit is not judged.
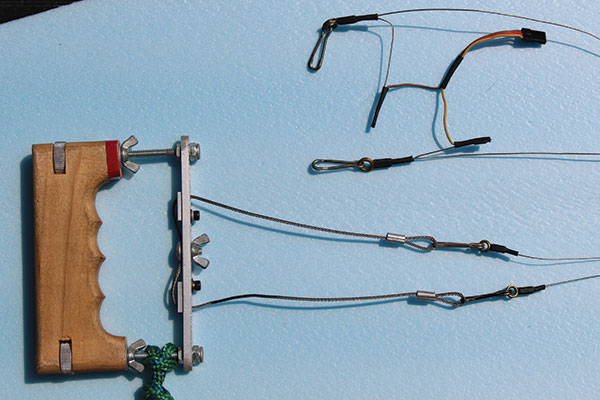
The lines with the handle are used with the 2.4 GHz controls, while the other set of lines has the connector that is required for down-the-lines electronic controls.
Profile Scale is the same as Sport Scale, except the fuselage and nacelles are 1-inch maximum thickness. There is also Team Scale, which is similar to Sport Scale. A new event for 2015 is Authentic Scale, which demands extensive documentation. The model is judged up close and surface detail is expected. This is the only CL Scale event where the cockpit is judged and the judges can walk around the model and look at details up close. When building a model for Authentic Scale, it is best to look at the full-scale subject in person, take the pictures, and document the color of the full-scale airplane.
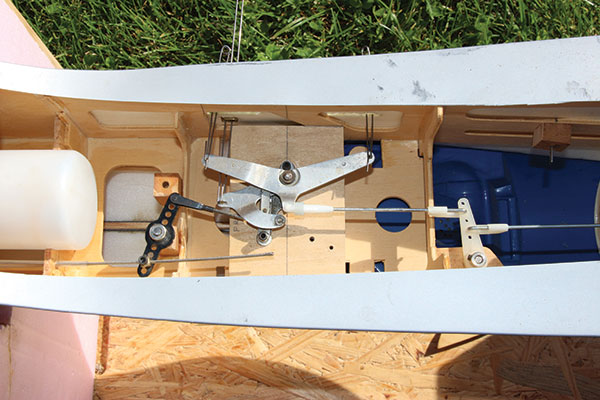
A typical three-line bellcrank for throttle control is installed on Joe Eiben’s P-51. One pushrod controls the elevator, while another goes to the engine.
Throttle Control Systems
There are many choices, so select the level that you are comfortable with and have fun. Regardless of which event you choose, throttle control is expected in CL Scale competition. There are many options for the throttle control system including the traditional three-line handle and bellcrank, which has been in use for more than 50 years. This is a mechanical system where the handle and bellcrank are matched with three lines and only control one function. Electronic controls were developed in the 1970s using RC technology to transmit the signal down the insulated flying lines without a frequency. This popular method has been referred to as “down-the-lines” electronic controls.
Joe Eiben installed a 2.4 GHz receiver for the flaps and retract servo on his P-51 ARF that he flies for general sport flying. The throttle is controlled with a three-line bellcrank.
Before 2013, the CL Scale rules were specific: no radio frequency was allowed in CL Scale, but down-the-lines electronic controls could be used. This is why the variety of systems that used insulated lines, such as the single-channel Electronic CL handle, Clancy Arnold’s U/T system, and converted radios, were developed. You can take an existing RC car transmitter and add a metal structure to attach flying lines. Modeler Dave Platt took all of the guts out of an RC car handle and made his own CL handle using those parts. Some modelers hold the RC car handle in their left hand and use the trigger to fly with a standard stunt handle with their right hand. Another option is to use a traditional RC transmitter clipped to a belt, with a standard stunt handle for the elevator.

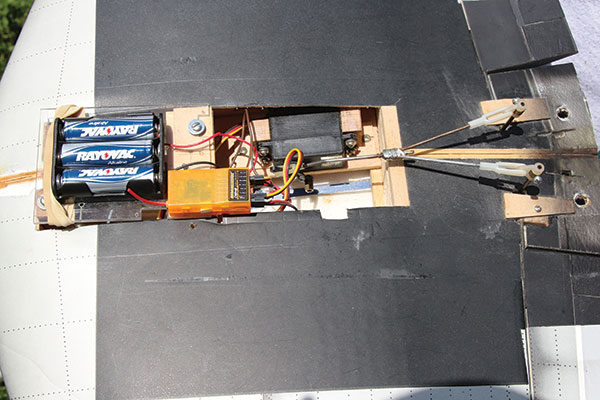
The complete wiring for the receiver, battery, and retracts with the HobbyKing landing gear door sequencer are shown. The two servos would be used to open and close the gear doors.
Additional Options
CL Scale is all about mechanical or flight options that are performed during a competition flight. When researching your favorite aircraft, you will figure out which flight options can be used. Retractable landing gear has been around for many years, but has recently gone through some major changes. Air-powered systems required a valve, air tank, servo, and retracts. Mechanical retracts involved a servo retracting the gear with a pushrod. Electric retracts are now available and act like servos because they have an electric-powered jackscrew built into the retract unit and they plug directly into the receiver. Install the 2.4 GHz receiver, plug in the electric retracts, and you are done. A P-51’s landing gear would need a servo for each gear door, gear door sequencer, and the electric retracts. Although setting up and installing this gear is still not easy, the number of linkages that were required in the past has been greatly reduced. The gear door sequencer is an electronic device that plugs into the receiver and does all of the timing for the gear doors and retracts. Some aircraft, such as the B-17, don’t have gear doors and only require a receiver and electric retracts. Flaps are easy to add with a standard servo and pushrod. I use the end-point adjustment on the RC transmitter to control the flaps’ up and down position. Servos can control other features such as the bomb bay doors and bomb drop.

Devices such as this landing gear door sequencer from HobbyKing are plugged in between the receiver, the door servos, and the retracts to control the the gear door operation sequence.
Take advantage of navigation, strobe, and landing lights by installing a simple wire harness and an electronic board that plugs into the 2.4 GHz receiver. It is controlled by a switch on the transmitter. The LED lights are installed at the wingtips and controlled when the navigation lights are turned on and off. I recently purchased one of these units, and the deluxe version turns the navigation lights on and off by moving a toggle switch on the transmitter. Flight options that can be used include touch-and-go, taxi, overshoot, and aerobatic maneuvers if the full-scale aircraft was capable of aerobatics. Duplicate how the full-scale aircraft was flown. This means a loop can only be flown if the full-scale airplane was capable of performing it.
The Great Planes Spitfire’s iron-on film was removed so wing fillets, radiators, and landing gear doors could be added. The model was then painted. The size of the cowl makes it difficult to install a glow engine.
Powering the Model
Now let’s discuss how to power the model. There are myriad choices of motors and engines available including two-stroke glow engines, four-stroke engines, electric motors, and turbine jet engines. Turbine jet engines have been used in CL Scale, but a builder would need to research this power system before considering that option. An AMA turbine waiver is also required. A two-stroke, glow-powered engine is easy to use except for trying to hide the muffler. A four-stroke engine has a great sound and works well. Electric power has been getting more attention because LiPo batteries and motors are widely available. The size of the LiPo batteries can vary, so determine the battery size needed before building. No matter what size you want to fly, there is an electric motor that will provide sufficient power. CL Scale rules allow for glow engines up to 1.25 cubic inches and equivalent electric power. The largest engine I have flown with is a .90 size. I haven’t yet found a reason to fly with a 1.25-size engine.
Grant Hiestand’s 1/3-scale Spacewalker was built from a Sig Manufacturing kit, weighs roughly 19 pounds, has an E-flite Power 160 electric motor, and has a speaker system from Model Sounds Incorporated that sounds like the full-scale aircraft’s Continental engine.
One item judged during competition is realism. The judges look to see if the model is flown similar to how the full-scale aircraft would be. In addition to the takeoff run, landing, and flying, it also includes the engine’s sound. A four-stroke engine closely matches the sound of the full-scale aircraft. Electric power is quiet and does not sound anything like the full-scale aircraft’s engine, so expect a point deduction in realism if flying with electric power. There are sound modules with a speaker that can be added that work with the speed control and create the desired scale sound. Grant Hiestand has flown his Spacewalker with a speaker that sounds like the Continental engine on the full-scale aircraft. Electric power requires that electronic controls or 2.4 GHz for the throttle are used because the ESC can only plug into a receiver to work correctly.
Converting to CL
You need to understand how to position the line guide before flying the model. Because you will likely convert an RC kit, plans, or an ARF to CL, you will not have instructions for where to locate the line guide. Mark the location of the center of gravity (CG) along the centerline of the fuselage, then extend a line to the wingtip that is 90° to the fuselage’s centerline. Offset the line aft of that line by multiplying half of the model’s wingspan by .052 to get a 3° line rake. This will make the model’s nose point outward from the circle during flight. See the figure that shows how to locate the line guide. The vertical location of the line guide must also be determined so the model remains level in flight. If the line guide is too low, the aircraft will roll to the right after it takes off. If the line guide is too high, it will roll to the left. One trick is to make a set of dummy lines and hang the model from the garage ceiling. As viewed from the front, the wing should be vertical. If looking at the airplane from the top, the nose should be pointed down by 3°.
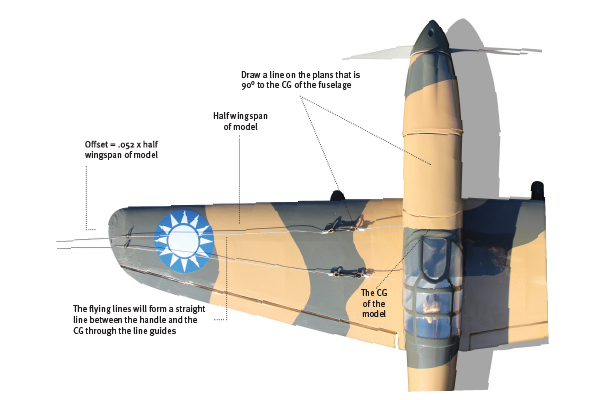
This shows the location of the line guide based on the model’s CG and planform. You want 3° of line rake for the starting position of the line guide on the first flight.
Always make sure you have an adjustable leadout guide on a larger model so you can move it forward to decrease the line tension, or move it aft to increase it. Trimming the line guide ensures that you have enough line tension, but not so much that it pulls you over. I have not mentioned the position of the bellcrank because it has little to do with trimming the model. The line guide location, overall weight, and CG will determine how much line tension you will get. I typically put the bellcrank’s center bolt 1 inch behind the model’s CG. I use a 4-inch bellcrank for the larger models, and a 3-inch one for smaller models. The model will also need some wingtip weight. For RC, the model needs to be balanced along the fuselage’s centerline. CL models need weight in the right wing to counteract the line drag. What about a rudder to keep line tension? I have multiple models with zero rudder offset and several models without any rudder at all. I mount the rudder with some stiff hinges so it can move, but it has zero offset. Ailerons are effective and must be set to the neutral location for CL flight. One trick is to mount a standard servo to hold the location of the aileron and if the wind is gusty, move the aileron to a new position to counteract the wind. The aileron servo is not plugged into the receiver.
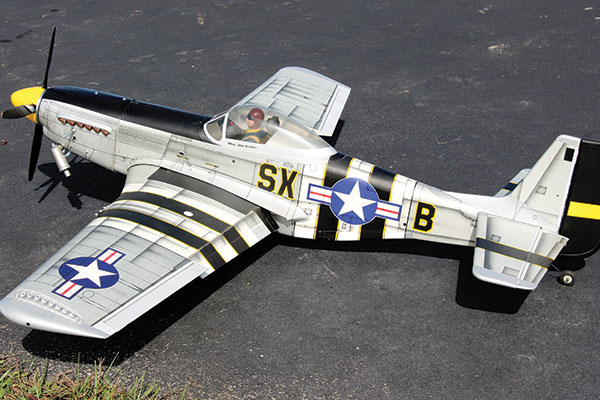
Joe Eiben’s P-51 was built from an ARF and has flaps, throttle, and retracts.
The only modifications from the RC instructions are three items: 1) Install a bellcrank, the leadouts, and the line guide to control the elevator. 2) Lock the rudder and aileron in the neutral position. 3) Add wingtip weight.
Where to Start
If you want to try CL Scale and are not sure about some of these ideas, build and fly an ARF for general flying. Select an engine/motor and a 2.4 GHz control system and give it a try. This allows you to experiment and if you make a mistake, it is no big deal. After flying your model for some time, you will know what you like and don’t like and before you start a more serious CL Scale project, you will have experience with a practice model. Another option is to pick up a used model at an RC swap meet or auction and install a bellcrank and 2.4 GHz control system to give it a try. RC swap meets or auctions are a great way to find items for CL Scale models.
The bottom view of Joe’s P-51 shows its four-stroke engine, retracted landing gear, and the on/off switch for the 2.4 GHz controls.
Conclusion
CL Scale is all about the static score and mechanical or flight options during the flight portion. Scoring differs with each event, but is a combination of the static and flight scores. This means the model needs to look like the full-scale aircraft and also fly correctly. It is not uncommon for models to show up at a contest and do well with static points, but not score well with the flight points. The static portion is all about the outline, detailing, colors, markings, and making sure the airplane accurately replicates the full-scale aircraft. This can be a fun event that allows a modeler to create his or her own fleet of models. When I go to a hobby shop or hobby show, I look at the electronic devices, hardware, kits, motors, and engines for RC models to see if I can use them for CL Scale models. You never know what you might find that can be used for your next project. The AMA Special Interest Group for Scale is the National Association of Scale Aeromodelers (NASA). It is responsible for organizing and running the annual RC and CL Scale Nats. NASA’s website has all of the judging forms and plenty of information related to Scale modeling. I have a YouTube channel with videos on how to set up CL Scale models with 2.4 GHz for glow- and electric-powered models. There are also videos showing several models flying so you can see and hear some the items that have been covered in this article. Search for my name and look for my channel. I have also included several companies in the “Sources” listing for some of the equipment mentioned in this article. Good luck with your next project! Land softly! —Fred Cronenwett [email protected]
Sources:
NASA www.nasascale.org MBS Model Supply (785) 256-2583 www.mbsmodelsupply.com Brodak Manufacturing (724) 966-2726 www.brodak.com BMJR Models (321) 537-1159 www.bmjrmodels.com Model Sounds Incorporated [email protected] www.modelsoundsinc.com Motion RC (224) 633-9090 www.motionrc.com Dave’s R/C Electronics (423) 332-7504 www.davesrce.com
This Month's Issue

Join the AMA
![]()


3 comments
Great Article
Fantastic Article
C/L scale article
Add new comment