


Dissecting Helicopter Setup and Terminology
Written by Chris Mulcahy RC Helicopters Column As seen in the June 2014 issue of Model Aviation.
Learning to fly model helicopters can be challenging. Add to that the lingo that comes with helis, and it can be somewhat confusing to a beginner. Compounding this are the many RTF helicopters that are now available, which are perfect for getting into the air quickly, but the pilot misses out on the education that he or she could get from building an aircraft from a kit. I often receive requests to explain terminology and for correct helicopter setup techniques, so I decided to attempt to break down some terms for those who wish to learn. For the purposes of this column, I’ll be discussing setup techniques that can be used for most 3-D helicopters. In 3-D, the helicopter uses a variable-pitch rotor head. This means that the pitch of the rotor blades can change from a negative to a positive value. If it changes from -12° to +12°, for example, giving 24° of usable pitch (this varies between helis), this is known as the collective-pitch range. We change this value using the throttle stick on our transmitters with -12 being the stick at its lowest position, and +12 being at the stick’s highest position. This change in pitch is provided by the servos driving the swashplate. Most of today’s helis use three servos, arrayed 120° around the main shaft, to drive the swashplate up and down, which changes the pitch of the main blades. This type of mixing is referred to as electronic cyclic/collective-pitch mixing (eCCPM). The e is frequently dropped from the acronym. The “electronic” part of the title refers to the software in your transmitter, and the “cyclic/collective-pitch mixing” refers to the action of your three swashplate servos being driven by your transmitter. Pilots get confused about the difference between collective pitch and cyclic pitch.
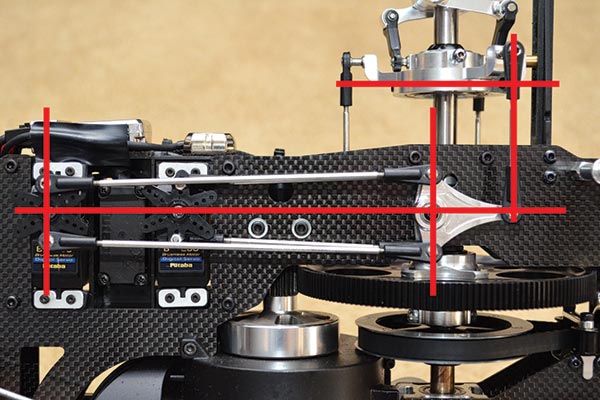
This Synergy N5c shows how the pushrods should be set in relation to the servos when the transmitter is at mid-stick with zero pitch on the blades.
You should now know what collective pitch is. Cyclic pitch refers to the maximum pitch allowed by an elevator or aileron input. For this example, we’ll say that the cyclic pitch range is +/- 10°, giving us 20° of usable cyclic-pitch range. In its simplest terms, this is how far the blades are allowed to deflect when given an aileron or elevator command. A low pitch setting will manifest itself in a slow roll or flip rate, whereas a high pitch setting will give a fast roll or flip rate. Some gyros can be programmed with a specific roll/flip rate, but still require a setting for the cyclic-pitch range so that they don’t exceed your helicopter’s limits. The programming for all of these settings takes place inside most modern-day gyros, with little programming done in the actual transmitter. These gyros can be plugged into a computer and programmed, or in some cases, programmed directly on the gyro (unless you fly using a Mikado VBar, which allows you to program it from the new Mikado transmitter). When setting up a new helicopter, begin with the collective-pitch range. The setup procedure is the same for a sport or 3-D helicopter. The pitch curve in your transmitter should be linear, which can be viewed in graph form on your transmitter as a straight, diagonal line from the bottom left to the top right. The first thing to set is zero pitch, with the throttle stick in the center position. Most of the setup from this point will be done with the throttle stick in the center position, and the blades at zero pitch. A pitch gauge can verify that the blades are at zero pitch. The pushrods from the blade grips to the swashplate can be adjusted until the blades reach zero; both main blades need to be zeroed. When this is complete, you can test your collective-pitch range by running the throttle stick up and down and reading the pitch gauge. The adjustment for the maximum/minimum collective pitch will be controlled in your gyro, which should be explained in the instructions. If you have excessively more pitch in one direction than the other, you will need to go through all your linkages back to the servos to make sure they are correctly set up. This all needs to be set up with your throttle stick in the center position. Pushrods should be 90° to the servo arms. If you were to draw an imaginary line between the center of the servo and the servo ball on the end of the arm, your pushrod should be 90° to that line. If you have an offset bellcrank with a push/pull system then the imaginary line you draw between the servo arm, and the same on the bellcrank arm, should be parallel with each other, even if the pushrods taper in one direction.
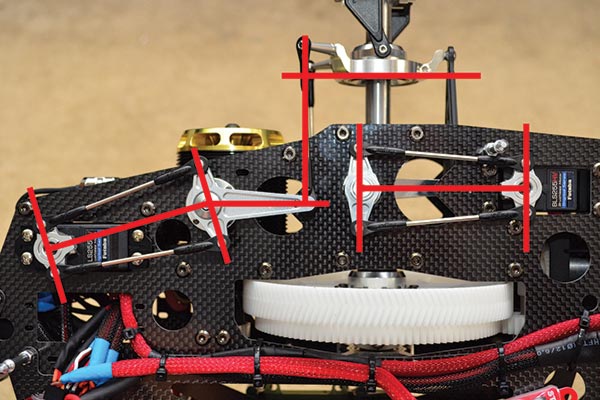
The Raptor E700 is a good example of correct geometry with an offset bellcrank.
All of your pushrods should be square to ensure that you get an equal amount of travel in both directions. Correct geometry is a key part of a good heli setup. When you have set your geometry and have achieved 0° pitch at mid-stick with an equal amount of positive and negative pitch, you are ready to set your cyclic-pitch range. This will likely be programmed in your gyro. Depending on the gyro, you will need to either set only the elevator or aileron pitch, or both independently. To set the elevator cyclic-pitch range, the blades should be positioned perpendicular to the helicopter. Using your pitch gauge, you can deflect the blades with an elevator input, and adjust your gyro settings accordingly. For the ailerons, it is the same process, but with the blades running parallel to the heli, deflecting the blades with an aileron input. The aileron and elevator pitch should end up the same for a consistent feel. With the setup complete, your heli should be ready to start flying 3-D. However, if you are flying sport only, you can now go into the pitch settings in your transmitter and adjust your pitch curve to reduce the amount of pitch used when sport flying. You still have a flight mode available with a linear curve for when you want to try 3-D. Some people learn to fly with the helicopter hovering around mid-stick, whereas in 3-D, you will be hovering at roughly 3/4 stick. This is because you will have 0° to 12° of collective pitch, from mid-stick to either high or low (depending on being upright or inverted). If you plan to fly 3-D, the best thing to do is to learn to hover at 3/4 stick with a linear pitch range from the start. There are plenty of new terms and techniques to learn when getting into helicopters, and it never hurts to ask questions. A good source is your local hobby shop, or you can talk with experienced pilots at your flying club. There are several websites that you can view for information. If you have any specific questions about setup or terminology, drop me an email and I’d be happy to discuss it in a future issue. -Chris Mulcahy [email protected]
Sources:
International Radio Controlled Helicopter Association (IRCHA) www.ircha.orgThis Month's Issue

Join the AMA
![]()


1 comments
GREAT Article!!!!
Add new comment