


Hover Training
by Dave Scott Lessons in proactive vs. reactive flying Helping new helicopter pilots learn to hover with greater efficiency and fewer mistakes. As seen in the December 2014 and April 2015 issues of Model Aviation.
As the saying goes, some of the most rewarding activities are often the most challenging, and learning to fly helicopters often fits into that category. Indeed, merely hovering a helicopter has been compared to trying to balance a marble on top of a bowling ball, so those who become successful heli pilots have something to be proud of. Although the new generation of entry-level, fixed-pitch helicopters have never been easier to fly, flying more agile collective-pitch (adjustable) helis is a skill that requires a lot of practice. The practice cannot be haphazard or pilots risk developing improper habits that will impair learning and future success. The following instructions, combined with simulator practice, are aimed at helping new helicopter pilots learn to hover with greater efficiency and fewer mistakes.
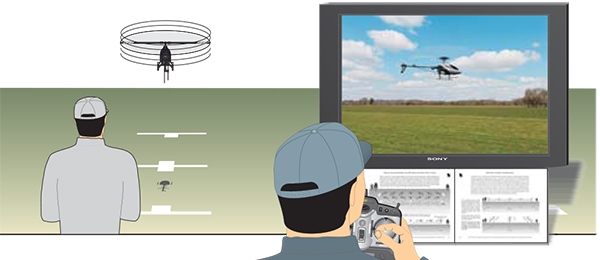
The Simulator Advantage
Much of the challenge of flying helicopters stems from the fact that a pilot often has to manipulate all four primary controls at the same time (compared with an average airplane pilot who uses only two controls most of the time). Training on a simulator allows a heli pilot to learn the controls independently before combining them. This article focuses primarily on the control techniques required to fly more agile collective-pitch helicopters, with the understanding that if a person can fly a collective-pitch heli with a simulator, flying a highly stable, fixed-pitch aircraft will seem like child’s play. I’ll forgo discussing entry-level coaxial helis, not only because they are so inherently stable that they almost fly themselves, but because the control techniques required to fly them are in many ways contrary to the techniques used to fly more agile, single-rotor helis. Specifically, coaxial helis typically require you to hold in inputs to maneuver them, which is a habit to avoid when hovering single-rotor helis. Thanks to modern helicopter software and design, a typical entry-level, single-rotor heli is nearly as stable as a coaxial heli, but features enough agility to allow control techniques closer to those used to fly collective-pitch helicopters. Whether hovering a fixed-pitch, single-rotor heli or a more agile, collective-pitch heli, one can expect to use similar control techniques.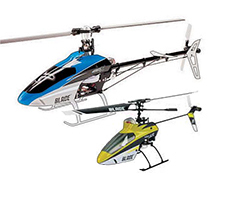 The biggest difference flying entry-level, fixed-pitch helis, including quadcopters, is that they are designed to return to upright flight when the pilot neutralizes the controls. The tradeoff for the increased agility of collective-pitch helis is that they are less stable and will not return to upright on their own. Deviations will tend to grow worse unless the pilot immediately corrects them.
Collective-pitch helicopters require more control inputs to fly and there’s less margin for error if overcontrolled. Conversely, entry-level, fixed-pitch helis don’t require as many corrections and consequently allow more time to react, thereby making them the better choice for rookie pilots.
The biggest difference flying entry-level, fixed-pitch helis, including quadcopters, is that they are designed to return to upright flight when the pilot neutralizes the controls. The tradeoff for the increased agility of collective-pitch helis is that they are less stable and will not return to upright on their own. Deviations will tend to grow worse unless the pilot immediately corrects them.
Collective-pitch helicopters require more control inputs to fly and there’s less margin for error if overcontrolled. Conversely, entry-level, fixed-pitch helis don’t require as many corrections and consequently allow more time to react, thereby making them the better choice for rookie pilots.
Ground School 101
Unlike an airplane that moves in the direction it’s pointed, as a rule, a collective-pitch helicopter’s movement is determined by which way the main rotor disk is tilted, regardless of where it’s pointing. For example, pulling the right “cyclic” control stick to tilt the heli’s nose up causes the heli to move backward and tilting the nose down causes it to move forward. Tilting the rotor disk to the right causes the heli to move to the right, and vice-versa. The amount of tilt is determined by the size and duration of the control inputs—the steeper the tilt, the more rapidly the heli will move in that direction, and the more prone it is to dropping. The left “collective” control stick is used to control height by changing throttle/rotor rpm along with changing the angle/pitch of the main rotor blades to increase and decrease lift. Moving the left control stick left and right varies the tail rotor to control yaw (where the nose is pointed). As a rule, when the left stick is neutral, a good heading-hold tail-rotor gyro will continue to keep the nose pointing in the same direction. It is customary to use the airplane term “aileron” to describe bank and roll control, “elevator” to describe tilting the heli forward and backward, and “rudder” to describe yaw. This is how the controls are listed in the transmitter menu.Takeoff and Hover Techniques
To keep the heli from moving around before liftoff, you’ll need to smoothly “spool up” the rotor rpm to the point where the heli appears light on the skids. Steadily advance the throttle further to lift off. Spooling up in stages should prevent the rotor torque from jerking the heli around, making it easier to enter a stable hover. During a stationary hover, the right control stick is used to correct unwanted left, right, forward, and backward movements, while the rudder is used to keep the nose pointing in the same direction. Thanks to the stabilizing effect of a heading-hold gyro, most of the attention given to the left stick at this point will be directed toward working the throttle to take off and control altitude. You may run into experienced heli pilots who put much emphasis on the left stick tail-rotor control because they use it as much as the right while maneuvering and performing aerobatics. However, 90% of the control inputs made during a stationary hover are brief bumps of aileron and elevator with the right stick. Once airborne, the name of the game is to keep your control inputs small and brief. The problem with making a large input or holding one in is that it often requires another large input to compensate, thus increasing the risk of overcontrolling. Consequently, deviations during hover need to be corrected with small brief bumps of aileron and elevator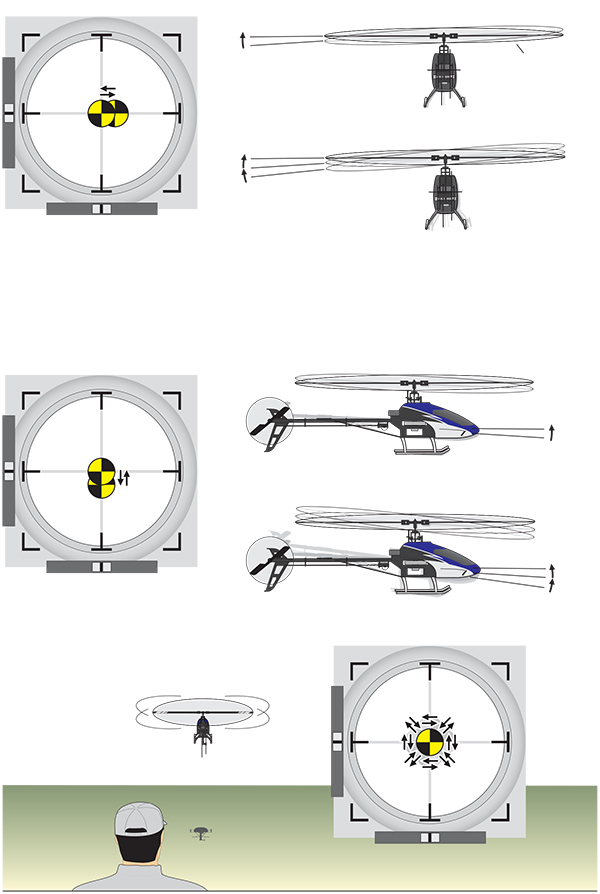
Small, brief aileron and elevator bumps are the primary type of control input used to correct deviations during a stationary hover. To avoid overcontrolling, it is better to correct a deviation with multiple, small bumps than trying to correct with a single, large bump or holding in the correction.
It’s important not to jerk the stick because that would make controlling the size of the bumps difficult. Instead, a bump is a controlled in-out input that creates a slight heli response as long as the input is small. Excluding aerobatics, experienced pilots vary the size of their bumps—very, very small, very small, and small, depending on how large of a correction they need. Novice pilots are best served by trying to keep all their bumps tiny and operate by the rule that if one bump isn’t enough, you can always apply another. When flying more maneuverable collective-pitch helis, don’t get lulled into thinking that you’ve found the “sweet spot” and can pause at neutral, because before you finish that thought, the helicopter will likely have already started moving. As a rule, if a deviation is corrected late, it’ll take a larger input to correct it, thus increasing the potential for overcontrolling. Helicopter pilots need to keep their fingers nimble or moving while hovering in order to be ready to respond to the moment’s needs. In other words, continuing to input tiny adjustments, rather than waiting until after the deviation is obvious to respond, helps to reduce the likelihood of overcontrolling. There are differing opinions about whether it is best to look at the rotor disk or the helicopter’s body while hovering. The fact is, it’s a combination of both, but mostly it’s the body. The problem with trying to detect deviations by looking strictly at the rotor disk is that often by the time the pilot sees the disk tilting, the heli has already started drifting. Furthermore, a helicopter can be moving even when the rotor disk is level, or remain stationary when the rotor disk is banked into the wind. Watching the rotor disk to determine what corrections to make doesn’t always work. That is why proficient pilots primarily watch the body or the heli as a whole.
To keep the heli from moving around before liftoff, smoothly spool up the rotor rpm to the point where the heli appears light on the skids. Steadily advance the throttle further to lift off, while using the right stick to correct any movement and using the rudder to realign the body. Adjust the throttle to maintain a stationary hover at the preferred altitude.
Detecting deviations or movement during a hover is accomplished with an eye on the body of the heli or “seeing the heli as a whole.”
During a stationary hover, use the rudder to keep the body of the helicopter pointing in the same direction. If your heli features a quality heading-hold gyro or you’re flying in the ideal world of a simulator, there will only be an occasional need to use the rudder to realign the nose. If the deviations are corrected early, small nudges of rudder should straighten it out. If the deviation is larger, thanks to the stabilizing effect of the tail-rotor gyro, it’s okay to hold in the rudder as long as you need to.
Whenever things start becoming hectic, focus on using the right stick to level the rotor disk and reestablish a stationary hover then use the rudder to correct the body. Crashing out of a hover usually doesn’t occur because the nose is 10° off heading. Crashes occur when a pilot is so focused on correcting yaw that he or she neglects to return the heli to level or stop it from moving!
Throttle Technique
For various reasons, helicopters are prone to rising and sinking while hovering and therefore require frequent throttle adjustments to maintain the same height. On average, slightly more than half throttle is required to hover, thus, if a throttle adjustment remains above or below that setting for any length of time, the heli will end up climbing or descending.
In order to maintain the same height during hover, the proper response to rising and sinking is to briefly bump or nudge the throttle more or less to stop the trend and then return to slightly above half throttle (or to whatever throttle position your heli best hovers). If it turns out that the initial bump of throttle isn’t enough, you can always bump the throttle again and/or learn to change the size of the bump depending on the severity of the rise or sink.
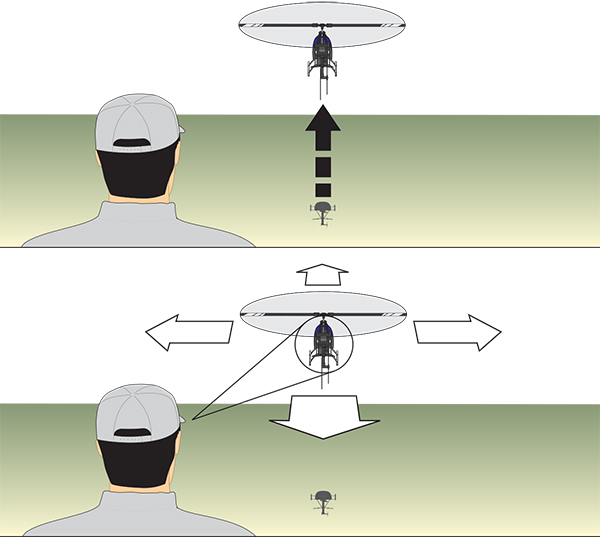
In the same way that bumping the right stick enables more precise flight control, briefly bumping the throttle will enable you to stop unwanted altitude changes without affecting a climb or descent in the other direction (Figure 4).
Anyone who can maintain a stationary hover can also land the helicopter. Gradually lower the heli and establish a stationary hover a few inches above the ground. Because of the ground-effect phenomena, the helicopter will tend to descend more slowly as it gets close to the ground. This sometimes causes novice pilots to feel as though they must reduce the power further, only to experience a sudden drop and hard landing.
Practice gently nudging the throttle to lower the heli an inch at a time until it touches down. Furthermore, don’t ever allow the heli to touch down if it’s moving sideways, forward, or rearward, because doing so in the real world would likely result in the heli tipping over and the rotor blades striking the ground.
Although it’s only on a simulator, reinforce good habits by not letting the heli touch down unless it’s vertical.
Hover Throttle Technique: Precise altitude control during a hover is accomplished by briefly bumping the throttle in response to slight altitude changes. The only time a throttle increase or decrease is maintained is when you wish to gain or lose altitude.
The instant the heli starts to sink, input a short burst of throttle and return to slightly above half throttle.
The instant the heli starts to rise, briefly reduce the throttle and then return to slightly above half throttle. Sustain a throttle adjustment to climb or descend.
Crawl-Walk-Run
The quickest way to learn the skills needed to maintain a stationary hover is to practice them individually before bringing them together. Fortunately, training on a flight simulator allows heli pilots to learn the controls one at a time.
In the interest of simplicity, I’ll continue to use the term aileron to describe bank and roll control, elevator to describe tilting the heli forward and backward, and rudder to describe yaw control.
Start with the helicopter pointing away from you (with the tail in) so that its orientation matches your own as if you were sitting in the cockpit. Before lifting off, smoothly spool up the rotor rpms to the point where the heli appears light on the skids, then smoothly advance the throttle to lift off. Don’t advance the throttle all at once or the increasing torque of the rotor will jerk the heli around and make everything that follows more difficult.
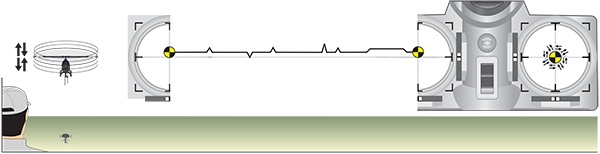
Once aloft, the sole objective should be to practice adjusting the throttle to maintain a height of approximately 1 to 2 feet (Figure 1). Don’t worry about correcting any other deviations—just concentrate on adjusting the throttle to maintain the same height as long as you can or until the heli drifts too far away. It will take less time to learn to use the throttle when you’re not distracted.

Figure 1
1: Throttle
Determine the approximate throttle setting required to maintain the same height, and correct up-and-down movements with brief nudges of more or less throttle.
2: Aileron
Correct left and right movements with small, brief aileron bumps.
3: Elevator
Correct forward and rearward movements with small, brief elevator bumps.
4: All together
Maintain the same height. Correct left and right movements and forward and backward movements with small, brief aileron bumps.
When you are proficient with the throttle, it’s time to lift off. While continuing to adjust the throttle to maintain the same height, start correcting left and right movements with small, brief bumps of aileron. The rotor disk is not a good indicator of the aircraft’s behavior, so concentrate on the body or “heli as a whole” to detect movements as early as possible.
Continue practicing aileron corrections until you feel comfortable with the aileron and can keep the helicopter from moving left or right for lengthy periods.
Next, start concentrating on correcting forward or backward movements with small, brief bumps of elevator. When you feel comfortable keeping the heli stable with the elevator, start introducing aileron corrections between your elevator adjustments and vice versa.
If accomplishing each of these steps seems simple, you’ll know that you must be doing it correctly because making things seem easy is a good sign of proficiency. You’ll soon be simultaneously applying all of the controls.
The most important thing that any novice can do early on is to try to under-control all aileron and elevator inputs. If you read part one and think that continuing to stress the importance of keeping inputs small and brief seems redundant, the reason it’s done is because holding in inputs is the number one mistake that leads to crashing. Because it takes advanced skills to recover an out-of-control heli, avoiding trouble by making small, brief inputs is the best option for a novice.
The second most common cause of crashes is applying inputs in the wrong direction. Take confidence from knowing that if you keep your corrections small and brief, you can go the wrong direction without getting into serious trouble. Also, small, brief bumps only affect the heli slightly to “test the direction.” This works to your advantage when you’re not sure which way to go, because there is little consequence if you go the wrong way.
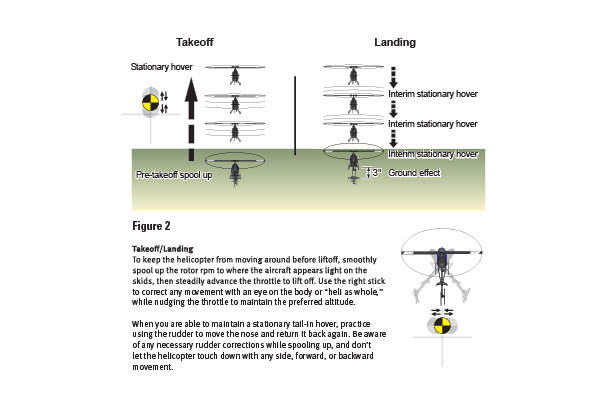
Figure 2: Takeoff/Landing
To keep the helicopter from moving around before liftoff, smoothly spool up the rotor rpm to where the aircraft appears light on the skids, then steadily advance the throttle to lift off. Use the right stick to correct any movement with an eye on the body or “heli as whole,” while nudging the throttle to maintain the preferred altitude.
When you are able to maintain a stationary tail-in hover, practice using the rudder to move the nose and return it back again. Be aware of any necessary rudder corrections while spooling up, and don’t let the helicopter touch down with any side, forward, or backward movement.
An upcoming DVD featuring these techniques will demonstrate how a pilot can apply two consecutive bumps in the wrong direction without losing control as long as they’re tiny and not held in.
When you’re capable of maintaining a stationary hover with the throttle and right stick corrections, making rudder corrections will seem easier. In the ideal simulator world, the need for rudder corrections during a hover is minimal, so you’ll have to induce deviations with the rudder to create more opportunities to practice rudder corrections (Figure 2). If things start getting hectic, concentrate on the right stick to reestablish a stationary hover and use the rudder to correct the body.
The first rudder corrections you’ll make in the real world will be to reposition the heli when it occasionally jerks left or right prior to liftoff, especially on smooth concrete. Be ready to make rudder corrections while spooling up rather than waiting until your aircraft is airborne.
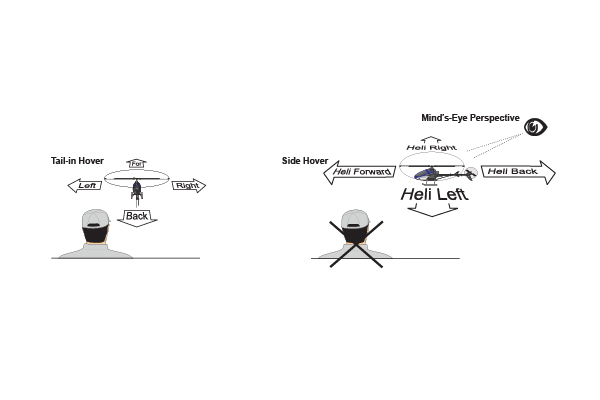
Figure 3. During a tail-in hover, the helicopter’s orientation is the same as the pilot. When you start maneuvering beyond tail-in orientation, you’ll have to forget about your own orientation and learn to think in terms of the helicopter’s left, right, front, and rear. In other words, bank to the heli’s right or left, push forward toward the nose, or pull back toward the tail—almost as if your head is above or behind the helicopter.
Anyone who can maintain a stationary hover also has the skills to land. You will have landed many times while developing hovering skills, but it’s important that you treat your simulator landings the way that you’ll need to in the real world.
Because of ground effect, for example, the heli will act as if it’s riding on a cushion of air when it gets close to the ground, and rather than cutting power and letting it plop to the ground, keep adjusting the throttle to gently lower the aircraft an inch at a time until it smoothly touches down.
Don’t let the heli touch down if it’s moving sideways, forward, or rearward. Doing so will turn into an expensive bad habit when the helicopter consequently tips over and proceeds to beat itself up (aka “the funky chicken”). Although you’re flying with a simulator, don’t let the helicopter touch down unless it’s upright.
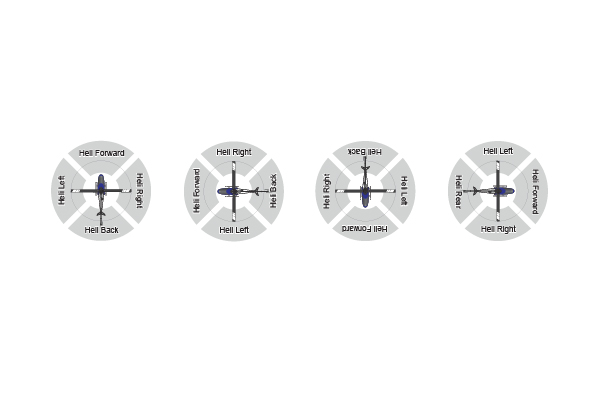
Figure 4
Side and Nose-In Hover
At some point you’ll practice hovering with the side of the helicopter facing you and then a nose-in hover. During the previous tail-in hover, your own perspective matched the heli, so right aileron moved the aircraft to your right and vice versa. Pulling the control stick back toward you moved the helicopter toward you and vice versa. That’s not the case during a side hover.
In a side hover, pulling and pushing elevator causes the heli to move to your right and left, whereas right and left aileron moves the helicopter away from or toward you. To determine the direction to apply the controls during all of the helicopter’s orientations, forget about your own left and right and switch to thinking about inputting corrections to the aircraft’s left, its right, pushing forward toward the nose, and pulling back toward the tail (Figures 3 and 4). This process doesn’t happen overnight, but thanks to the simulator you’ll have plenty of opportunities to practice before flying in the real world.
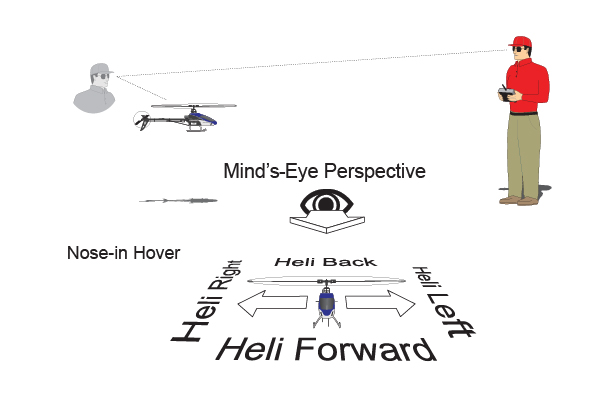
Figure 5. During a nose-in hover, experienced pilots transpose themselves as if above or behind the heli and apply corrections to the aircraft’s left and right, push toward the nose, and pull toward the tail. When uncertain, intermediate pilots will sometimes input brief, tiny bumps to test direction.
An alternative nose-in orientation technique is to apply the sticks toward the deviations, but this only works when the heli is pointing in the direction of the pilot and is only used until he or she is capable of thinking in terms of the helicopter’s orientation rather than his or her own.
When you become reasonably proficient at hovering with the side facing you, it’s time to practice nose-in hovering (Figures 5 and 6). The most efficient process for learning to hover in a nose-in orientation is to return to the start of this program and repeat each step with the nose in.
Stationary Pirouettes
The maneuver that puts all of the skills learned to this point to the test consists of holding in the rudder and performing single, then multiple pirouette rotations while making tiny aileron and elevator corrections to remain over the same spot. You may try adding a steady wind into your simulation as a great way to challenge yourself before flying in the real world.
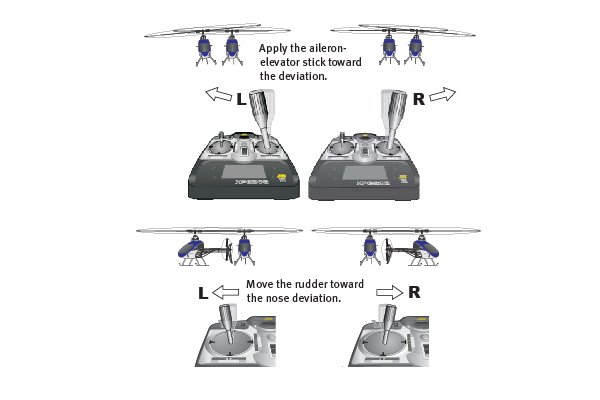
Figure 6
Translating tendency is a helicopter’s likeliness to drift to the left during hover because of the side thrust from the tail rotor (which is necessary to counter the main rotor torque). Pilots can compensate for this in calm conditions by tilting the heli slightly to the right. Those who seldom have the opportunity to fly in conditions calm enough for translating tendency to be much of an issue will instead find that correcting for wind almost always takes precedence, especially with smaller aircraft.
Practicing continuous pirouettes while bumping aileron and elevator into the wind to prevent wind drift is a great exercise for reinforcing your wind-correcting skills (Figure 7). If you establish a tail-in hover in a right-to-left crosswind, for example, you’ll need to bump or hold right aileron against the wind to remain over the same spot. When you start to pirouette, briefly pull the elevator when the tail points into the wind, bump left aileron when the other side is exposed to the wind, and push forward elevator when the nose points into the wind.
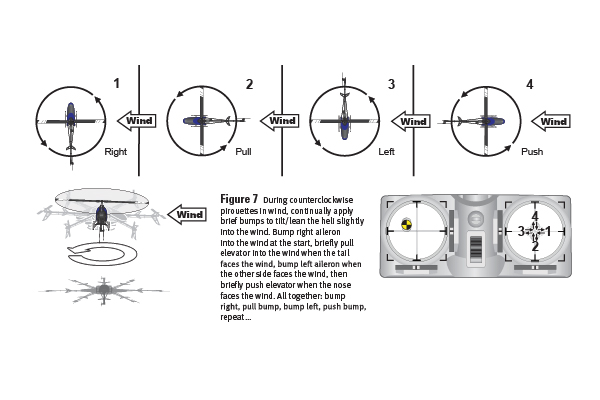
Figure 7. During counterclockwise pirouettes in wind, continually apply brief bumps to tilt/lean the heli slightly into the wind. Bump right aileron into the wind at the start, briefly pull elevator into the wind when the tail faces the wind, bump left aileron when the other side faces the wind, then briefly push elevator when the nose faces the wind. All together: bump right, pull bump, bump left, push bump, repeat …
Final Tips
It is common for helicopters to display a tendency to move forward or backward and/or to the side when initiating rudder inputs. When conditions are calm, proficient pilots will perform a series of 90° and 180° pirouettes without any corrections to determine whether the heli is prone to additional unwanted movements when applying rudder, then input the appropriate elevator and/or aileron correction during subsequent pirouettes to prevent the deviation(s).
Although most pilots attempt to fly the best maneuver right away and end up making so many corrections that it becomes difficult to spot how to improve the maneuver, proficient pilots initially keep things simple to make it easier to pinpoint what they need to do to make significant strides by the third or fourth attempt. Pros know that it’s not how you start, it’s how well you finish that counts!
If you follow these tips, certain segments of flying will become automatic—freeing you to find more ways to improve your flying and/or add new maneuvers.
—Dave Scott
About Dave Scott
Dave Scott is a full-scale aerobatics competitor and airshow pilot, and has worked in the development of several full-scale aircraft. He founded 1st U.S. R/C Flight School and has professionally trained more than 1,500 RC pilots of all skill levels. His groundbreaking flight training manuals and articles feature the accelerated airplane and helicopter training techniques that he’s developed during his 14,000 hours of instructing experience.
More information about Dave’s flight school and manuals can be found at www.rcflightschool.com.
Sources
1st U.S. R/C Flight School
www.rcflightschool.com
The instant the heli starts to sink, input a short burst of throttle and return to slightly above half throttle.
The instant the heli starts to rise, briefly reduce the throttle and then return to slightly above half throttle. Sustain a throttle adjustment to climb or descend.
Crawl-Walk-Run
The quickest way to learn the skills needed to maintain a stationary hover is to practice them individually before bringing them together. Fortunately, training on a flight simulator allows heli pilots to learn the controls one at a time.
In the interest of simplicity, I’ll continue to use the term aileron to describe bank and roll control, elevator to describe tilting the heli forward and backward, and rudder to describe yaw control.
Start with the helicopter pointing away from you (with the tail in) so that its orientation matches your own as if you were sitting in the cockpit. Before lifting off, smoothly spool up the rotor rpms to the point where the heli appears light on the skids, then smoothly advance the throttle to lift off. Don’t advance the throttle all at once or the increasing torque of the rotor will jerk the heli around and make everything that follows more difficult.
Once aloft, the sole objective should be to practice adjusting the throttle to maintain a height of approximately 1 to 2 feet (Figure 1). Don’t worry about correcting any other deviations—just concentrate on adjusting the throttle to maintain the same height as long as you can or until the heli drifts too far away. It will take less time to learn to use the throttle when you’re not distracted.
Figure 1
1: Throttle
Determine the approximate throttle setting required to maintain the same height, and correct up-and-down movements with brief nudges of more or less throttle.
2: Aileron
Correct left and right movements with small, brief aileron bumps.
3: Elevator
Correct forward and rearward movements with small, brief elevator bumps.
4: All together
Maintain the same height. Correct left and right movements and forward and backward movements with small, brief aileron bumps.
When you are proficient with the throttle, it’s time to lift off. While continuing to adjust the throttle to maintain the same height, start correcting left and right movements with small, brief bumps of aileron. The rotor disk is not a good indicator of the aircraft’s behavior, so concentrate on the body or “heli as a whole” to detect movements as early as possible.
Continue practicing aileron corrections until you feel comfortable with the aileron and can keep the helicopter from moving left or right for lengthy periods.
Next, start concentrating on correcting forward or backward movements with small, brief bumps of elevator. When you feel comfortable keeping the heli stable with the elevator, start introducing aileron corrections between your elevator adjustments and vice versa.
If accomplishing each of these steps seems simple, you’ll know that you must be doing it correctly because making things seem easy is a good sign of proficiency. You’ll soon be simultaneously applying all of the controls.
The most important thing that any novice can do early on is to try to under-control all aileron and elevator inputs. If you read part one and think that continuing to stress the importance of keeping inputs small and brief seems redundant, the reason it’s done is because holding in inputs is the number one mistake that leads to crashing. Because it takes advanced skills to recover an out-of-control heli, avoiding trouble by making small, brief inputs is the best option for a novice.
The second most common cause of crashes is applying inputs in the wrong direction. Take confidence from knowing that if you keep your corrections small and brief, you can go the wrong direction without getting into serious trouble. Also, small, brief bumps only affect the heli slightly to “test the direction.” This works to your advantage when you’re not sure which way to go, because there is little consequence if you go the wrong way.
Figure 2: Takeoff/Landing
To keep the helicopter from moving around before liftoff, smoothly spool up the rotor rpm to where the aircraft appears light on the skids, then steadily advance the throttle to lift off. Use the right stick to correct any movement with an eye on the body or “heli as whole,” while nudging the throttle to maintain the preferred altitude.
When you are able to maintain a stationary tail-in hover, practice using the rudder to move the nose and return it back again. Be aware of any necessary rudder corrections while spooling up, and don’t let the helicopter touch down with any side, forward, or backward movement.
An upcoming DVD featuring these techniques will demonstrate how a pilot can apply two consecutive bumps in the wrong direction without losing control as long as they’re tiny and not held in.
When you’re capable of maintaining a stationary hover with the throttle and right stick corrections, making rudder corrections will seem easier. In the ideal simulator world, the need for rudder corrections during a hover is minimal, so you’ll have to induce deviations with the rudder to create more opportunities to practice rudder corrections (Figure 2). If things start getting hectic, concentrate on the right stick to reestablish a stationary hover and use the rudder to correct the body.
The first rudder corrections you’ll make in the real world will be to reposition the heli when it occasionally jerks left or right prior to liftoff, especially on smooth concrete. Be ready to make rudder corrections while spooling up rather than waiting until your aircraft is airborne.
Figure 3. During a tail-in hover, the helicopter’s orientation is the same as the pilot. When you start maneuvering beyond tail-in orientation, you’ll have to forget about your own orientation and learn to think in terms of the helicopter’s left, right, front, and rear. In other words, bank to the heli’s right or left, push forward toward the nose, or pull back toward the tail—almost as if your head is above or behind the helicopter.
Anyone who can maintain a stationary hover also has the skills to land. You will have landed many times while developing hovering skills, but it’s important that you treat your simulator landings the way that you’ll need to in the real world.
Because of ground effect, for example, the heli will act as if it’s riding on a cushion of air when it gets close to the ground, and rather than cutting power and letting it plop to the ground, keep adjusting the throttle to gently lower the aircraft an inch at a time until it smoothly touches down.
Don’t let the heli touch down if it’s moving sideways, forward, or rearward. Doing so will turn into an expensive bad habit when the helicopter consequently tips over and proceeds to beat itself up (aka “the funky chicken”). Although you’re flying with a simulator, don’t let the helicopter touch down unless it’s upright.
Figure 4
Side and Nose-In Hover
At some point you’ll practice hovering with the side of the helicopter facing you and then a nose-in hover. During the previous tail-in hover, your own perspective matched the heli, so right aileron moved the aircraft to your right and vice versa. Pulling the control stick back toward you moved the helicopter toward you and vice versa. That’s not the case during a side hover.
In a side hover, pulling and pushing elevator causes the heli to move to your right and left, whereas right and left aileron moves the helicopter away from or toward you. To determine the direction to apply the controls during all of the helicopter’s orientations, forget about your own left and right and switch to thinking about inputting corrections to the aircraft’s left, its right, pushing forward toward the nose, and pulling back toward the tail (Figures 3 and 4). This process doesn’t happen overnight, but thanks to the simulator you’ll have plenty of opportunities to practice before flying in the real world.
Figure 5. During a nose-in hover, experienced pilots transpose themselves as if above or behind the heli and apply corrections to the aircraft’s left and right, push toward the nose, and pull toward the tail. When uncertain, intermediate pilots will sometimes input brief, tiny bumps to test direction.
An alternative nose-in orientation technique is to apply the sticks toward the deviations, but this only works when the heli is pointing in the direction of the pilot and is only used until he or she is capable of thinking in terms of the helicopter’s orientation rather than his or her own.
When you become reasonably proficient at hovering with the side facing you, it’s time to practice nose-in hovering (Figures 5 and 6). The most efficient process for learning to hover in a nose-in orientation is to return to the start of this program and repeat each step with the nose in.
Stationary Pirouettes
The maneuver that puts all of the skills learned to this point to the test consists of holding in the rudder and performing single, then multiple pirouette rotations while making tiny aileron and elevator corrections to remain over the same spot. You may try adding a steady wind into your simulation as a great way to challenge yourself before flying in the real world.
Figure 6
Translating tendency is a helicopter’s likeliness to drift to the left during hover because of the side thrust from the tail rotor (which is necessary to counter the main rotor torque). Pilots can compensate for this in calm conditions by tilting the heli slightly to the right. Those who seldom have the opportunity to fly in conditions calm enough for translating tendency to be much of an issue will instead find that correcting for wind almost always takes precedence, especially with smaller aircraft.
Practicing continuous pirouettes while bumping aileron and elevator into the wind to prevent wind drift is a great exercise for reinforcing your wind-correcting skills (Figure 7). If you establish a tail-in hover in a right-to-left crosswind, for example, you’ll need to bump or hold right aileron against the wind to remain over the same spot. When you start to pirouette, briefly pull the elevator when the tail points into the wind, bump left aileron when the other side is exposed to the wind, and push forward elevator when the nose points into the wind.
Figure 7. During counterclockwise pirouettes in wind, continually apply brief bumps to tilt/lean the heli slightly into the wind. Bump right aileron into the wind at the start, briefly pull elevator into the wind when the tail faces the wind, bump left aileron when the other side faces the wind, then briefly push elevator when the nose faces the wind. All together: bump right, pull bump, bump left, push bump, repeat …
Final Tips
It is common for helicopters to display a tendency to move forward or backward and/or to the side when initiating rudder inputs. When conditions are calm, proficient pilots will perform a series of 90° and 180° pirouettes without any corrections to determine whether the heli is prone to additional unwanted movements when applying rudder, then input the appropriate elevator and/or aileron correction during subsequent pirouettes to prevent the deviation(s).
Although most pilots attempt to fly the best maneuver right away and end up making so many corrections that it becomes difficult to spot how to improve the maneuver, proficient pilots initially keep things simple to make it easier to pinpoint what they need to do to make significant strides by the third or fourth attempt. Pros know that it’s not how you start, it’s how well you finish that counts!
If you follow these tips, certain segments of flying will become automatic—freeing you to find more ways to improve your flying and/or add new maneuvers.
—Dave Scott
About Dave Scott
Dave Scott is a full-scale aerobatics competitor and airshow pilot, and has worked in the development of several full-scale aircraft. He founded 1st U.S. R/C Flight School and has professionally trained more than 1,500 RC pilots of all skill levels. His groundbreaking flight training manuals and articles feature the accelerated airplane and helicopter training techniques that he’s developed during his 14,000 hours of instructing experience.
More information about Dave’s flight school and manuals can be found at www.rcflightschool.com.
Sources
1st U.S. R/C Flight School
www.rcflightschool.com
This Month's Issue

Join the AMA
![]()


11 comments
Good article.
thanks
Learn to fly
Practice
nice article, need more like
Nice article
Great article
excellent
Thank you for taking the time
Hovering Exercises
I think you nailed it with
Add new comment