


The Rolling Workstation Project

Written by Tim Soukup A great project starts with a great foundation How To Do It As seen in the January 2011 issue of Model Aviation.
The Breakdown
Work Surface: This is a sheet of 5/8 or 3/4 MDF trimmed to 4 x 6. You can buy it last, when the construction is almost complete. The last operation is to fasten the top surface. MDF requires no paint or finishing, but I painted mine and then applied a coat of polyurethane. When it gets old, scarred, and stained, simply unscrew this surface, flip it over, and reattach it. Then you have a fresh top. I learned that MDF is sold in 49 x 97-inch sheets, so it’s 1 inch larger than necessary all around. Have it trimmed for you at the time of purchase. You also need two sheets of 3/4 birch (five ply) plywood, trimmed to 44 x 68 inches. These pieces are 2 inches undersized all around (not 48 x 72 inches). That is so that the MDF top will leave you with a 2-inch lip on every side. If your finished bench has no overhang, you can’t clamp anything to it. Compartment Walls and Drawer Frames: Two or three sheets of 1/2 birch plywood trimmed to 36 x 96 inches are required. I used the better part of three sheets. Also get 12 straight, high-quality 2 x 4s, untrimmed. You won’t need them all, but you will probably make a mistake or two cutting them at home during construction. I did. It’s best to have a few spares to save you a trip to the store. Two straight 4 x 4s, 8 feet long, will be cut to exactly 36 inches and used as corner supports. Check these for straightness. I cut mine a tiny bit long and then made a series of trimming cuts, to ensure that the final length was correct.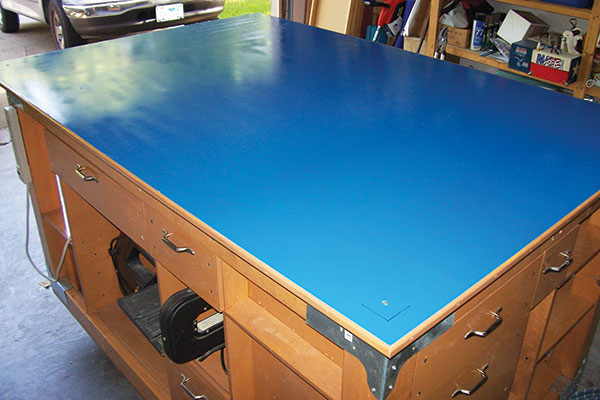
This is where dreams begin. A wide-open building surface cries for a project.
Casters (Optional): These 4-inch casters stand 5.25 inches tall. I obtained mine locally, at Northern Tool and Equipment for $11 each (part number 189341). The picture in the online catalog is incorrect. The casters I purchased came with the bare minimum amount of grease in the bearings. I used a grease gun to inject a bit more. Estimated Materials Cost: Four or five plywood sheets (the good stuff): $140-$180 One sheet of 5/8 MDF: $25 12 8-foot 2 x 4s: $30 Two 4 x 4s (cut into 36-inch sections): $24 Four caster wheels: $44 One set of slides per drawer at $5 per set (optional): $50 One 4 x 8 sheet of 1/4 hardboard (optional): $12 Five boxes of coarse-thread drywall screws: $25 (Two boxes of 3-inch, two boxes of 2-inch, 1 box of 15/8) Eight steel corner brackets at $5.50 each: $36 One gallon Min-Wax polyurethane (optional): $29 One gallon mineral spirits (optional): $12 Total: $494 ($364 without drawers)
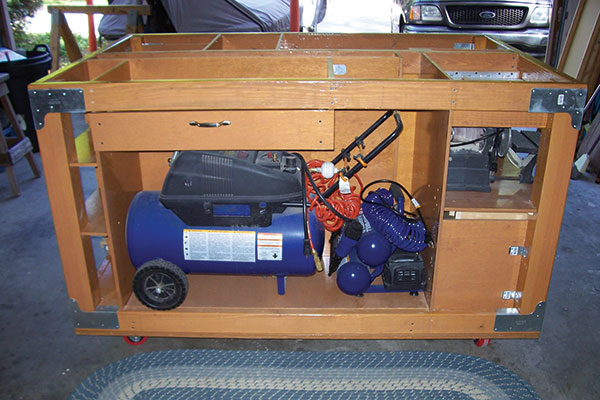
A rolling workstation offers its user not only four vantage points for whatever is being built, but also four storage options.
Many of us build and repair our models without taking our work areas into consideration. After all, it’s our domain, right? Tools and tables are our environment. We should make this a higher priority in our pursuit of the hobby. How many times have you wished that you had a better work area or more room to work? I can’t tell you how many times those thoughts have occurred to me in the past 30-plus years. I have been involved in this hobby/sport since I was 8. Growing up, I built on whatever was available—a Ping- Pong table in my parents’ garage, a card table, or whatever I had access to. These days I feel fortunate to have a two-car garage that doubles as my shop. Sure, I’d like to have a dedicated standalone shop, but we work within our means. If you live in an apartment or a condo, your workstation abilities are probably more constrained.
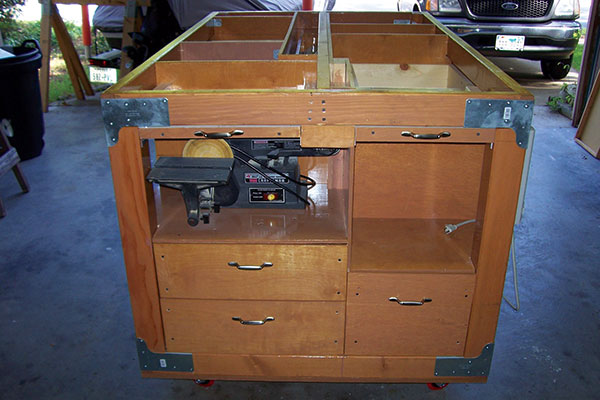
The tabletop is 44 inches from the floor, which is good for the average-height person to work on a model up to 1.20 size. Giant-scale builders might want a shorter bench.
For a long time I used two 24- x 96-inch workbenches with drawers and storage underneath. However, they were flush against the wall and limited accessibility. In addition, while working I frequently lose small items that are mysteriously attracted to the crevice between the workbench and the wall. My preferred workspace is an “island.” Although I don’t claim that the project I’m presenting is the do all/end all/be all of workstations, it serves my purposes much better than what I had been using. Even those who assemble ARFs can appreciate a straight working surface. I “make do” with standard tools, and I think you can too. If you have questions at some point, ask someone. Don’t guess; that might cost you time and money. I am fortunate in that a couple of my friends make cabinets and are master woodworkers. Nothing smells better than freshly cut pine, cedar, or oak. As I have mentioned, aeromodelers’ building needs differ depending on task, location, and other factors. The intent of this article is to help develop your own space through the construction story of my rolling workstation.
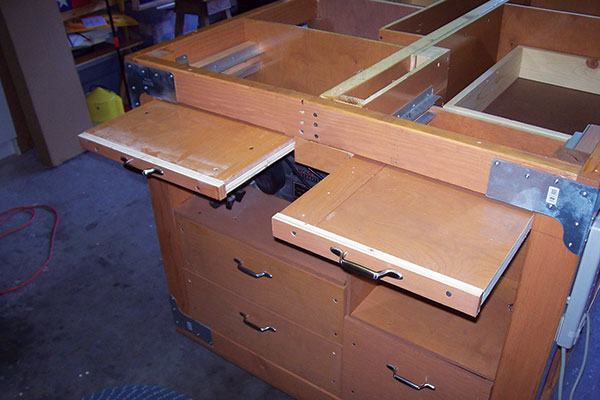
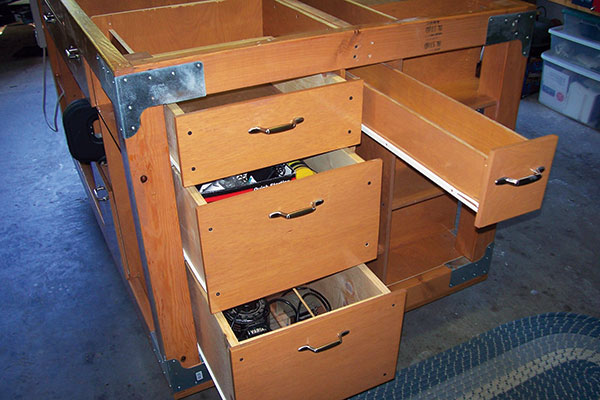
Drawers on rollers use hardware scavenged from an old computer desk. Everything is attached with screws, including galvanized corner brackets.
This structure consists of a generous worktop that measures 4 x 6 feet, several compartments for storage, and a good number of drawers. It also features a sidemounted electrical power strip with six outlets and sits on four sturdy casters so I can move it around or out of the way as the situation dictates. Mobility is what makes this workbench multifunctional. Getting Started: We aeromodelers have unique building needs and requirements, and the solutions can be as varied as we are. For this project you can use your own dimensions or the ones that I provide. I have changed facets of this workstation even while building using my new setup. Before I began, I browsed the Internet for free plans for a workspace similar to this. The searches I conducted turned up probably 2 million results. I formulated my design by gleaning information and ideas from approximately two dozen articles. I also incorporated a number of considerations that Bob Hunt addressed in the March and May 2010 MAs. From that point I went to a clean sheet of graph paper. Don’t start cutting up good lumber and driving screws without a plan. I sketched several simple dimensions and the overall layout. Then I went into my shop and measured all the tools that I wanted to incorporate into the design, wrote all of the dimensions on a small pad, and then began designing.
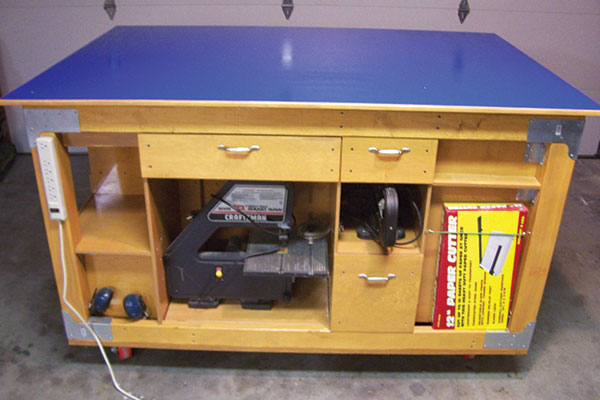
Tim measured his popular tools and supplies, and then made custom storage spaces to fit them. He finished all wood parts with several coats of Min-Wax before assembly.
I created the station to offer a generous and sturdy work surface and plenty of storage below. I made sure that I fabricated cubicles that were adequate sizes to store all of my most often-used tools. Nothing is worse than having a space that is 1/2 inch too narrow or 1/4 inch too short in which to store an item. If you choose to make individualized spaces for your tools, don’t guess the dimensions; be sure of their required spaces. Keep in mind the thickness of the materials you are using. If you planned to employ 1/2 plywood but then purchased 5/8 or 3/4, you are going to run into problems. I went to the local home-improvement store with my notepad. I made notes about what materials were available and their associated costs.'
The tabletop is two layers of heavy plywood the size of the station frame. On top of that the author screwed on a painted layer of MDF that is 2 inches wider all around.
You could purchase precut workbench kits and then modify them to accept wheels, but those setups are made to sit flat on the floor. If they are constructed from particleboard, they probably warp and sag as time passes unless you mount them atop a level, sturdy frame. The precut structures might be more suitable for you, but you won’t have the option of custom-sizing cabinets or storage compartments. My workstation has no wasted space. After my home-improvement-center field trip, I knew that the cost would be close to $400 for wood, hardware, and the Min-Wax polyurethane finish that I would need. Materials: As I was browsing at the store, I noticed that there are considerable variations in materials and their costs. I encourage you to spend the extra money on good-quality products.
Four-inch casters support the full weight of the workbench, with duty to spare. The station can easily be relocated in the garage, to make space for a car in the winter.
I remember the day I learned about “contest balsa.” It made the models I built fly considerably better than regular balsa did, and they were definitely lighter in weight. They also cost slightly more. That’s also when I realized that most “bargain” wood really wasn’t. You have a choice to make; will this workstation be stationary or mobile? If it is going to sit in one spot, almost any sort of plywood or premade cabinets will do for a base. It’s the top that will need to be the most accurate. I chose to make my structure mobile, so it was going to have to be much more robust. I purchased an extremely high grade of materials; I was building this workstation to last a long time. Don’t waste your time building the frame from particleboard or OSB (oriented strand board); they look like chipboard or thin wood wafers pressed and glued together. These materials are too weak, and the result will not look like a carefully crafted workpiece. It might appear to be a crate when you’re shooting for a cabinet. As you select your lumber, make sure it’s straight. Warped 2 x 4s will yield a similarly twisted product. Check for knotholes, and look at all four sides of each piece of wood. A few little (dime size) knotholes aren’t bad, but the fewer the better.
The basic frame of Tim’s bench is hand-picked 4 x 4 posts and 2 x 4 spreaders. Sealing the material is important to minimize seasonal expansion.
Sight down each edge of the wood and look for obvious warps. I saw some pieces that would have made great propellers! I’ll bet that I culled through 120-140 pieces to select the 12 I bought. I purchased 8-foot (96 inch) 2 x 4s. For this project, the longest needed to be 68 inches. I found a few pieces that were straight and had great grain, but one end was bad. That was fine, because those lengths were trimmed during construction and the flaws presented no problems. While you are at the home store, ask to see the high-quality plywood. I chose some presanded 1/2 and 3/4 birch. It is a step or two better than construction-grade plywood—but not furniture grade—and both sides have a beautifully sanded finish. Check both sides for blemishes, and examine edges and corners for damage. Take notes while you are shopping. Even write down item names, prices, and SKU (stock-keeping unit) numbers so you don’t get confused later. You’ll need to have the plywood cut to size. Many home-improvement stores have fixtures that will slice plywood almost straight. Mark your material, and then have an attendant make the long cuts on a saw fixture. Since I planned for my bench to be 4 x 6 feet, a standard sheet of plywood needed to be trimmed. Keep the scraps.
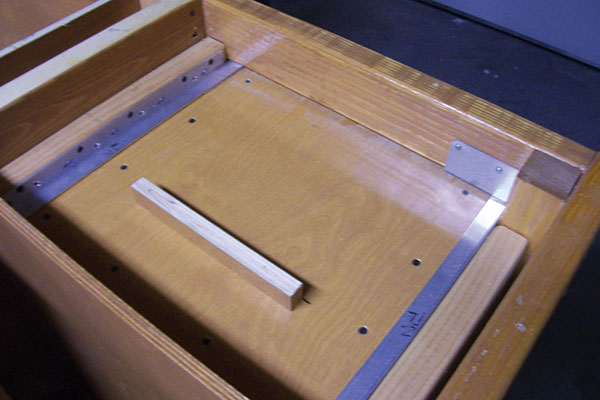
Corner posts are notched as shown. Angle aluminum cut to size supports the sliding shelf. Notice the wood grain; the author made some excellent material choices.
I bought four 6-inch-diameter swiveling casters but returned them after a test installation and obtained the 4-inch size. The 6-inch wheels would have been too tall. By fitting 4-inch wheels, the tabletop was 44 inches from the floor. At least two of the four casters must be able pivot so you can maneuver your workstation into different locations. If they don’t spin, you’ve built a 500-pound speed dolly. The wheels I used are rated at 550 pounds of capacity each. I didn’t want to overload a less capable wheel, nor did I relish the thought of a wheel failing someday when I’m moving my workstation around the shop. Assembly: Rather than provide a step-by-step progression through this project, I’ll hit only the fine points. You already know that you need to make accurate cuts. I used two rechargeable drills for the assembly process; one had a bit installed and the other had a Phillipshead driver. That way I could drill with one and drive in screws using the other.
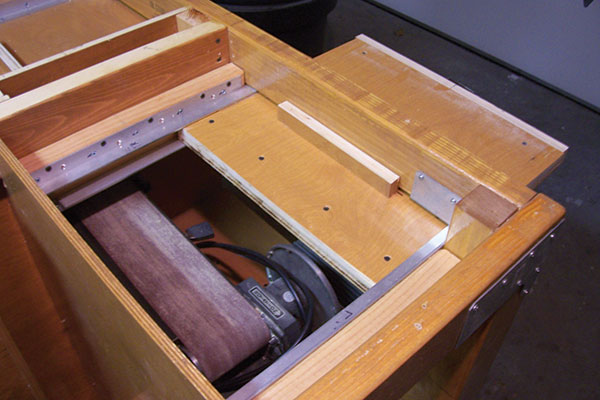
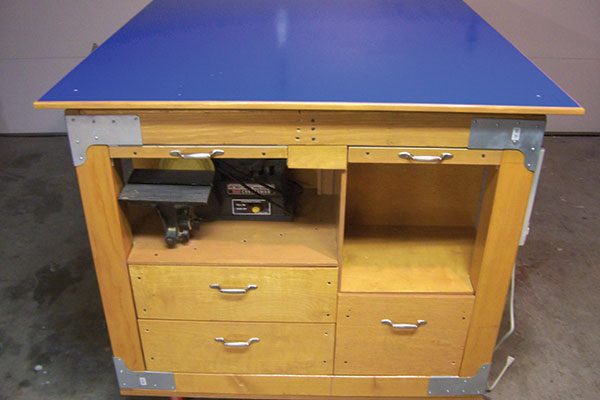
Tools that are used most often are kept in a cubby that is easy to access. Design your workbench to suit your needs. Fill empty spaces with drawers instead of shelves.
Remember that a 2 x 4 piece of wood is actually 1.5 inches by 3.5 inches. A 4 x 4 is actually 3.5 inches square—not 4. Allow for these dimensions if you design your own structure or work from a sketch. Use as many squaring devices as you can. Triangles and squares aren’t solely for aligning wings, rudders, and stabilizers. This project isn’t simply a table with wheels. It needs to accommodate a lot of equipment stored in various places, which adds substantial weight to the final product. I don’t want to find two years from now that the entire table is swaybacked like an old mare; there’s nothing I can do about it at that point. I want it to stay flat. If you don’t plan on storing heavy power tools in your workbench, it probably doesn’t have to be as substantial as mine is. A few framed cubicles made from 1/2 plywood and plastic tubs would be fine. Doors are a nice touch too. I began by constructing the basic box frame. Then I stained, sanded, and sealed it with two or three coats of polyurethane. I chose this sequence because it was easier to manipulate the frame and turn it over to apply the finish while the structure was still mostly unbuilt.
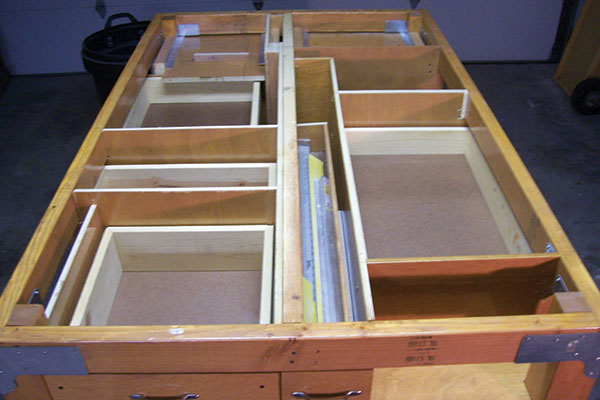
The frame supports the work surface in several places, to prevent sagging. You can build your workstation from a plan or start with a frame and fill it in.
I finished approximately 95% of the structure and plywood panels (while they were still large sheets) with polyurethane before final assembly. If you wait until you’re finished assembling the workstation to apply the finish, you’ll find that your structure has gained considerable mass. This method provided me with a surface that was 99% free of runs and drips. I didn’t relish the thought of having to get on my hands and knees to stain inside all of the little crevices and sand them between coats. This was by far the easiest but most time-consuming (taking into account drying time between coats) portion of the project. I applied finish to one side of the plywood sheeting all the way to its completion. When I was satisfied with the result, I finished the other side. This way I didn’t have to keep track of how many coats I had given each side. From start to completion, this finishing process took slightly more than three weeks. If you omit a painted finish, you can probably build your workstation in a three-day weekend. If you omit the plans, you can build it in maybe four hours. If you put forth enough time and don’t rush, you’ll have a fine workstation. I’m guessing that the total amount of time that I invested was close to 100 hours. Do you remember those 1/2 plywood sheets you had the store cut to 36 x 96 inches? They are going to make all of the inner supports and cabinetry. Thirty-six inches is exactly the spacing between the plywood top and bottom. As I mentioned, the complete workstation, sitting on its wheels, will be 44 inches from the floor to the surface of the medium-density fiberboard (MDF) top. I’m tall, and I appreciate being able to work on my models without having to stoop over. I framed the box structure on the garage floor. When I was satisfied that all was square, I fastened the bottom plywood using 3-inch screws and then flipped the entire structure right-side up to complete the cabinets.
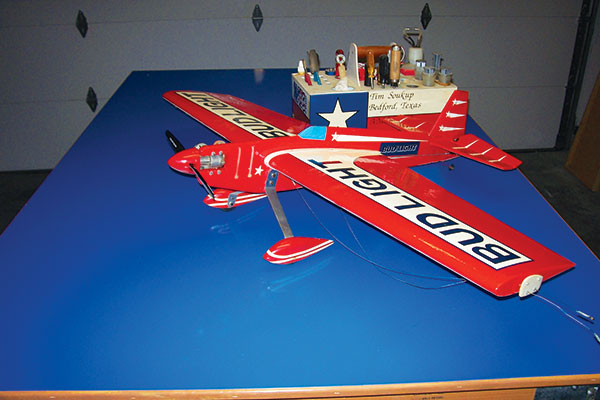
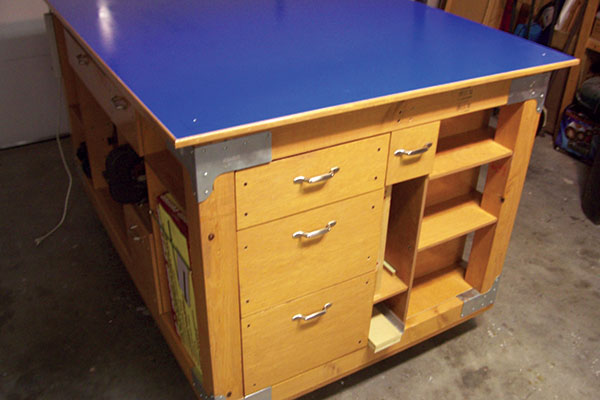
There’s enough room to build several models on the author’s rolling workstation. Its bright-blue finish is excellent for photos and easy on the user’s eyes.
Install all inner walls and interior post supports before you add the top piece of plywood (predrilled) and MDF top. It’s easier to install the drawers and their associated hardware and the slide-out tables with the top off. It would only be in the way at this point. A smaller (and simpler) workstation certainly won’t require this amount of preparation. Whether or not you opt for drawers is up to you. I suggest that you have all slide hardware in hand, and follow the manufacturer’s recommendations when you build the drawers. That will affect the dimensions of each drawer and depends on whether you choose side- or bottom-mount slides. Each type has its own mounting method. My workstation has a total of 11 drawers. I recently got rid of an old computer desk, but before it went out to the curb I scavenged all of the slide hardware from it. I got three free slides from that. So I went a bit overbudget. The price will change depending on who’s listening to you tell the story and the dimensions of your finished project. But I’ve got one sturdy workstation, though, and I can even roll it outside if I want. Watch those saw blades and count your fingers. Good luck! -Tim Soukup [email protected]
This Month's Issue

Join the AMA
![]()


6 comments
Great Worktable!!!!
Great Worktable!!!!! Might
Rolling Work Station
Rolling Work Station Article
Workstation Modification
Rolling Work Station
Add new comment