


Phoenix Model Stuka Ju 87 GP/EP ARF
Written by Tom Sullivan An electrified dive bomber Abridged product review Photos by the author Read the full product review in the November 2016 issue of Model Aviation.
Specifications
Model type: 1:5-3/4 semiscale ARF Skill level: Advanced Wingspan: 75 inches Wing area: 936 square inches Airfoil: Semisymmetrical Length: 60 inches Weight: Listed at 10.8 to 11.9 pounds; actual 12.375 pounds Radio: Minimum six-channel, nine standard high-torque servos Power system: Recommended: 1.20 two-stroke; 1.40 four-stroke; 20cc (gas); or 1,600- to 2,200-watt electric with 5S or 6S 5,500 mAh battery Price: $289.99Test-model details
Power system: RimFire 1.20 brushless outrunner motor; ElectriFly 80-amp ESC; 6S 5,000 mAh LiPo battery Radio: Tactic TR625 receiver; nine TSX45 Tactic servos; three Y harnesses, four servo extensionsPluses
• Laser-cut balsa and plywood used in construction of the complete airframe. • Prepainted fiberglass cowl, wheel pants, and wheel spats included. • Film covering is in a typical German camouflage color scheme, preprinted with a wealth of panel lines and hatch details. • Two-piece, plug-in wing panels supported by an aluminum wing tube. • Aileron and flaps are preinstalled. • Firewall comes predrilled and includes preinstalled T-nuts. • The front half of the canopy doubles as a hatch for battery, radio, and tank access. • External tanks and bomb are included to add scale detail. • Prepainted pilot and gunner figures are included.Minus
• The port main gear failed on the maiden flight during an average landing.Bonus video
Abridged product review
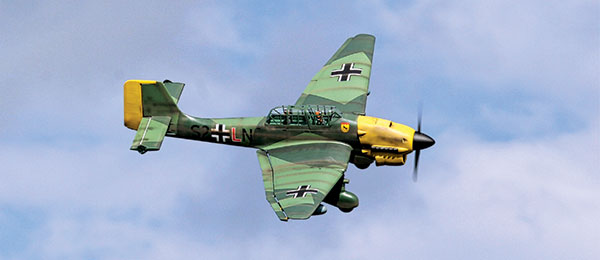
In 1935, a German aircraft designer named Hermann Pohlmann came up with a new design for a ground-attack airplane. It was so revolutionary that it helped define what we know today as precision bombing. That airplane was the Junkers Ju 87 Stuka. With its inverted gull wings, fixed spatted undercarriage, and legendary siren, it became one of the best-known warbirds used in World War II. Now that same design has been reproduced by the Phoenix Model company in 1:5-3/4 size. Far from a small foamie, this semiscale ARF model has a 75-inch wingspan and is built-up from laser-cut balsa and plywood. The airframe is covered with a unique, preprinted German camouflage scheme (medium and dark green on the upper surfaces, gray on the underside), but a wealth of details printed on the covering includes panel lines, hatches, Iron Crosses, and squadron markings. It’s an interesting covering that seems to have an adhesive backing. The individual airframe components are solidly made with typical built-up construction, and an outer layer of sheeting. It feels solid in your hands and the wing panels don’t show any signs of bending or warps when under stress. Matching the colors is a wealth of prepainted parts made from a variety of materials. The largest of these are the fiberglass cowl, wheel pants, wheel spats, and underwing fuel tanks. Smaller pieces made from plastic include the stabilizer/elevator end caps, spinner, and two identical pilot busts (one pilot and one gunner). Rounding out the parts are an aluminum wing tube, wheels, fuel tank, control hardware, and even a dummy bomb that can be mounted underneath the fuselage. Multiple options are available to power the Stuka: glow, gas, or electric. Included are the parts to mount a glow engine via beam mounts, or if going electric as I did, there is a hardware package with a standoff to properly space the motor. A substantial amount of work has been done for you at the factory. One of the more difficult things to do when building a Stuka is to correctly align and install the ailerons and flaps. Well, no worries here because all of that is done right out of the box.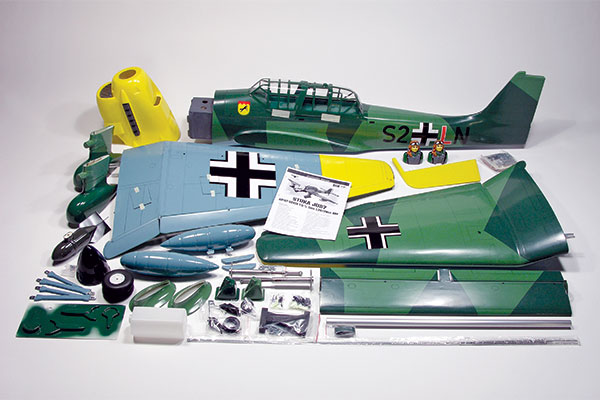
For an inexpensive scale model, the Phoenix Stuka ARF kit includes a variety of items that are optional extras elsewhere—pilot figures, wing tanks, a spinner, and even a centerline bomb.
As usual in my reviews, I’m not going to go through all of the construction steps. If you’d like to see the steps, a link to the Stuka ARF’s manual is in the “Sources” section. The manual is 28 pages long and is surprisingly good considering it was translated into English. Each step has at least one detailed drawing showing what needs to be done. Oh, one other thing before I go any further. You’ll notice a difference in the Stuka’s finish if comparing any close-up shots to the finished flight shots. The Stuka looks “factory fresh.” The covering has a sheen, but the painted parts are glossy in many cases, especially the canopy framing, the wheel pants, and the cowl. Now, I wasn’t around back when Stukas were produced, so there may have been a few that looked that way, but for my taste, I chose to weather this one to give it a more authentic look. I’ll describe how I did this later.
Construction
You need to decide how to power your Stuka. In my case, an electric power system was supplied, consisting of a RimFire 1.20, an 80-amp ESC, and a 6S 5,000 mAh battery. This electric power system is a good match for the Phoenix Stuka. Included in the kit is all of the hardware needed to mount the RimFire brushless motor and no drilling is required. Simply use the supplied hardware and some threadlocker. You’ll find that everything is properly spaced. If you do choose to install a glow engine, a two-part beam mount is included that bolts into the same mounting holes as the RimFire. Also included are a fuel tank and a throttle pushrod. One great thing about using electric power was that there was no fiddling or trimming to fit the cowl. It simply slipped over everything with no clearance problems. After positioning it to center on the spinner and have the proper spacing to the backplate, I drilled four holes and the cowl was attached. It was as simple as that. A few other optional details can be added for more realism. One is a set of gun “blisters” that are cut from vacuum-formed plastic and glued to the top of each wing panel. Another is a preassembled bomb that is held under the center of the fuselage with a single screw. It looked slightly small to me, so I chose not to install it. You could always try it, and it’s simple to remove if you change your mind. I was happy to see that the model balanced right where it should. There’s a little room to move the LiPo fore/aft if balance is a problem. The manual calls for the Stuka to weigh between 11.25 and 12 pounds. This review model was 12.375 pounds without the battery. One more thing before I discuss flying. As I noted before, the Stuka comes “factory fresh.” I wanted to weather mine to match Stukas I’ve seen in photos. See the full product review in the November 2016 issue of Model Aviation to learn how the author weathered his Stuka.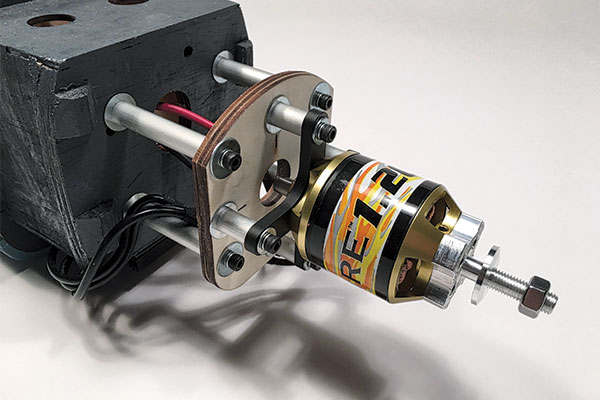
An electric power system was supplied as part of the review. Although the author leaned toward a 20cc gasoline engine, the RimFire 1.20 motor and a 6S battery pack were a nice match for the airframe.
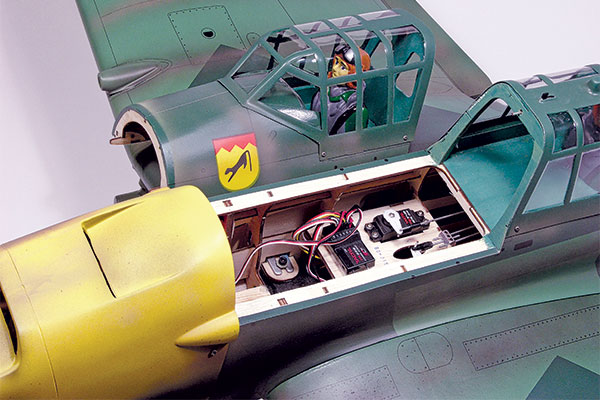
The front half of the canopy doubles as an easily removable hatch, providing access to the radio, and fuel tank or batteries.
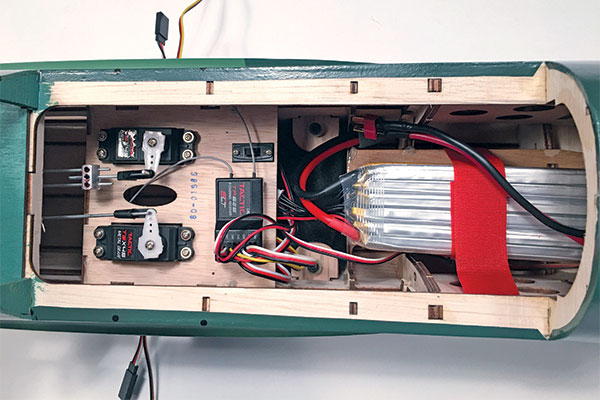
There is ample room inside of the fuselage for nearly any radio system. Toward the right is the 6S 4,200 mAh battery installed. If using glow/gas power, the fuel tank would be positioned there instead.
Flying
Any model’s maiden flight gives me butterflies, and the Stuka’s did more than usual because of the amount of work I had put into it. After taxiing, I lined up into the wind and applied power. To my surprise, this slightly overweight Stuka (according to the manual’s specifications) accelerated with authority and lifted off in roughly 150 feet. It needed a lot of trim to get it to fly hands off, but after a few passes it was trimmed out and ready for the photo passes. Approximately half power was more than sufficient for the Stuka to maneuver and fly realistic passes at a very nice, scalelike speed. Actually, I was very impressed at how well it flew at these slow speeds. Not knowing the flight time that the 5,000 mAh battery pack would give, after 7 or 8 minutes it was time to land and check things out. I flew a couple of practice approaches to judge the speed and sink rate, then settled in for the landing. I touched down with an average landing, but the strut of the port main gear broke where the axle threads in. It was a pretty light touch—so light, in fact, that the fiberglass wheel pant remained attached and easily held up the wing. After some grumbling and a few choice words about my luck, a replacement set of gear was sent and installed. I’m happy to say that so far, this pair of struts has held up, but I’ll admit that I’ve been landing the Stuka carefully. I always land with half flaps and try for either a three-point landing, or to touch the tail gear down first. I’ve had sufficient time to evaluate the Stuka and I really like the way it flies. It has far more than adequate power, and I find myself usually only needing half throttle for a typical flight. I know that many of you will be looping, rolling, and doing inverted flying with your Stuka, so I’ve tried some of that with no problems at all. The power system has plenty in reserve. The flaps are extremely effective, just as split flaps should be. When deployed, the Stuka will pitch down, so some up-elevator mix is needed for a smooth transition. I rarely use more than half flaps, but when I do deploy them fully, the Stuka can be brought to extremely slow speed. Use the throttle to pull you out of trouble if you get too slow, but that rarely happens.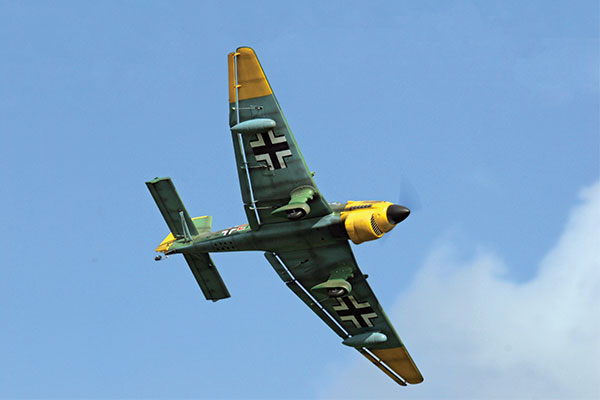
This angle shows off the long, multipart dive flaps for which the Stuka is famous. When extended, they work wonders in slowing the Stuka for slow passes, simulated dive bomb runs, or for landing.
Conclusion
I’m a sucker for warbirds, especially for many of the German designs, so the Phoenix Model Stuka ARF is right up my alley. It has a great flight envelope and plenty of power with the RimFire power system. Its plug-in wing system is a snap to assemble at the field and despite the initial landing mishap, the entire airframe has held up well. Takeoffs and landings are straight and true with no tendency to swerve when the tail wheel lifts off. With some throttle management, flight times can be as long as 12 minutes on a 5,000 mAh battery pack—slightly less if you choose to power through the sky. Either way, the Stuka is a great model and worth a look if you’re in the market for an inexpensive warbird. —Tom Sullivan [email protected]Manufacturer/distributor
Phoenix Model www.phoenixmodel.com Tower Hobbies (800) 637-6050 www.towerhobbies.comSources
Stuka manual www.towerhobbies.com/manuals/pmm/pmma0380_manual.pdf ElectriFly (800) 637-7660 www.electrifly.com FlightPower www.flightpowerbatteries.com Tactic www.tacticrc.com APC Propellers (530) 661-0399 www.apcprop.comThis Month's Issue

Join the AMA
![]()


6 comments
Phoenix/Black Horse Stuka
Pheonix Stuka Landing Gear
Phoenix ARF Ju-87 Stuka build
WHAT IS THE SPEC FOR ALERON
Aileron and flaps
Gear strut spare part reference
Add new comment