


Horizon Hobby E-flite P-51D Mustang 1.2M BNF Basic
Written by Ryan Ramsey Fly this aviation icon with AS3X as your copilot Product review Photos by the author As seen in the July 2016 issue of Model Aviation.
Specifications
• Model type: BNF • Skill level: Intermediate • Wingspan: 48 inches • Flying weight: 53.9 ounces • Length: 42 inches • Radio: Minimum six-channel 2.4 GHz with Spektrum DSM2/DSMX technology and adjustable dual rates • Flight battery: 3S 2,200 mAh 30C LiPo • Power system: BL15 850 Kv brushless outrunner motor with 40-amp ESC • Receiver: Spektrum AR636A six-channel sport receiver • Price: $269.99Pluses
• Constructed from durable Z-Foam. • Removable battery tray and drop tanks. • Highly visible invasion stripes and paint scheme. • 15-size BL motor with 40-amp ESC installed. • Scale four-blade propeller. • Quick assembly. • Uses common 3S 2,200 30C LiPo battery. • Steerable tail wheel. • Preinstalled flaps and retracts.Minuses
• Battery tray placement makes it hard to move the CG without adding ballast. • Airplane feels nose-heavy with the battery all the way aft on the tray. It makes high-rate elevator a better choice while on the ground.Product review
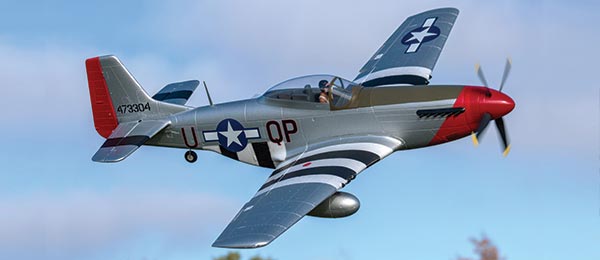
The Horizon Hobby E-flite P-51D is not just another Mustang. Modeled after the U.S. Army Air Corps 334th Fighter Squadron, this Mustang is determined to please. Intermediate pilots will have no trouble flying this Mustang. The 48-inch aircraft has a potent 15-size 850 Kv brushless outrunner motor with 40-amp ESC that runs on a 2,200 mAh three-cell LiPo battery. Easily removed external drop tanks, factory installed flaps and retracts, and an AR636A Spektrum receiver with AS3X stabilization are a few of the features that adorn this superb flying model. The four-blade propeller, painted pilot figure, invasion stripes, and well-dressed landing gear legs and strut covers help set it apart.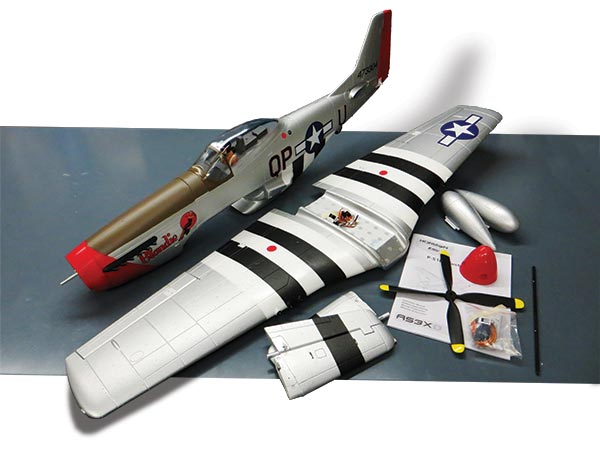
The low parts count and well-fitting parts make assembly a breeze.
Assembly
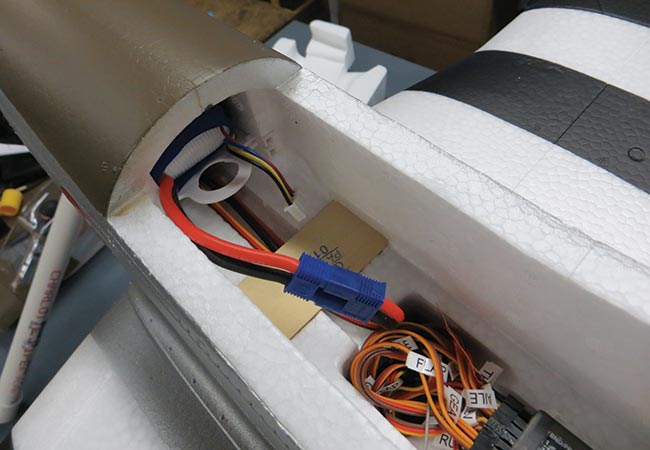
The low parts count and highly detailed, “to-the-point” manual make assembly and setup an easy task. Transmitter setup is the first action laid out in the manual. The P-51D BNF Basic is designed with Spektrum technology. A table in the manual guides you through setups for Spektrum transmitters ranging from the DX6i to DX18. I like how the table is split. Many of the radios share the same setup, so newer transmitters are grouped together. The DX6, DX7, DX9, DX10t, and the DX18 all share the same setup. DX7s and DX8 also share a setup. Last, but not least, is the DX6i, which stands alone. This takes the guesswork out of the transmitter setup. Not only does it solve the mystery, it ensures that a pilot—no matter which Spektrum transmitter he or she uses—reaps the benefit of the AS3X system. AS3X stands for Artificial Stabilization—3 aXis. This allows airplanes to fly similar to a larger, professionally set-up model. The effects of wind and buffeting are dampened and you’ll find that flying on a windy day is easier than it used to be. The horizontal stabilizer installation is the next step in the manual. The spar goes in first, and the two stabilizer halves simply slide in over it. The root of each stabilizer half fits snugly in a hard, plastic fillet and they key into each other for the moving elevator surface. Two short screws—one on each half—anchor the horizontal stabilizer into the fillet. Attaching the clevis to the recommended outer hole of the elevator control horn finishes the tail section. All other clevises are factory installed and attached. Moving on to the wing, the Y connectors needed for the aileron, flaps, and landing gear are included in a parts bag. Plugging in the Y connectors to their prelabeled servo leads while noting correct polarity is easier with the wing apart from the fuselage. Feeding the wires up through the fuselage and toward the receiver is next. Gently pull the wires through while installing the wing. Make sure the wing fits in such a way that the fuselage saddle is unobstructed. When the wing is down and fitting snugly with no servo leads pinched, it is time to secure the wing with the four long machine screws. After the wing is attached, plug the servo leads into their prospective channels on the AR636A Spektrum receiver. The ailerons must be plugged into the Aileron #2 channel for the AS3X to properly work. Now you can check the control surface directions. With the propeller still off of the airplane, throttle up to 25% and then lower the throttle to engage the AS3X stabilization system to test it. You can reference the table in the manual to ensure everything is correct. I have flown many AS3X-equipped aircraft and they were always spot on out of the box, but it is important to check. The propeller installation is the next step illustrated in the manual, but I think that binding the airplane with the propeller off of the model is best to do next. Plus, you can extend the scalelike landing gear and get the aircraft sitting on its gear to finish the assembly. As I mentioned earlier, setting up the transmitter is one of the first steps. Setting failsafe by rebinding the aircraft after the initial setup is always a good idea. You might find that after binding the receiver with the manual settings, your flaps are not at a perfect neutral position. Simply return to the Flap System screen on your transmitter and adjust the numerical values to give you the desired flap position. The values might differ slightly from the manual callouts. At this point, rebinding to set the failsafe is a good idea. It ensures that the receiver remembers the proper neutral settings in case of a signal loss. I’m using a DX6, which allows me to set the flap deployment as a two-second operation. Voice alerts add a cool factor as well. It’s pretty neat to have the radio tell me things such as gear down, flaps up, and time expired. Now that the system setup is complete, installing the propeller assembly is the next order of business. The spinner backplate goes on first. It fits nicely on the base of the preinstalled propeller shaft, followed by the one-piece four-blade propeller, then the barrel nut. The round barrel nut can be tightened with a small screwdriver. The spinner is screwed in with one screw. The included external drop tanks simply slide onto rails molded into the wing. The antenna mast is installed aft of the cockpit simply by inserting it in the slot made for it. Now step back and take a look at an excellent flying replica of the iconic P-51D Mustang.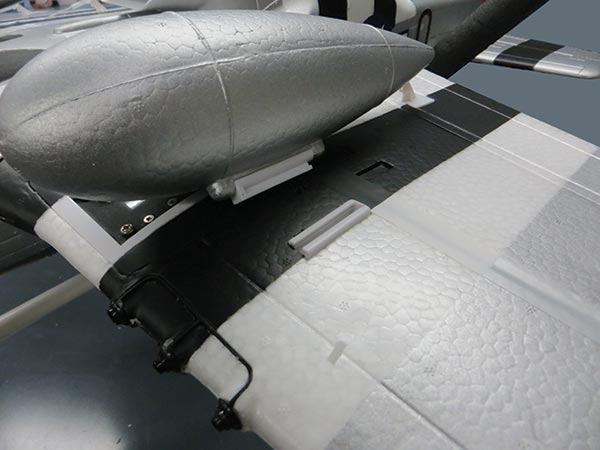
The drop tanks easily slide on and off with rails. The wing-mounted .50-caliber machine guns are molded in plastic.
Preflight
At this point, the model is ready to fly for the first time. When inserting the flight battery on the removable sliding tray, make sure that you hear and feel a click indicating that the tray is all of the way in and secure. Set the airplane on something stationary and plug in the flight battery, while being mindful not to move the aircraft for at least five seconds while the AS3X system gets its bearings. Flying the E-flite P-51D is awesome. After setting my timer to five minutes for the first flights, per the manual, I’m ready to take to the skies. My center of gravity (CG) is slightly nose-heavy with my battery all the way back on the tray, but it is still in an acceptable range.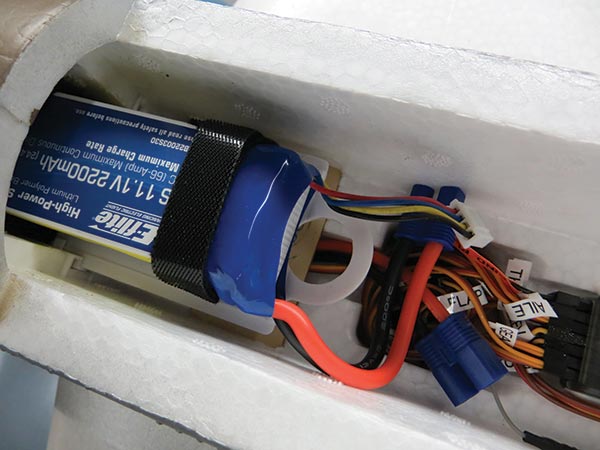
A removable battery tray allows for spot-on placement every time.
The battery and its tray slide into the nose where hands can’t reach. Super cool!
The manual suggests taking off in low rate and landing in high. I decided to take off in high rate as well, to help keep the tail planted. For pilots with less stick time, taking off in low rate is a good idea. This helps ensure that sufficient speed is present before takeoff. Facing into the wind, I hold elevator back pressure and slowly increase throttle. When I have established forward momentum, I gently release my elevator back pressure and let the tail rise. After building up speed, I add in more back pressure and the P-51D is off of the ground. When I clear the runway, I flip the gear switch and the landing gear tucks away. The next order of business is to climb to a safe height and do any necessary trimming. Trim the airplane for cruise speed at 3/4 throttle while at a good height, and give no inputs for three seconds. This allows the AS3X system to properly work. Now that that’s done, it is time to explore the flight envelope of this fantastic-looking model. After extending the flaps and making a nice, slow pass, it was time to wring it out. I like how the AS3X stabilization system helps the airplane feel larger and expertly tuned. After extending and raising the flaps, I noticed no pitch change. Often, a pilot must play with mixes to negate the pitch effect when deploying flaps, but not with this aircraft! A full range of warbird aerobatics is the next order of business. Slow rolls, Cuban 8s, wingovers, and inverted flight are all easily achieved with this P-51. Not only can it perform—it looks good while doing it. The easily removed external tanks, along with the antenna mast, add to the scale realism when the airplane is flying by. The P-51D handles well in its landing configuration. With the landing gear down and flaps deployed, the Mustang really slows down. It’s a good idea to make a nice, slow pass to get a feel for the airplane’s slow flight characteristics. In my experience, Mustangs like a good two-wheel landing. This ensures that sufficient speed is present—allowing the control surfaces to be effective. If the model gets too slow upon landing, you might see an ugly bounce. I treat my landings similar to a touch-and-go, which serves me well. With my first approach, I planned to shoot a touch-and-go. I noticed that the airplane settled in nicely. I kept idle at 1/4 throttle to prevent my descent angle from becoming too steep. After achieving a nice descent angle, I gently flared the airplane and watched it touch down on the main landing gear. I slowly fed the throttle back in and watched the Mustang drive down the runway on two wheels with its tail up. I added a little back pressure and it was off again. The next approach was the final one. I touched down on the mains, backed off of the throttle, and when the tail started to lower, I planted it to give my rudder steering some authority. Wait to pin the tail until you know the aircraft has bled off enough speed that it won’t take to the air again.
Conclusion
The E-flite P-51D Mustang is a great addition to Horizon Hobby’s 1,200mm-size warbird line. The company provides a nice-size aircraft that runs on a common 2,200 3S LiPo battery power system—making it widely accessible. The AS3X system makes it a good choice to take to the field when other airplanes might be grounded. The E-flite P-51D has a stable and wide flight envelope that make it predictable in a mellow cruise, as well as being rock solid while being wrung out. Its highly visible invasion stripes and red nose and tail make orientation easy. The E-flite P-51D is an all-around fantastic airplane that looks as good in the air as it does on the ground. —Ryan Ramsey [email protected]Manufacturer/Distributor
Horizon Hobby (800) 338-4639 www.e-fliterc.comSources
Spektrum (800) 338-4639 www.spektrumrc.comThis Month's Issue

Join the AMA
![]()


1 comments
Overcoming Warbird Fear
Add new comment