


Maxford USA Nieuport 17 ARF
Article by Mark Wilkins A delightful 1/5-scale interpretation of the iconic fighter. Digital exclusive.
Specifications
Model type: Semiscale ARF Skill level: Intermediate builder; intermediate pilot Wingspan: 60 inches Wing area: 615 square inches Airfoil: Semisymetrical Length: 40 inches Weight: 4 pounds, 12 ounces Power system: Maxford U35425 motor with U60A ESC or equivalent; 3-4S 3,300-4,000 mAh LiPo battery Radio: Four channel transmitter; two submicro servos; two micro servos Construction: Balsa and plywood Covering/finish: Glossy or flat Mylar Price: $229.99Test-Model Details
Power system: BP 2814-8 brushless outrunner; 80-amp ESC; 4S 2,200 LiPo battery; APC 13 x 6.5 propeller Radio: Spektrum DX6 transmitter; Spektrum AR400 receiver; two Hitec HS-81 servos for elevator and rudder; two Hitec HS-55 servos for the ailerons Ready-to-fly weight: 4 pounds, 14.5 ounces Flight duration: 6 minutes without sound module; 5 minutes withPluses
• Lightweight balsa and plywood construction. • Ample wing area for slow, stable flight. • Semiscale with additional detailing optional. • Assembles quickly and looks great.Minus
• Landing gear has no shock absorbers.Product Review
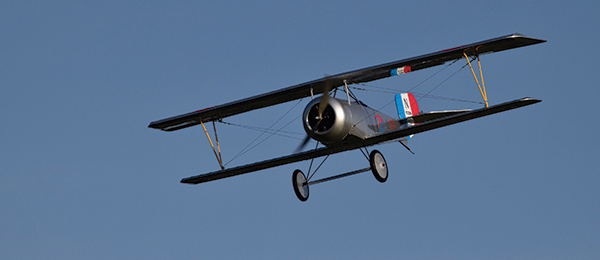
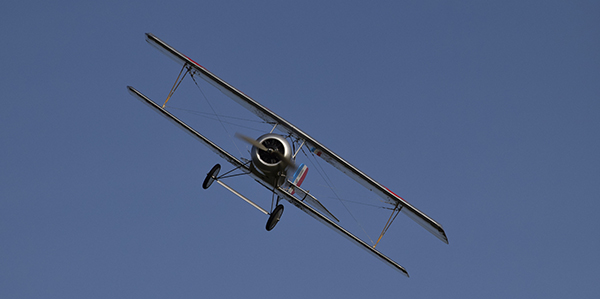
The Nieuport 17 was the successor to the Nieuport 11 Bébé and it featured a slightly more powerful engine, larger wingspan, a Vickers machine gun, and a fully enclosed cowling. It attained widespread popularity with pilots because it had only one bad tendency—the single spar on the lower wing made this sesquiplane weaker than a true biplane. Sometimes the entire lower wing fell off. The trade-off was very good downward visibility, good rate of climb, and excellent maneuverability. Maxford USA’s 1/5-scale Nieuport 17 is a delightful interpretation of this iconic fighter and represents the Nieuport 17 flown by French ace René Dorme. Its semiscale airframe handles beautifully in the air and features some interesting features such as the pull-pull rudder and elevators. The wing framing has full and partial leading edge ribs. The French roundels are preapplied so there is a minimum of decals to affix. There is a full rigging kit, which is nice because rounding up these items can be difficult if you don’t know where to look! Optional items (at an additional cost) include the 1/5-scale pilot figure and Vickers machine gun.Assembly/Construction
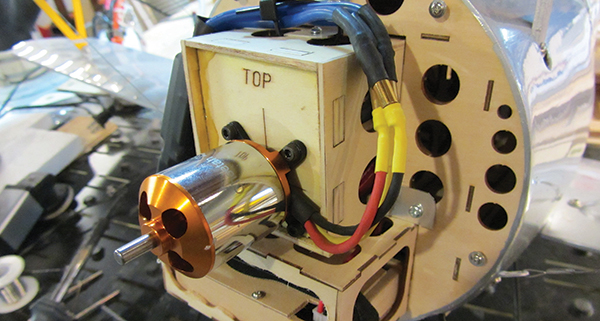
The BP/Cheetah motor is mounted to the firewall with the sound module below it. The compartment housing the sound module is designed for the ESC.
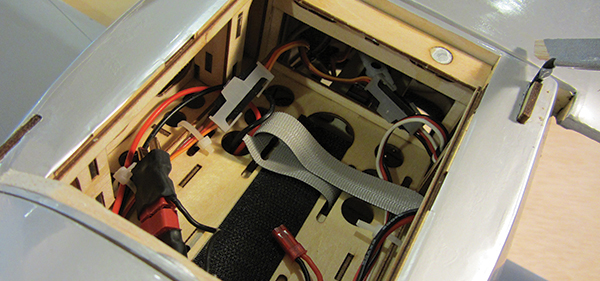
The battery compartment is large enough to accommodate a range of battery sizes. I like to use an adhesive Vecro strip on my battery and bottom of the battery box, as well as a Velcro strap. The connection lead for the sound module and the Deans plug connector can be seen in the lower right corner of the box.
The construction is straightforward. The wings slide together over a carbon-fiber spar and are epoxied into place. CA hinges are provided for all the control surfaces and all of the surfaces are pre-slotted. I replaced the CA hinges with two nylon-and-pin hinges (not included) for the full flying rudder because this joint takes much abuse. The engine and ESC installation is straightforward and there is even a box below the engine mount for the ESC, although I used mine for a sound module. The engine box slides fore and aft which ensures easy motor alignment through the aperture in the cowling/engine. The dummy engine is built into the cowling, which is another nice scale feature. The cowling features a “twist-lock” mounting system that makes removing cowling easy. All of the joints that are under stress are securely fastened with screws. The only fussy part of the construction process is rigging the pull-pull rudder and elevators—you’ll want to pay attention and carefully follow the directions. Each line for the pull-pull system is fed into plastic tubes that travel aft and exit the fuselage at the appropriate spot. Double check that you are feeding the correct line into the correct tube! Rigging the wings is straightforward and even if you don’t get the flying and landing wires tight, they are all set up on adjustable clevises so you can tighten them. You’ll want to fly the airplane a few times to allow the wires to stretch slightly before using threadlocker or shellac to secure the threaded clevises. I installed a sound module from Mr. RC Sound to give the model a scalelike sound. I mounted it inside the motor box behind the firewall and the sound card is in the box under the engine box. The battery compartment is accessed readily via a magnetic hatch that is on the underside of the airplane and between the landing gear struts.
Flying
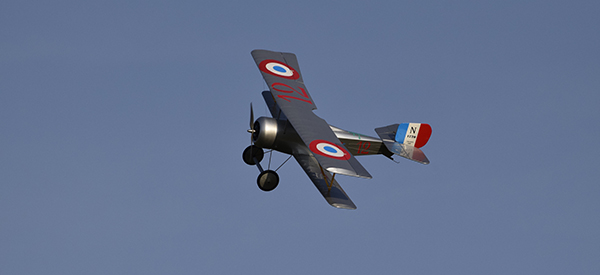
The roundels, fin flash, and squadron insignia are nice and bright so you can maintain orientation even on cloudy days. You’ll want to keep some power for landings in order to set the Nieuport down gently.
The Nieuport will turn nicely with only ailerons, but looks best with a slight amount of rudder.
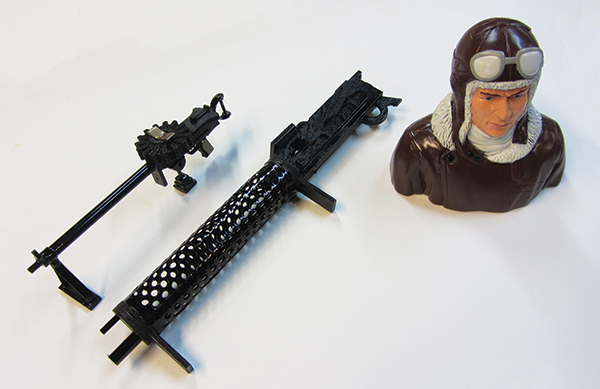
Maxford USA donated the pilot and gun accessories for the review. The pilot is convincing and the Vickers gun is the right size for this airplane. I substituted the perforated barrel cooling cylinder (which looks more like a Spandau) with a piece of corrugated cardboard painted flat black.
The Nieuport is a joy to fly! It performs in a scalelike manner and can do basic aerobatics including loops, stall turns, and barrel rolls. Takeoffs and landings also look good and with its ample wing area, the model simply floats off the grass. You’ll want to stay on the rudder to ensure straight takeoffs. You can slow it to a quarter throttle and on a calm day, float along scouring the frontlines for signs of enemy activity. The Nieuport will land fine with a little bit of power or even throttle off on a calm day. It turns well with ailerons or rudder, the best being a combination of the two. Because of the large wingspan, I found keeping a fairly flat bank in turns was best. Its slightly oversize rudder comes in handy in the air and on the ground and it’ll even perform a knife edge maneuver! Be sure after you’ve ripped up the skies with your Nieuport to check all of the pull-pull wires running to the rudder and elevator. Depending on how aggressive you are flying, these may also stretch slightly. To make the gentlest of landings, keep a little power on because the gear and wheels have very little give so the airplane is prone to “bouncing” on a grassy field. Landings on pavement will not pose a problem. I gave my model a simple suspension system by simply adding another axle over the existing one, securing it at its midpoint, and then setting up the ends with rubber bands (see the sidebar).
Conclusion
Maxford’s Nieuport 17 is fairly easy to assemble and is great fun to fly. It’s docile in the air yet is capable of doing all World War I scale stunts as well as some that are not scale! It will fly well slow or fast, and can be augmented with various scale details such as a pilot, Vickers machine gun, and Lewis gun (top of wing). These are available from Maxford or you can make your own. I suggest modifying the aircraft with a suspension for the landing gear and/or soft tire wheels with more give to them, and adding landing strut fairings.Modifications
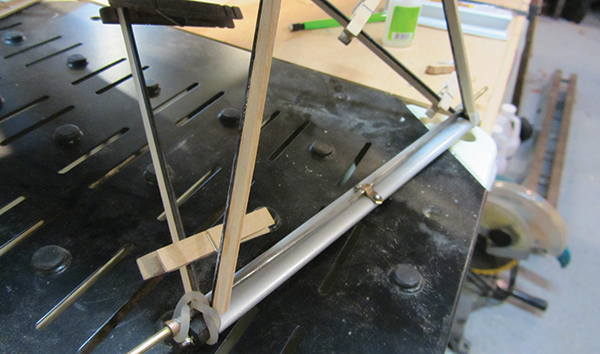
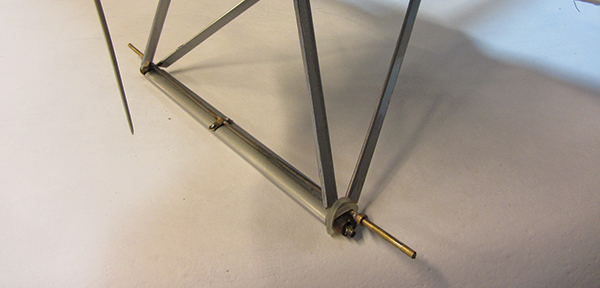
Landing gear: To make a simple suspension, remove the wheels and spreader bar between struts. Cut off the axles leaving roughly 3/8 inch of stock protruding from the strut joint. Using piano wire, make a new axle for your wheels that is approximately 14 inches long. Find its midpoint and the midpoint of the now-shortened original axle. I soldered a brass tang on to the axle and then attached it to the aluminum spreader bar using screws. Clean off any flux with rubbing alcohol. I used a slightly smaller-diameter wire than the axle to allow good flexibility. Next, I cut two brass tubes to fit over this and it fit the wheel hubs perfectly. To this I soldered two stoppers. Now simply wrap a couple of thick elastic bands around the new and old axles. Slide on your wheels and secure with collars. Voilá, you are done! Landing gear strut fairings: The ARF comes with some clumsy strut fairings, which I feel are too large. You can simply remove the covering and use this material or make new strut fairings using scrap balsa. You’ll want to groove one edge for a neat job. Once you’ve finished shaping them to your liking, you can CA or epoxy them onto the struts and then wrap with scrap silver covering such as Microlite.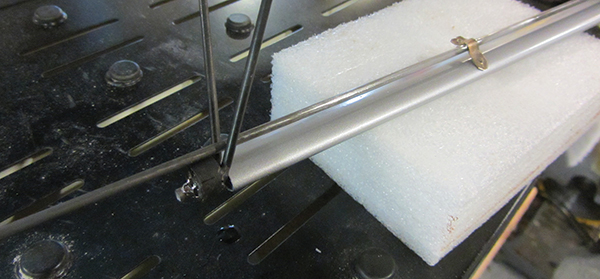
I decided to give my model a suspension to help with the potholes on my club’s grass runway.
I made some scale strut fairings out of scrap balsa because those that came with the ARF were slightly large.
I covered my struts with some scrap pieces of silver Microlite covering film.
Manufacturer
Maxford USA (562)-529-3988 www.maxfordusa.comSources
Spektrum (800) 338-4639 www.spektrumrc.com E-flite (800) 338-4639 www.e-fliterc.com Mr. RC Sound www.test.mrrcsound.comThis Month's Issue

Join the AMA
![]()


4 comments
Nieuport
I just ordered one of these
MAXFORD USA's N-17
Indeed I did, and actually
Add new comment