The Cardboard Condor

Written by Ryan Livingston
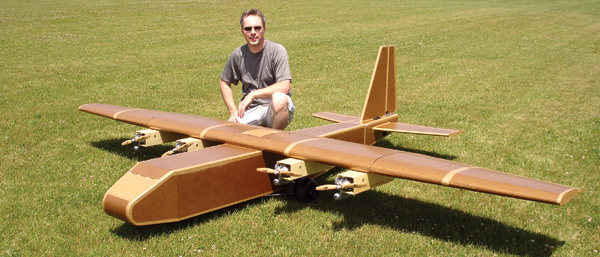
Find the entire feature on page 37 in the September 2009 issue. Read an abridged summary relating to the article. WHEN I WAS a much younger kid, I would scrounge up anything I could to build something that resembled an RC model. I’d try to fly most of my creations as gliders, throwing them off of hillsides with a cobbled together radio system for rudder and elevator control. I made wings from foam insulation that I’d cover in packaging tape. Four sheets of balsa for a fuselage and a little more sheeting to make a tail, and I had my next chance at getting something substantial to stay in the air for more than a few seconds. I loved it. The fact that everything I tried to fly usually crashed immediately after the hand launch didn’t stop me from trying again and again. Currently, a few decades later, building and flying come much easier to me. But every now and then, I find myself recollecting what a great time of discovery those years were. In hindsight, that’s where the idea to build the Cardboard Condor was born. Now in my 30s, people probably thought I sounded like a 9-year-old a couple years ago when I said, “I’m gonna build a really big RC airplane outta cardboard and pine. And it’s gonna have four engines. And it’ll be really awesome!” They must have thought I was joking. But I was excited by the prospect of trying something new that, as far as I knew, hadn’t been done on such a scale. The idea of using cardboard came from my school days, when I built an airplane wing cross-section from poster board for use as a visual aid. I was surprised by its rigidity and strength. So the thought of employing some type of cardboard in building a model had been playing in the back of my mind for years. Designing the Cardboard Condor was mainly a combination of building and design experience, experimenting with the materials to be used, and basic formulas for surface area. I also designed it with its cardboard covering in mind, using flat surfaces wherever I could. It didn’t have to carry anything but itself. With the wingspan exceeding 12.5 feet, I allowed the fuselage and wings to enjoy a fairly stout build at the cost of a few extra pounds. I never had a multiengine model, but throughout the years I had become comfortable and confident in operating my engines to the point where it didn’t seem to be an unwise leap. The initial estimates of the Condor’s flying weight resulted in a range of 43-53 pounds. That included four 7-inch main wheels at 14 ounces each, four two-stroke O.S. 61FX engines at 23.6 ounces each, and approximately 80 square feet of cardboard, which weighed roughly 10 pounds. Tossing on 6 pounds here and 10 pounds there was unfamiliar territory for me in building RC airplanes. I found myself going back and staring closer at the numbers as I built. I estimated that the design could absorb this extra weight and still keep the wing loading within an acceptable range. Another design requirement was that this 12.5-foot-wingspan airplane had to fit into my Pontiac Vibe. No problem, right? That’s where the removable empennage and wingtips came in. The 4-foot-span tail section is secured to the fuselage with four 1/4-20 nylon bolts. The servos are located in the tail; thus one had only to attach the servo connectors upon assembly. The center wing section supported all four engines, which helped keep assembly simple. I like my marriage, so I wanted to spend as little money on this thing as possible. The Condor used one four-cell, 3600 mAh NiMH battery. A 1/4-scale analog servo was employed on each control surface, of which the elevator used only one. The throttle and nose gear servos were standard size. All servos used nylon or Karbonite gears, with the exception of the metal-geared elevator servo. I decided that my servos and their applications would not require a PowerBox—another big cost reducer. The radio I used had only one channel available for the throttle. So they were all ganged; throttle linkages were built and adjusted to be as identical as possible, from one engine to the next. I wasn’t keen on the idea of spending the money on the two areas where I did have to deviate to costly aircraft-grade plywood: select wing ribs and the engine nacelles. However, I kept the price down by using 1/8 birch light plywood instead. I merely doubled the thickness for use with the ribs and tripled it for use with the firewalls. I did use some balsa, but only on certain LEs, TEs, and in the aileron cores. I created a hatch in the nose to access the Condor’s electronics. Two power switches were installed for redundancy. I built two unique features into the access hatch in the nose to add convenience in operating the four engines, the first of which is a master remote glow plug connection that supplies power to all four glow plugs through four toggle switches. It’s wonderful; there’s no fiddling with a glow starter near the adjacent engines’ spinning propeller. If you try this, make sure to use low resistance wire and connections. The glow plugs’ high current draw at such a low voltage can easily be compromised by tiny amounts of resistance—even fractions of an ohm.
Starting the engine on the Cardboard Condor.
Second, I installed a switch to turn power on and off to each throttle servo individually. This allowed me, for example, to prime engine 4 (for starting) with wide open throttle, while keeping the other three running engines from screaming away.Instead, I’d have them running at idle with the power shut off to those throttle servos until all engines were started.
However, this is a double-edged sword.
A potential safety hazard is created without the instant ability to stop all engines using the transmitter during starting. I decided that it was realistically safer to have this system in place based on observations at the field through the years.
It’s certainly a subject for debate. As we say where I work, “I reserve the right to be smarter five minutes from now.”
All of the Condor’s wheels had some form of spring suspension. The nose strut was kept simple. It traveled through a couple of frame members.
I had originally installed brass sleeve inserts in the frame to receive the nose strut, but the strut tended to bind in the sleeves when its wheel experienced any side loads. Holes in the wood frame used as guides seemed to work best.
As I got closer to the reality of how 50 pounds felt as I built, I made more changes to lighten things. Before I was finished, the main gear went through a second revision and the third undercarriage design did a better job of distributing the weight between the nose and main wheels, which was the result of having located all four main wheels to one axle.
In keeping with the theme of simplicity, the engine nacelle-mounting and wing mounting methods involved the use of screw-and-nut fasteners through holes drilled into the wing. It uses a twin-mainspar design, which offers the nacelles good support. The wing didn’t have much fuselage weight to lift; the bending stresses were spread somewhat evenly along the spars.
Only four hardened-steel 8-32 screws were needed to lock the wing onto the fuselage frame. That’s relatively light hardware, but the majority of the Condor’s weight was in the wings.
There was a good amount of preparation to determine what checklists I wanted to go through one more time at this point. Basically, the model needed to establish a good, fast taxi of which I had complete directional control, before opening up the engines all the way.
I stood at a point along the runway where I decided to abort my takeoff attempt if the airplane wasn’t off of the ground with a healthy head of flying speed. Not as much throttle as I anticipated was needed for the Condor to roll over the grass under its own power. I was pleased with its groundhandling stability.
Taxiing the Cardboard Condor
I tried a couple of fast taxis and then checked the model one last time for anything that may have come loose that didn’t shake out during engine break-in or other testing. Everything looked good. It was time to see if my four .61s could actually pull an excess of 50 pounds into the sky.
Every fiber of my being wanted to jam that throttle forward to see if this thing would fly. Luckily I resisted and went through my checks, including visualizing the climbout I wanted. I’m happy that I had the the presence of mind to take a minute to realize that this was the moment I had pictured in my mind with every ounce of effort toward making thisidea a reality. Otherwise I would have blown right by it with a flick of the throttle.
When I was ready, I slowly opened the throttles and the Cardboard Condor started rolling. Having watched the video, in reality the Condor took less than five seconds to go from a standstill to airborne. (At the time, it seemed to take considerably longer.) It responded to my inputs and continued down the center of the runway while advancing to full throttle. The aircraft heaved itself off of the ground and, with little complaint, answered my respectful request for a shallow climbout.
I did my best to keep the Condor on a nice climbing turn back over the field. Flyingwise, it looked fairly strong. I throttled the engines back and my nerves followed. After minor trimming, I knew that I had a good airplane. The elevator was sensitive and I had to correct the steeper banks with some opposite aileron, but I was in business.
The Cardboard Condor takes flight.
Wondering if and how a giant cardboard airplane would fly was over. It was “corrugated overcast.” After flying around a bit and quickly gaining a feel for the model, I did one slow pass over the runway and saw that I could expect a fair amount of flying stability on the landing approach. The next time around, the Condor settled downward so nicely that I thought, “What the heck; let’s try a landing now.”
The weight and wing loading kept things moving slow enough for me to even enjoy it. The model flew directly down to the runway, set its 7-inch wheels on the grass, and lumbered to a stop with four running engines. To say I felt good at that point is an understatement.
Since then, I have run out a tank or two of fuel on a couple occasions while flying. However, the relatively low wing loading for such a large airplane helped me get to an approach and landing each time. Each of those times an engine stopped, I was in a position to immediately bring the running engines back to idle. So I haven’t been put to the full engine-out test yet. On landing, the wingspan’s long reach doesn’t threaten to drag a wingtip, even with a healthy correctional bank while touching down. Landings with or without power seem easy. The relatively large vertical surface might give the Condor additional relief from the ill effects of uneven engine speeds.
I ended up making small adjustments on a couple throttle linkages to fine-tune the engine synchronization. However, I noticed no adverse yaw in the air from uneven engine thrust that might have existed. I could hear a couple of engines running slightly slower than others in their midrange and wanted to improve the synchronization as a matter of good practice. With such a strong wing spar and joiner system, I was comfortable trying something with a couple of “Gs.”
On the second flight I performed two consecutive inside loops, starting from the bottom.
Doing a loop with the Cardboard Condor
Coming down on the backside the first time was a little scary; I wasn’t sure what to expect. But the aircraft’s rather blunt frontal profile seemed to keep the speed under control. The Condor doesn’t resist inverted flight too much, either. Could one engine taxi the Condor over the grass field? If not, could two? One of the inboard engines at full throttle would not move the Condor, even if I helped start it rolling. But both inboard engines would taxi it at half throttle.
The four engines get a workout during flight, requiring me to apply much more throttle than I normally use to fly a singleengine, 60-size model. I like the concept that one engine is unable to taxi a fourengine model on grass, but two should be capable. It seems like a good heck on engine selection to me, although there are many other factors.
Building a giant model mainly from cardboard and pine is possible. Only time will tell how it holds up with age. The Condor hasn’t experienced extreme highs in humidity and heat. I haven’t noticed issues with the cardboard’s stability in the days I’ve had it out in temperatures n the mid- 80s with medium-high humidity. don’t recommend that everyone tries something similar to this project. The Condor definitely requires an increased level of attention to safety because of its experimental nature and relatively large size. The amount of care it takes in landling and flying to avoid overloading the structure does call for a fair amount of experience.
I hope this project encourages you to consider new directions in which you can take your RC flying. After all, exploring and experimenting is what made flying possible in the first place.
Ryan Livingston
[email protected]
To read the complete story how the author designed, tested, built, and flew this unique aircraft, go to the September 2009 issue of Model Aviation.
Specificiations
Wingspan: 150.7 inchesWing area: 2,946 square inches
Length: 100.6 inches
Height: 35.5 inches
Takeoff weight: 50.6 pounds
Wing loading: 40 ounces/square foot
Construction: 5/32 inch corrugated cardboard, fiber-reinforced Kraft paper, tape, clear polyurethane paint
Engines: Four O.S. 61FXs (two-stroke)
Propellers: 13x5 two-blade Zingers
Fuel capacity: 48 ounces total (12-ounce tanks)
Battery: 3600 mAh, 4.8-volt NiMH
Wheels: 7-inch Tatone main wheels, 5.5-inch Tatone nose wheel
Radio system: Futaba t6XA
Servos: Four Futaba S148 for throttle, one Hitec SH-325HB for nose steering, three Hitec HS-755HB for aileron and rudder, one Hitec HS-755MG for elevator


Add new comment