


Horizon Hobby Carbon-Z Cessna 150 2.1m BNF Basic
Written by George Kaplan Fly this gem of civilian aviation Product review As seen in the November 2017 issue of Model Aviation.
Bonus Videos
With Floats
Specifications
Model type: Semiscale BNF Skill level: Intermediate Wingspan: 83.7 inches Wing area: 1,053 square inches Airfoil: Semisymmetrical Length: 61.8 inches Weight: Recommended 8.9 to 9.9 pounds; actually 8.75 pounds Power system: E-flite BL50 brushless motor and E-flite 60-amp ESC (included); requires a 4S to 6S 4,000 to 7,000 mAh LiPo battery Radio: Spektrum AR636A receiver; EFLR7155 and EFLR7145 servos come preinstalled Price: $399.99 BNF Basic; $379.99 PNPPluses
• Large sport scale model assembles in roughly an hour. • A wealth of LED navigation and collision lights come preinstalled and are powered by the flight battery. • Scale details include flaps, wheel pants, antennae, fuel tank caps, and more. • The plug-in wing halves incorporate a hands-free servo connection system and need no tools to assemble at the field. • Included AR636A receiver has AS3X stabilization and SAFE Select correction (optional). • E-flite 60-amp ESC and BL50 brushless motor included. • Hatches for access to the radio and the battery compartment are large and easy to remove. • Has shock-absorbing landing gear for grass strips. • Optional float kit and wire mounting set available. Tricycle gear is easily removed and the assembled float kit is bolted in its place.Minus
• The wheels, especially on the nose gear, had quite a bit of play on the axles (up to 3/16 inch), which caused rattling when taxiing and in the air. This can be reduced by adjusting the position of the wheel collars inside of the wheel pants.Product Review
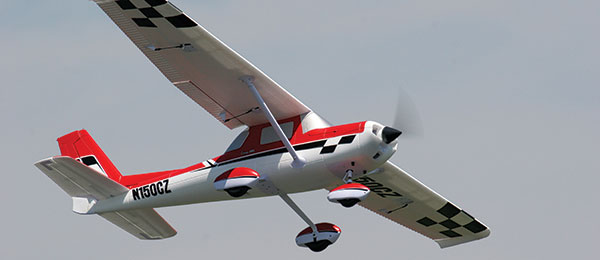
Dozens of iconic aircraft have come and gone since the Wright brothers first took to the air in 1903. On the civilian side, one of the most recognized brand names is Cessna. The company has produced several iconic designs. In 1958, Cessna introduced its model 150, a first for the manufacturer, with tricycle gear, squared-off wingtips, and large Fowler flaps. Many variants were produced and one of the more exciting was the 150 Aerobat (the K model). This upgraded design brought limited aerobatic capabilities with a strengthened airframe, four-point harnesses for the pilot and copilot, dual overhead skylights for better upward visibility, and many other improvements, which earned it a +6/-3 G rating for mild aerobatics. One of the Cessna 150K’s more notable upgrades was a sporty checkerboard paint scheme that set it apart from a typical 150. This aerobatic version is the basis for Horizon Hobby’s latest offering: the Horizon Hobby E-flite Carbon-Z Cessna 150. With an 84-inch wingspan, this model is one of the larger foam models that I’ve had the chance to review, so let’s get started. To reinforce just how big this model is, it comes in a box that’s nearly 5 feet long, 2 feet wide, and nearly a foot high! All of the airframe parts were securely held in place in a foam cradle inside the box with a good amount of tape and foam sheets to pad the parts against chafing during shipment.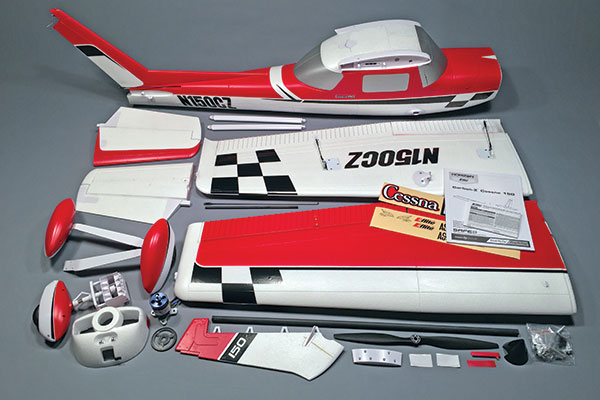
With most of the work done at the factory and using many of Horizon Hobby’s design innovations, the Cessna 150 will go from box to flight-ready in roughly an hour.
All of the smaller parts came in a series of small, reclosable polybags. Every review requires a parts layout shot, which gives me the chance to get a good look at everything that goes into a kit. The first thing that impressed me about the 150 was how rigid the airframe components were, considering they are all made of molded foam. You might expect some flex in the foam, especially in the wing and stabilizer, but that’s not the case. No doubt, this is because of the carbon fiber and other internal structural components that are incorporated when the parts are molded. While I’m on the subject of the wing, both halves come with the flaps, ailerons, servos, and pushrods preinstalled. There are no servo leads dangling from the root. The Cessna 150 utilizes E-flite’s hands-free servo connection system, making the connections as soon as the wing halves are joined. A keen eye might note that there are three of these connectors. There is one for the aileron, one for flaps, but what is the other one for? It’s for the wingtip lights. These lights, as well as those on the fuselage, mimic the navigation, collision, and landing lights that you’d see on a full-scale Cessna 150. Moving to the fuselage, most of the assembly will focus here because many parts still need to be attached. The aircraft does, however, come with much of the work already finished. The radio and servos are preinstalled and the pushrods and clevises are also attached. Two hatches are built in—one is on the top of the cabin area to access the radio and the other is a larger one consisting of the front windscreen and rear cowl. This hatch provides access to the ESC, battery installation area, and the on/off switch. At points where components will attach to the fuselage, smaller plastic subassemblies are installed. These plastic pieces should hold up far better than trying to attach to the foam itself. The Cessna 150 is white with red stripes and black trim. Most of the red is painted on, whereas the black trim (like the checkerboards) is mostly made of a series of stickers. Similar to the wing, the stabilizer comes in two halves supported by a smaller tube. The elevators are rejoined to the stabilizer halves, but interestingly, the rudder is separate from the vertical fin, possibly to keep the size of the box down. Various other small parts are included, such as the landing gear, wing struts, front of the cowl, screw packages, etc. Finally is the power system. A 60-amp ESC is preinstalled and the kit comes with an E-flite BL50 brushless motor, a 15 x 7 composite propeller, and a plastic spinner.
Assembly
The Carbon-Z Cessna 150 goes together with a variety of screws. I won’t describe all of the steps, but you can see them for yourself by downloading the manual from the Horizon Hobby website. The only problem I had with assembling the model was that the pushrod for the steerable nose gear was too long. A 90° bend is prebent into the pushrod, where it attaches to the servo arm, but the bend was approximately 3/8 inch too long. This presented a problem because the rudder’s pushrod also attaches to this same arm. Although a lot of work could have been done through clevis adjustments, subtrims, and other adjustments in the transmitter to make this work, I chose to rebend the pushrod at the correct spot and cut off the excess rod—a simple solution. Other than that, the rest of the fuselage construction is fairly straightforward. Internal access to the servos, pushrods, receiver, and binding plug is gained by removing the top hatch. Although not cavernous, there was enough room to slip one of my large hands through and work as needed. Two hands? Not going to happen. Up front, the motor is bolted into place and the front part of the cowling is installed. I mention this only because there are two super-bright LEDs that have to be plugged in, which add another nice touch to the Carbon-Z Cessna 150’s looks. The manual suggests installing the propeller at this point. I advise you to install it temporarily to check the rotation of the motor, but then immediately remove the propeller until after the assembly is completed and you’re ready to check the center of gravity (CG). Too many accidents happen with propellers attached to live motors in workshops. Safety first!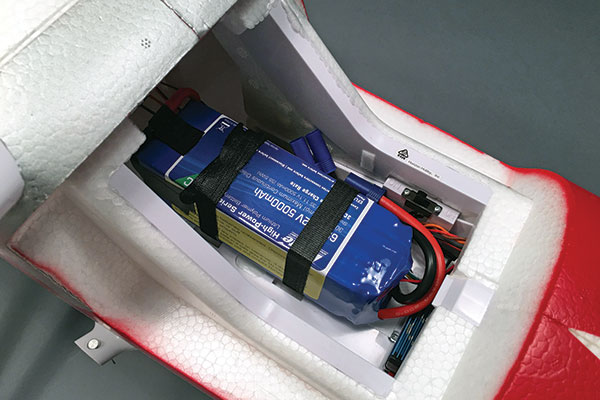
A large hatch is built into the front of the Cessna’s fuselage and it provides plenty of space in which to insert the LiPo battery. The aircraft’s power switch is also hidden under this hatch.
A bit of thin CA adhesive is needed to attach the rudder to the vertical fin. It uses four CA-type hinges and the manual doesn’t spell out whether foam-safe glue should be used. I decided to test this by using regular, thin Bob Smith CA adhesive on one of the hinges. To my surprise, it worked as it should, so there was no need for foam-safe CA. CA adhesive is also used to attach the cover to the top of the rudder. A few drops of thin CA hold the LED in place. I think you could consider the stabilizer halves removable for transport/storage, but I’m leaving mine in place. Each half is supported by a composite rod and held in place by a 3 x 12mm screw. If you’ve ever had an airplane with wing struts, you likely have found that they can be a pain to attach/detach/store/transport. Well, the struts on the Cessna 150 are made to fold flat against the wing when removed, but also easily unfold and push into place when attaching the wing. No tools are needed to attach the wing halves because the struts are held to the fuselage with a pin clipped in place, and the wing halves are held against the fuselage with a proprietary thumb screw. When attached, pop the top hatch back into position and you’re ready to go. Popping open the front hatch gives you access to the battery compartment. A 6S 5,000 mAh LiPo battery was supplied for this review and it easily fits in the compartment with room to spare. The battery is held in place with hook-and-loop strips. After the power is connected, flip on the power switch and you’ll see the Cessna 150 come to life. The LEDs around the model immediately come on—some constant, some blinking, and all in proper white, red, and green. A few seconds later, the AS3X system initializes as seen by the control surfaces going through their setup “jiggle.” The ESC beeps for each of the cells attached and the Cessna 150 is ready for takeoff. Something I didn’t cover was the receiver setup. The manual explains this well, and you can choose to program the SAFE system if you like. Spektrum’s website has a long list of setups that can be downloaded and installed in current Spektrum transmitters. I selected mine (DX18) and found the Carbon-Z Cessna 150 on the list. After downloading the setup file to the SD card, it was easily installed as a new model. All I did was bind the receiver, double-check that the throws were correct, and I was ready to go.

The author loves this hands-free servo connection system that Horizon Hobby has incorporated into the plug-in wing halves. There are no servo extensions to forget, plug in backward, or pinch during assembly!
Flying
Similar to many club fields, mine has grass between the pit area and the runway. Normally, I carry my airplane out to the runway because it’s a little rough, but I decided to taxi the airplane out to the runway to see how it would handle. To my surprise, it rolled through the grass with no problems. The shock-absorbing gear did its job as the model rolled along. I noticed some rattling from the gear as it bounced along. Some of this can be fixed by adjusting the wheel collars—lessening the side-to-side movement of the wheels. On the runway, the nose gear has ample steering—so much so that at low speeds, the Carbon-Z Cessna can turn tightly enough that it will almost spin in place. One thing that I like to do with any electric-powered airplane is to adjust the throttle trim so the propeller will spin at the lowest “idle” setting when the throttle is in its low position. You’ll understand why I mentioned this later. To say that the takeoff run and climbout were uneventful would be an understatement. Gradually advancing the throttle saw the Cessna 150 take to the air in roughly 200 feet without flaps, and at approximately 2/3 throttle. Holding this throttle setting, the model climbed out at roughly a 20° angle, just as you’d see with any full-scale Cessna. Photo passes are always first on the list and comfort level. The AS3X stabilization made it easy for the Cessna to perform rock-solid passes. The only other thing that I like to do on a maiden flight is test the aircraft’s low-speed characteristics, especially on any model with flaps. To do this, I first start a few mistakes high and simply slow the aircraft until it stalls. The Carbon-Z Cessna 150 slowed nicely and had no bad habits. It did not drop a wingtip or snap, even with the elevator in the full up position. It simply dropped in altitude as the speed dropped. Flaps were assigned to a three-position switch. When activated, the flaps will cause the aircraft to climb slightly when at higher speeds. At slower, landing-approach speeds, however, there’s no noticeable climb when lowering the flaps.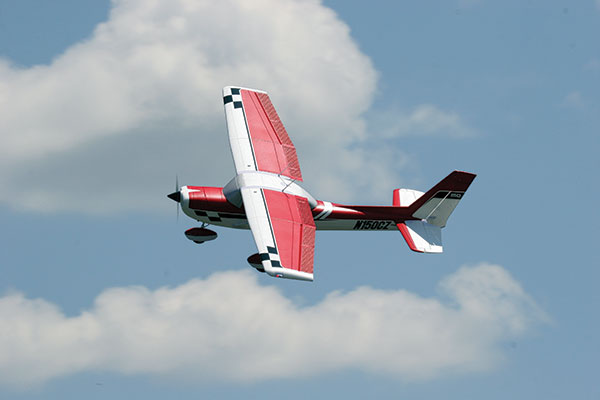
In the air, the Horizon Hobby E-flite Carbon-Z Cessna 150 is a blast to fly. Go low and slow with the flaps out, or speed things up and put on an air show with loops, rolls, snaps, spins, and more.
Next up were a few touch-and-gos. With no flaps, the Cessna 150 prefers to come in as you’d expect, with a slightly longer, shallow approach. Dialing in flaps allowed me to approach the runway at a higher angle. Because the propeller is spinning at low idle, it acts much like a brake—working in tandem with the added drag of the flaps to slow the Cessna in a controlled manner. With all of the slow stuff out of the way, it was time to see if the Cessna 150 lived up to the “K” status, and I’m happy to state that it didn’t disappoint. Because of its design and size, it’s not what I’d call a “snappy” aerobat; instead, it is measured and methodical. By that I mean nothing happens quickly. The Cessna’s maneuvers are large and graceful, which give it an in-the-air presence of a much larger airplane. If you look at the International Miniature Aerobatic Club (IMAC) Novice sequence, everything that you see there is in the Cessna 150’s repertoire. It might not be as crisp as an Extra or Edge would be, but there’s more than enough power and performance to have a ball snapping, spinning, and looping your way through the sky. Inverted passes? They are not exactly scalelike, but no problem. What about an Avalanche? It looks nice with that graceful snap at the top. Point rolls and knife-edge flight? Yes, there’s more than enough power and rudder to do them all the way across the field, but you’ll have to feed in a bit of aileron and elevator to keep the aircraft on track. Flight times on the 6S 5,000 mAh LiPo battery will vary depending on how heavy you are with the throttle. If you cruise around in a non-aerobatic way, with touch-and-gos and simple maneuvers, you could achieve flights close to 15 minutes with power to spare. With throttle-heavy aerobatics, flight times are in the 8- to 10-minute range.
Carbon-Z Float Set
The Carbon-Z Cessna 150 can also be outfitted with optional floats. Horizon Hobby supplied a set of those for the review, so I refitted the Cessna 150 to fly from water. One note on this: If you order the float kit, you also need to order the separate wire mounting set. It’s the Wire Mounting Set for CZ Cessna 150: Carbon-Z Floats (EFLA5605). Assembling the gear is easy, but you have to pay attention, especially when fastening the brackets to the floats. The brackets have varying hole sizes that need to be positioned correctly for each of the wires to properly attach. The left float has a servo and pushrod already embedded in the foam. I state that it’s embedded because it’s built in and inaccessible. The steerable water rudder is attached to the back of this float and the pushrod’s clevis snaps into the steering arm.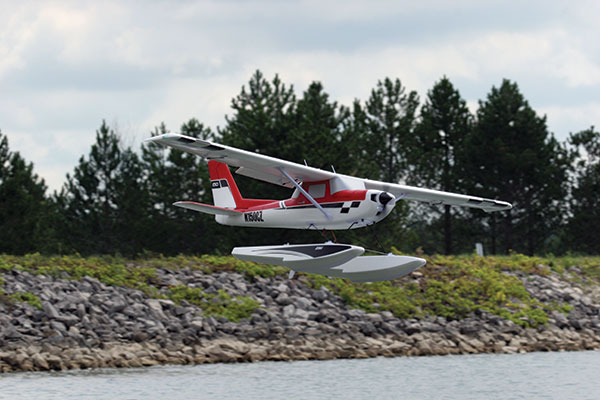
Not a land lover? Add the optional float kit and you can have just as much fun flying off of your local pond, lake, or reservoir. Swapping between fixed gear and floats takes roughly 10 minutes.
Attaching the floats to the Cessna 150 is a simple matter of unbolting the main gear from the fuselage then bolting on the supplied replacement pieces. The wire from the float’s rudder servo plugs into the bottom of the fuselage. A couple of molded plastic plates are attached to the floats. Pay close attention to how these are mounted because the instructions are unclear. In particular, the front pair of plates has holes in three sizes—the smallest of which should face aft. This is not covered in the instructions. After the floats are assembled, the changeover between regular landing gear and floats takes approximately 10 minutes. On the water, the float kit works as advertised, but with two notable things. First, I’d love to have more rudder authority. The Cessna 150 is a larger airplane and can easily weathervane on the water in strong wind. The second is that the port float (the one with the servo) can take on water. It didn’t have any noticeable effect in flight, but when I took it back to the pits, I heard water flowing through the float when I picked it up. My guess is that the water is entering through the back of the float where the pushrod is. I hope it won’t affect that embedded servo, but only time will tell.
Conclusion
E-flite’s new Carbon-Z Cessna 150 is one of those designs that can satisfy many modelers’ tastes. For those wanting trainerlike performance, the aircraft delivers with its easy flying abilities, AS3X stabilization, and optional SAFE Select system. If you’re looking for a sport scale model with more detail than your average ARF, the Cessna 150 delivers. If you want a wide range of aerobatic capability, it delivers yet again. This great-flying model assembles quickly, goes together easily at the field, and has really caught the eye of many in my local club. —George Kaplan [email protected]Manufacturer/Distributor:
Horizon Hobby (800) 338-4639 www.horizonhobby.com E-flite (800) 338-4639 www.e-fliterc.comSources:
Spektrum (800) 338-4639 www.spektrumrc.com Cessna manual www.horizonhobby.com/pdf/EFL1450-Manual-EN.pdf IMAC www.mini-iac.comThis Month's Issue

Join the AMA
![]()


Add new comment