


Blade 350 QX BNF
Horizon Hobby’s first GoPro-compatible quadcopter. Article and video by Greg Alderman. Photos by Jennifer Orebaugh. Read the full article in the May 2014 issue of Model Aviation.
SPECIFICATIONS
Type: Electric-powered BNF or RTF quadcopter Skill level: Beginner to advanced pilot Rotor diameter: 22.8 inches Length: 18.3 inches Flying weight: 24 ounces Height: 5.43 inches Radio: RTF: DX5e five-channel DSMX transmitter (included); BNF: DSM2/DSMX compatible transmitter (required) Motors: Four 1,100 Kv brushless outrunner motors (installed) ESCs: Four 10-amp brushless ESCs (installed) Power: 3S 11.1-volt 2,200 mAh 30C LiPo (included) Charger: 2S-3S LiPo Balancing DC Charger, 0.5-3 amps (included) Accessories: GoPro anti-vibration camera mount (included) Flight time: 10-15 minutes Price: RTF: $469.99; BNF: $419.99PLUSES:
• Fully assembled and quick to get in the air. • Included camera mount is an economical way to get into aerial photography. • Extremely easy to fly in Smart Mode; great for beginning pilots. • GPS-enabled safety features such as SAFE Circle and Return Home functions. • Many advanced features at a decent price. • Ability to calibrate components such as compass, accelerometer, and pressure sensor (altitude). • Exceptional instructional videos available at www.bladehelis.com/350QX. • Great post-purchase technical support and parts availability.MINUSES:
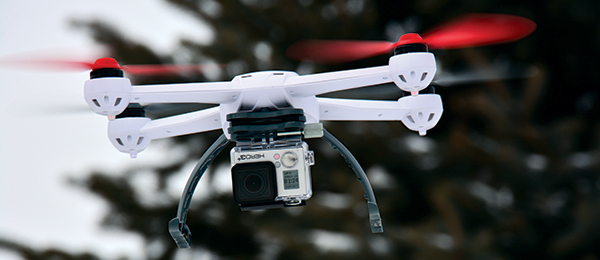
• Manual is confusing in places (watching videos helps). • Except at low altitude, it can be hard to see on a cloudy or clear day. • Orientation LEDs are useless during bright daylight hours. • Reports of a few “flyaways” (although none experienced with this unit). When I was asked about writing a review of the Blade 350 QX Quadcopter, my first thought was no. It is only another little quad and what more can be said about it? In hindsight, I’m glad I said yes. The 350 QX is fun and flies great! With the current popularity of multirotor aircraft, I am not going to go over the basics of flying one. Instead, I will cover the more specific flight mode features of the Blade 350 QX, such as Smart Mode, Stability Mode, and Agility Mode. The Blade 350 QX also has a Return Home function that can be manually initiated or, upon loss of transmitter signal, automatically initiated. As with most Blade RTF and BNF products, the 350 QX comes in a nice shipping and storage box. Upon opening the box you are treated to a fully built, tested, GPS-enabled quadcopter. I was sent the BNF version with which to bind to my Spektrum DX8 transmitter. If you purchase the RTF version, you will receive the full-feature Spektrum DX5 transmitter. Also included are the Quick-Start Guide, a 30C 3S 2,200 mAh LiPo flight battery, a 2-3S LiPo Balance DC Charger, a spare set of propellers, and an isolation mount for installing a GoPro camera. The printed manual that comes in the box is merely a quick-start guide, and does give you enough information to safely get your new 350 QX into the air. An in-depth manual can be found at http://www.bladehelis.com/350QX. You will also find many technical and training videos on how to perform calibration procedures and other maintenance.Blade 350 QX Setup
(video provided by Horizon Hobby at https://www.youtube.com/user/bladehelis)Blade 350 QX Flight Modes
(video provided by Horizon Hobby at https://www.youtube.com/user/bladehelis)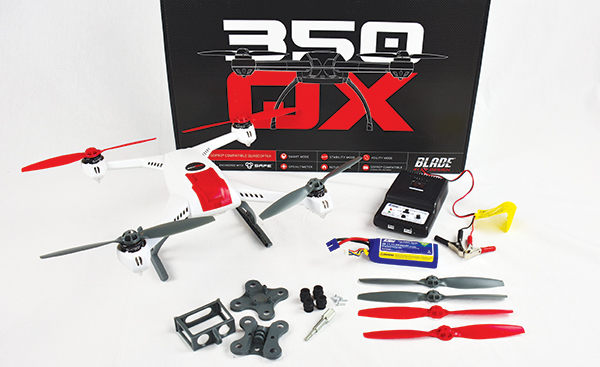
The Blade 350 QX comes completely assembled out of the box with exception of the GoPro vibration isolating mount. With the included battery and DC Balance Charger you can be ready to fly your Blade 350 QX about one hour after opening the box.
As with any GPS/compass-enabled device I have used, on the first flight you need to calibrate the compass. Compass calibration is slightly clumsy and confusing the first time you do it, and you need to ensure that you start the procedure with the front of the quad facing north. If you are accustomed to a different brand’s procedure, then the Blade 350 QX procedure will at first have you scratching your head. Why do you need to calibrate the compass? For good performance and GPS flight, the aircraft needs to know where north is. Strong magnetic fields can create havoc with the calibration. After you have calibrated the compass, if you set the quad down near a strong magnetic field such as a large brushless motor in a helicopter or airplane, the motor’s magnetic field could derogate the compass’ calibration. This could change the “north” that it needs to see by a few degrees or, in extreme cases, 180° or more. When the compass needs to be recalibrated, you will first notice it in flight. If you are flying straight away from yourself and the quad wanders off at an angle, you should land and recalibrate the compass. After the compass is calibrated, the 350 QX is ready for its first flight. The manual recommends that the first flight or two be performed in Smart Mode. To start in this mode, turn on your transmitter, then turn the off/on switch on the 350 QX to on. Ensure that your throttle is at minimum throttle and the throttle trim is centered. In this mode, after powering up the quad, the status light will begin flashing green. You cannot start the motors because the system is still trying to get GPS Lock. Within 30 to 90 seconds, the status light will stop flashing and turn solid green. At this time your Blade 350 QX is ready to start the motors. Before you start the motors, step back from the quad at least 15 to 20 feet. This will give you your SAFE Circle. When you are safely away from the quad, start the motors by pushing the rudder stick fully to the left and then fully to the right and then back to center. After a couple of seconds the motors will start up at a slow idle. Bring the throttle stick to roughly mid-stick and the quad will rise into a nice 6- to 10-foot high hover. In Smart Mode you are flying in Stick Relativity, meaning that at the time you started the motors, the direction the nose was facing and the GPS coordinates were logging into the memory as the Home point. In Stick Relativity mode, it doesn’t matter which way the quad’s nose is facing. If you push the right stick away from you, the quad moves away from you. If you push the stick to the left, the quad moves to your left; if pushed right, then the quad moves to your right, and so on. This is a great mode for beginners just wanting to push the 350 QX around the sky and not worry what direction the nose is facing. In this mode, the 350 QX’s speed and altitude are limited. Maximum altitude when in Smart Mode is approximately 150 feet. From a hover in Smart Mode, if you advance the throttle to full, the 350 QX will slowly climb to approximately 150 feet and stop. If you bring the throttle back to mid-stick, the aircraft will descend to an intermediate altitude. If you continue to bring the throttle down, the aircraft will continue to descend until it lands. Smart Mode also activates SAFE Circle and will not fly into it. It will fly to the edge of the circle and stop, even if you still have the transmitter stick pulled back toward you. Again, the best way to visualize the SAFE Circle and how the aircraft acts in Stick Relativity mode is to either watch the training videos or read the online manual. The next mode that is available is Stability Mode. In this mode, the 350 QX still has automatic self-leveling when you release the sticks. Position Hold is still active, meaning that if you release the sticks, the GPS sensor will stop the 350 QX and hold it on one position until you again move the sticks. But now you have direct control of the throttle. When you give more throttle, the quad will move along the ground or climb extremely fast. You also are no longer limited to the 150-foot maximum altitude of Smart Mode. This quad can really move in Stability Mode and can quickly appear small and hard to see! If this happens to you, there are two ways to recover. The first is to put the aircraft back into Smart Mode and pull the stick toward you, causing aircraft to come back toward you. The second option is to activate the Return Home switch. This will cause the aircraft to fly back and land at the same spot that was logged when you started the motors. The biggest difference between Smart Mode and Stability Mode is you have full control over motor thrust and you now need to “fly the nose” of the aircraft like a traditional helicopter or airplane in forward flight. I believe most pilots will prefer to operate in this mode after they have grasped the understanding of flight control of the aircraft. It certainly is a lot more fun than Smart Mode! The last true flight mode of the 350 QX is Agility Mode. This mode, as its name suggests, gives the pilot the most agility of the aircraft. The aircraft can “flip and roll” in this mode. Agility mode should only be used by experienced pilots because there is no self-level feature and you have full control over the motors. For experienced pilots, this mode is great fun! Although Return Home (RH) is not actually a flight mode, it is a useful safety feature. Each time you start the motors, the 350 QX will record the direction it is facing and also its GPS location. For the Hero 1 and Hero 2 cameras, you need to use the clear, plastic protective housings that come with the cameras in order to attach the camera to the isolation mount. If you have the latest GoPro Hero 3, you have the option of attaching the camera with the plastic case, but the 350 QX comes with a little frame to attach the GoPro Hero 3 when it is not in its protective plastic housing.
Flight Video
Read the complete review in the May 2014 issue of Model Aviation. Greg Alderman
MANUFACTURER/DISTRIBUTOR:
Horizon Hobby 4105 Fieldstone Rd. Champaign IL 61822 (800) 338-4639 www.bladehelis.comSOURCES:
Blade 350 QX instruction manual www.bladehelis.com/350QX GoPro (888) 600 4659 www.gopro.comThis Month's Issue

Join the AMA
![]()


Add new comment