
Written by Dan Grotzinger
Tips to take your model to the next level
How-to article
Photos by Jay Smith and Matt Ruddick
An extended article from the October 2016 issue of Model Aviation.
After seeing magazine coverage of the Best of Show and Best Finish winners at The Toledo Show: R/C Model Expo, held in Toledo, Ohio, when I was a kid, I usually felt a sense of awe and respect for what they represented. Gradually, a thought germinated in my mind: maybe, someday, I could do that.
This is a good place to clarify an important issue. You don’t build and paint an award-winning model to win a prize—you do it for yourself. We all appreciate positive feedback, but if I were alone on an island, I would still do the same work. Excellence of workmanship is a craftsman’s reward.
I grew up in the hobby during the 1960s on Control Line (CL) “Stunters,” that featured silk and dope finishes. There was no CA glue, no MonoKote, and no ARFs. You did the heavy lifting or bought someone else’s airplane.
Some of the best CL Stunt (Precision Aerobatics) aircraft were hand-rubbed (sanded with fine-grit sandpaper and then rubbed with polishing compound), because Stunt has a finishing component to its scoring.
In those days, AeroGloss was the gold standard. Your airplane could have a beautiful satin finish in two or three weeks by using a brush and no buffing. Butyrate dope often required buffing because it did not flow out and shine as well. AeroGloss was excellent for brushed-in repairs that became invisible without the need to paint an entire area.
Unfortunately, AeroGloss went through a progression of formula changes that rendered it inferior. Except for clear, which I still use to attach silk and tissue, it is no longer available.
My first hand-rubbed finish was with Sig Manufacturing dope in 1987. The dope was tricky to use because freshly applied coats would soften already sanded layers, reintroducing surface imperfections that required additional coats of an already heavy product.
Using clear nitrate in the base layers’ buildup somewhat alleviated this problem. Sig dope tends to shrink and pulls up at tail fillets. Much of the paint applied to the fillets must be sanded off until the final coat to reduce paint buildup and solve shrinking.
Next, I tried K&B epoxy and was pleased. The biggest problem with it was the slow cure and resulting tendency to attract dust. Sometimes it would attain an “orange peel” (a texture that resembles the skin of an orange) or “fisheye” (small circular, crater-like openings) appearance, a trait that seems common to epoxy paints. These traits make rubbing an attractive option.
I’ve tried water and particulate filters in the spray system, as well as surface preparations suggested by professionals, with limited success. The best prevention beyond that is applying thin, wet coats. After I had used it twice, K&B went off the market.
The next product that I tried was Chevron Perfect Paint. I had excellent results on several warbirds using the military flats. That product is also no longer available. Since then, I’ve used several others, including Rust-Oleum and automotive products—all with mixed results.
Each product has a learning curve with various pros and cons. There is no perfect paint. As with all things, you must work with each product’s strengths. Imagine my surprise and delight when Klass Kote epoxy appeared at the Toledo Show and was advertised to be interchangeable with K&B and Hobbypoxy paint components. I bought some and used it on a scratch-built Senior Skylark Twin with excellent results.
Because rib structure is a prominent feature of the Skylark/Falcon family of wings (no sheeting), it is not advised to rub out the finish. A consistent rubbing procedure would cut small valleys into the finish at the edges of the ribs, risking sand-through. Not rubbing the ribs would create inconsistent areas of polish and shine.
Careful application of a thin top coat resulted in a satisfactory final finish. A couple of unsightly dirt specks were spot sanded and polished without being noticeable.
How did I end up at the Toledo Show with a Best Finish winner? Everything came together. I had been collecting, building, and painting vintage airplanes when I discovered the Vintage RC Society (VRCS). The group has a Concours competition category, which encourages building vintage models “as they were in the day.” In 2009, VRCS was awarded its own category at Toledo. Competing against the best at a national level forced me to improve.
Throughout the years, the passing of many modeling friends impressed upon me that the time we have to do the things we wish might be limited. In 2013, I had problems that led to surgery, which convinced me even more.
Although I only competed in Pattern (RC Aerobatics) for one year, I love aerobatics and practice like a competitor. I saw an old Mach 1 Pattern airplane for sale at a swap meet. I admired its lines and proportions in three dimensions, but it seemed too heavy. (I once had a kit, but hadn’t seen one built.)
Two rows later, I found an original Midwest Products Mach 1 kit for sale. I have had several foam core wing kits and let them all go because of my perceptions about weight and adhesive issues.
The seller of this kit gave me some useful information on bonding wing skins, which I will explain later. I saw the use of Klass Kote on a fully sheeted foam core wing as the ticket to the best finish I had done. I could sand and buff to my heart’s content with no ribs to worry about. Three days later, I was building. Passion, experience, urgency, and circumstance had intersected.
I am not a professional with the requisite training, information, facilities, and equipment. If I can do this, with patience and desire, so can any modeler. I’ll share with you what I’ve learned from my mistakes. Are you ready?
Let’s jump in!
Setting Up
An 8-gallon 125 psi compressor, a DeVilbiss touch-up paint gun, a Badger airbrush, and a carbon-filter breathing mask are my essential equipment. Slow-drying epoxy paint can be applied with an airbrush. I use a stand that acts as a rotisserie by mounting it onto the model’s motor mounts. I usually have a checkerboard pattern on the bottom of the wing so that the top and bottom do not need to be sprayed at the same time. If you need to spray both at once, standoffs can be mounted in the servo openings of the wings and in the openings for the wing bolts. You spray the bottom first, turn the wing over, setting it on the standoffs, and then spray the top. When spraying the bottom, place the wing on clean waxed paper to avoid carrying dust to the yet-to-be-sprayed top surface.Applicable Building Tips
This is not a building article, but a few tips bear mentioning because a great finish is hard to accomplish over flaws. Use a metal straightedge and a sanding block to true-up as many joints as possible, trying to avoid putty. Many glues can be sanded when the joint is 90° to the surface. A feathered joint, such as D-tube sheeting that wraps over the leading edge instead of butting against it, is another matter if the glue used is epoxy or CA. For this reason, I use Testors solvent-type wood cement in these situations. The glue and balsa will sand off at the same rate, leaving a clean joint instead of an unsightly hump. The Mach 1 has 3-inch sheets that can be glued together for wing skins. If you use CA adhesive on your aircraft, you will have to sand too much to create a clean joint, leaving a valley that might not be visible until the final finishing. Use Testors cement or something similar, and then immediately wipe the excess off of the surface so you won’t have as much to sand. I pin the sheets to force them tightly together and tape them to keep the joint flush. I do this on the building surface over waxed paper. Sand the skins before bonding them to the foam cores. Companies such as Balsa USA supply wing-width skins, eliminating this chore. Most of the strength is in the skins, so if the grain is bad or the wood is too soft, replace it. Grain irregularities can be hard to see and judge, but can affect your finish. More paint will correct this, but it adds weight. Grain irregularities pose the biggest problem on the large surface of a wing, which will be similar to a mirror when you are done. At night, when I think I am done sanding, I turn out the lights and leave a small television on. I sit roughly 12 feet away and hold the wing between the TV and myself so that the wing reflects light to me on a tangent. Different angles with varying amounts of light will show every variation and flaw that you missed in normal light. You can then lightly sand with 320-grit sandpaper. This same sighting technique, sometimes referred to as candling, can be used in normal light to sand out each layer of paint. If you wait until the final coat to make these little corrections, the job will be harder and less effective.Bonding Wing Skins
The Mach 1’s skins were bonded with Gorilla Glue. It does not debond over time or in the sun as contact cement does, and will not add weight as epoxy does. When properly done, there will be no messy excess. Apply the glue to the wood skins, spreading it to a thin film with a credit card. If the wood “fuzzes up” and looks dry, you took too much glue off. Spread a little more. Using a spray-mist bottle, lightly wet the foam cores and rub the moisture around with a clean hand. This creates a surface tension that you will feel. Glue the upper and lower skins to the cores at the same time, mounting them back in their foam carriers or castoffs. Because the wet wood expands, a warp can be introduced when doing one side at a time. I used a thick glass table for this assembly, but any flat surface will work. The top of the assembly must also have a flat surface, and it needs to be weighted. A fair amount of weight that is equally distributed won’t crush or compress the cores. Install straight pins through the skins into the foam in a few places to prevent creeping while curing. When done, there will be little excess glue pushed out. There also will be no humps or irregularities and it will be lightweight and strong. The remainder of the wing assembly will be a breeze and you will love the result.Fiberglassing
The Mach 1 was fiberglassed using Sig .5-ounce and .7-ounce cloth. The heavier cloth is easier to handle, fill, and sand, but adds more weight. It was applied around the nose and wing fillets for durability, and on the top of the wing for a better surface texture. The lighter cloth was used on the remainder of the airplane. I used Zap Z-Poxy finishing resin for this project. At this point you have a controversy and a decision to make. Some modelers thin the mixed resin 50/50 with denatured alcohol and brush it on like silking a wing with silk and dope. Some feel this softens the resulting finish, so they apply the resin using a squeegee and the toilet paper-blotting method. I prefer the thinning method because it is quicker, easier, neater, and lighter. I’m careful with my airplanes, so I rarely dent them. This method quickly produces a good, lightweight surface. If you are prone to accidents, you might prefer the other method. Sometimes I apply a coat of clear dope to the wood before fiberglassing. This seals the wood and it seems to require less epoxy. A dry fiberglass cloth is placed over the wood with roughly an inch of overhang past the desired fiberglassing area. The resin is brushed in, starting at the center and stroking outward in all directions. This prevents the material from bunching, rolling, and sliding. After it cures, the excess will sand off easily with 220-grit sandpaper. Edges are easy, but end on a flat area that will easily feather out with sandpaper. The next piece can slightly overlap the first area, and it will also feather easily when cured. This lets you use pieces as big or as small as you want and the seams will disappear. I use fiberglass cloth on solid wood surfaces, no matter what paint I use or the size of the airplane. In a rebuild or refinish, the old paint can be stripped with thinner—leaving your fiberglassed surface like new. The exception is epoxy, which must be sanded off. After everything is covered, brush on a second coat of resin. It takes approximately six hours to be sandable. Start with 220-grit and end with 320-grit sandpaper. I take off the resin down to the surface of the cloth, so only the weave is filled. You can feel when you get to this point and the sound of the sandpaper will become scratchier. Depending on the wood grain, the weight of cloth used, the consistency of your resin, and your brushing technique, you might be done or you could have a few pinholes and open grain. You can apply a third thin coat of resin with a lint-free cloth, or depend on your primer to fill these problems. I’ve done it both ways. If you have a sand-through in the cloth, you might want to recoat that spot unless you are using epoxy primer (in which case it makes little difference). Some patience with the fiberglassing and sanding will give you a beautiful, lightweight base for your paint. The design weight of the Mach 1 is 8 1/2 pounds, but mine topped 7 3/4 pounds.Epoxy Paint Pros and Cons
Epoxy finishes can often be completed with only two coats of primer and two coats of color. Subsequent coats do not soften or alter previous coats. There is little shrinkage to cause the sheeting to buckle or distort and pull paint up from tail fillets. Masking will only pull up paint if it is too thin and applied to an unclean surface. It will not fade, crack, or age, and is fuel and cleaner resistant. It is cured to sand and handle in 24 hours, and reaches “sword hardness” in four days. Epoxy is the perfect paint for buffing because it does not need to gas out. Disadvantages to epoxy are that it is more prone to need buffing, is more expensive than some other finishes, and is messier than many products. It must be poured from container to container, and then into the paint gun to ensure complete mixing. The overspray does not dry in the air as dope does, so it bonds wet to anything it lands on. Because of its viscosity, it picks up more dust in both the spraying and curing process than most other paints do. There is a waiting or induction period after mixing that allows the chemical process to get up to speed. If you don’t mix enough, you are stuck and cannot complete an area. You might tend to overmix and waste epoxy. If you have excess, store it in a refrigerator for a few days and use it for the next coat. Epoxy paint is heavier than many finishes, but applying it with a good technique helps. It tends to develop an orange peel texture, but that can be minimized with proper thinning, clean air, and clean surfaces. If you intend to sand and buff, a mild orange peel appearance becomes a nonissue.Color and Geometry
You can apply a perfect finish and still end up with an unattractive model if you don’t plan your colors and geometry well. This does not apply to scale models. When I first got into the hobby, I read an article in American Modeler that included some basic principles to use when planning a finish. The first is to use at least two main colors, a dark and a light, for contrast. This is important for more than appearance; it gives good in-flight visibility. The dark color should be approximately 1/3 to 1/4 of your surface area minus trim, and the light color should be the remaining 3/4 to 2/3 of the surface area. A 1/8- to 1/4-inch wide line of either white or black to separate the two main colors, depending on the overall scheme used, can add life to your finish. These color-separation lines can enhance the airplane’s geometry. A nearly horizontal line from the spinner to the rudder makes a great accent. A line from wingtip to wingtip, near the high point of the airfoil or on the spar, also is visually pleasing. These lines can be curved or diverted at the root or wingtip for enhancement. Sometimes the two main colors touch and the trim line can run parallel to, but away from, their border. This was the crux of the American Modeler article and it has served me well with many variations and modifications. The Mach 1’s finish geometry traces its lineage back to that article. I consider this the only truly unique paint scheme that I ever devised. It was first developed for a Veco Chief in 1964. The dark color was Stinson green, and the lighter color was that same green lightened roughly 1:1 with white, creating a two-tone final finish. On this model, the separation color was black—not very original. I chose to put a yellow stripe slanted roughly 40° across the wing chord, near the wingtip. Then it seemed that two stripes of contrasting color would be even better. How about gray or a neutral? I then got a real inspiration. How about flipping the two-tone beyond the chordwise stripes? Wow, that looks good! I’ve used this two-tone scheme on eight or nine airplanes in red, blue, green, maroon, and purple. The beauty of the yellow and gray stripes is that they work with many other colors. There have been airplanes that used this geometry, but not as two-tones, such as red and yellow and red and lavender. I have painted airplanes with only one main color that still incorporate the wing chord and separator stripes. Sometimes the wing chord stripes became a checkered stripe or merely a silver stripe with a black and red border. I’ve almost worn this geometry out, but the variations keep working. Please refer to the picture of my recently rebuilt Dirty Birdy for a simple, but attractive, three-color metallic finish. This started out with black as the dominant color, red as the secondary, and silver as the trim.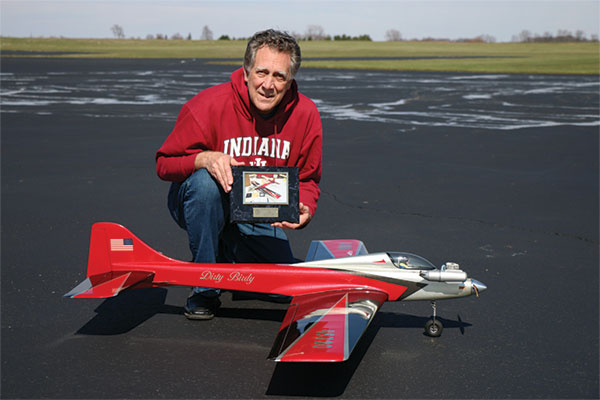
The Dirty Birdy was awarded first place in Vintage RC at the Toledo Show. The model was refinished after a crash.
The red is a simple wedge pointing into the fuselage on both the wing and the stabilizer. The point is located forward of the midpoint of the wing chord and the forward edge of the red does not sweep as much as the rear edge sweeps. This results in a balanced, pleasing effect on the swept wing. I planned to use a simple 1/4-inch silver trim stripe, but decided to broaden the silver to twice its width as it swept to the wingtips. This simple change brought the wing and tail to life. The Dirty Birdy has a low fuselage profile. I decided to make the dominant color there red instead of black for visibility, and to make the secondary color at the nose silver. Black became the trim color on the fuselage. This layout engages the eye and brings the model to life. Black, red, and silver are simple, similar-tone metallic colors, but they look good in the air. The red pops in vertical maneuvers and the silver nose stands out in level flight. Note that on both the Mach 1 and the Dirty Birdy, the main theme is not extended to the fin. I used to do that, but I decided that it looks too busy. Choose interesting, vibrant colors. Red, white, and blue are nice, but have been overdone on models. Some great color combinations are lemon yellow with black trim, pink and black, yellow and purple, orange and blue, dark blue and light green or the reverse, and lavender and turquoise. Keep your eyes open and you will get ideas. I first saw powder blue, burnt orange, and Cub Yellow on a paper at a mall. Those colors stuck with me and appeared on three airplanes before being incorporated into the Mach 1.
Adapt the scheme to your airplane
There are not any hard and fast rules, such as using straight lines on constant chord wings and curved lines on elliptical wings. This is useful advice, but exceptions occur. This is art—it will be right when it looks right. I own a Goldberg Skylark Twin and an upright engine Veco Thunderbird. The colors were changed, but the geometry featured on the kit boxes was not. How do you improve on the simple elegance of these two examples? Take things you have seen, or even the kit box art, and change it to suit your needs. There is no such thing as a totally new aircraft. They all build on past designs. The same is true of paint designs.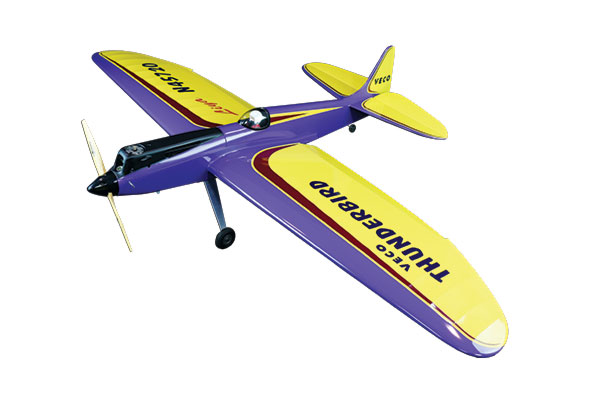
The author’s Veco Thunderbird got its inspiration from the kit’s box art, but the colors were changed.
It was a challenge to adapt the geometry you see to the Mach 1. I’ve mostly used this layout on nearly constant-chord wings. The leading and trailing edge angles and the aspect ratio of the Mach 1 wing to the stabilizer were different. The spinner sits low on the fuselage and the stabilizer sits high. The mean reference line of the fuselage differs greatly from the lines used to construct the airplane and set the incidences. How do you make all of these conflicting lines come out and look well together? I found I had to move the longitudinal white line fairly far aft on the stabilizer, and the yellow and gray stripes had to be widened, with the slant reduced to approximately 28°. This was the only geometry that would look right on the stabilizer and transfer to the wing. The white line also had to be moved back on the wing and the yellow and gray stripes moved in farther from the tips. Now the wing and stabilizer were in resonance. The fuselage’s longitudinal white stripe had to be placed high on the spinner and still needed to slope upward to a point below the stabilizer. In all of these calculations, I tried to find balance in the proportions of the colors, as well as in the presentation of lines on the shape of the airplane. As it was, the line on the fuselage barely cleared the large wing fillets. Sometimes I lay paint schemes out on the plans. Other times, I use a simple drawing. This project was entirely laid out in tape on the assembled, primed airplane. A lot of tape was moved around before getting it right. It was that complex. It’s up to you how it’s done, depending on your project. The same planning can be necessary with colors. How much of which shade and tone you use next to other shades and tones has a huge effect on the final appearance. Even test samples are sometimes not enough. There have been a few airplanes that I did not like when all of the masking came off. Occasionally that can be changed with some simple, well-chosen trim, which changes the dynamic interplay of the colors. Red, white, and blue are safe, right? Don’t be afraid to mix colors. This vastly increases you creative options. The burnt orange on the Mach 1 is orange with a few drops of blue. A few more drops would have given a true brown color. The most versatile mixing color is white because it is used to lighten all other colors. The auto industry is always creating new shades and colors to keep our interest. It works with model judges, too.
Primer
This is the simplest part of the article. Klass Kote primer is forgiving and easy to use. Mix it per the instructions on the can. It will flow on well without problems and cover most imperfections, except pinholes and deep grain that the epoxy doesn’t fill. Do not sand. An hour or two after spraying the first coat, pinholes can be filled in with a fine-tip brush. Let it dry a day and then sand it all at once, taking most of the primer off. You are only creating a smooth surface for the second coat. A little 220-grit sandpaper, followed by a more serious session with 320-grit sandpaper, should work. The second coat should be treated like a color. You will want a thin, consistent coat that will provide a base for colors. Do not leave serious “sand-through” area at this juncture—it will show through the color. You might want to touch it up a little, but you should not have to apply a third coat. This aircraft has to fly!Color Application
Standard procedure dictates that light colors, such as the white separation line, be applied first; however, in the case of the Mach 1, the chord-wise stripes cross and cut off the white line. The masking sequence works out much better by painting the chord stripes first. Place light pencil marks on the primed airframe for location of the yellow stripes. Fully “wet-coat” a layer of yellow paint approximately an inch beyond the marks. Don’t overdo it. Going too far beyond the marks equates to extra weight. When I sprayed these, the paint was a little too thick and I ended up with a mild orange peel texture. At this point, I sanded it to prepare for the second coat with 320-grit sandpaper, which I would have done even if there was no orange peel effect. I determined that if I dipped a 1/8-inch dowel into the paint cup and the paint mixture dripped with the consistency of water, the orange peel texture was very minimal. Because I was going to sand and buff, it didn’t matter. If you are going to sand and buff, the second (final) coat of yellow should be sanded with 1,000- or 1,500-grit sandpaper before masking for the next color. This does a much better job at the color borders when final buffing. The finer-grit sanding can be done after the spraying is completed. Tape off the final boundaries of the yellow stripes. I use Scotch 3M automotive 1/4-inch Fine Line Tape #06301. It does not need to be clear to seal the edge if it is properly applied—firmly with no dirt or oil on the surface. It will produce a very clean, sharp line. Cover the inside area with a wider automotive masking tape of good quality. This is important because the tape over these colors will remain on until all of the others are done. Do not use tape made for latex house paint. The solvent in stronger paints will bleed through and you will not like the result. Next, mark off the gray stripe with pencil and again spray past the border. It’s good to protect the border of the yellow from being oversprayed with gray. Overspray will complicate the border when you get to the appropriate colors. In all respects, the gray stripe is done in exactly the same manner as the yellow. When you are finished applying the second coat, mask this off. It too will remain until all the painting is done. My original plan was to use metallic silver rather than gray, but metallic cannot be buffed out. (It would have been stunning!) Next, lay out and spray the long, narrow, white stripes. Again, use two coats and sand to at least a 1,000-grit finish if you’re planning to buff the finish. Here’s the catch! Do not spray the white up against the tape that establishes the edge of the yellow and gray stripes. I did and it led to a lot of extra work. Epoxy paint is very dense and does not “gas out” like other paints such as dope. It lies up against the masking and leaves a high, sharp ridge I call a levee. If you are only applying one color over your bottom color, you remove the tape and sand off the levee at your buffing stage. The geometry of the Mach 1 scheme brings blue and burnt orange up to a corner created by the white line that butts up to the yellow or gray. If there is a white levee against the tape and you put another color over the white, when you sand the top levee off, you will leave an unattractive white reveal from the underlying white levee. I ended up having to sand down into that white reveal with the tape that protected the yellow or gray removed and masking it again. I then sprayed the blue and orange again. In some spots this was necessary more than once. One solution to this problem is to lay out a Cessna-type scheme. Paint the airplane all white and then paint the trim colors so that there are no multiple overlaps. In the future, the solution for a situation like the white stripe on the Mach 1 would be to not spray the white right up to the yellow and gray borders. Stay just short enough so that no paint ends up on the tape. Tape off the white to prepare for the blue and orange. When the blue and orange are completed and the tape that is covering the white is removed, the blue and orange can be taped off for a short distance and the short section of missing white is airbrushed in. This eliminates overlapping levees because the white stripe is now butting the other colors rather than having overlaps. After the white is sprayed, sanded to 1,000-grit finish, and taped off, either blue or orange can be applied. If spraying blue, protect the future orange area from overspray, and vice versa. On large areas I use waxed paper or plastic grocery bags to avoid using masking tape. This is important not just because of weight, but also because of the same levee and reveal issues that I discussed. Reverse the procedure for the other major color by removing the tape from the area and covering the just-completed major color after a 24-hour cure. After the final color and curing is complete, you can remove all of the masking unless you have an unfinished white line to complete. If you have avoided the levee problem, you have created a complex, beautiful paint job in a reasonable amount of time. If you chose a simpler scheme, such as that of the three-color Dirty Birdy, you finished rather quickly. If the level of orange peel and dust is satisfactory, you can be done. Otherwise, I will finish with a discussion about final sanding, buffing, waxing, markings, and decals.Final Finishing
I have been using the Mach 1 that is pictured in the article for a procedural example, which brings us to the final step. If you have done good work under favorable conditions, with just a little luck, you should have negligible dust and surface blemishes. If you just want to go fly, you might choose to be done at this point. A few scattered larger specks of dust can, with care, be individually sanded off and polished, saving time and effort. If you want a standout show finish, it would be best to buff out the finish. Before you decide, let me share this: This is the easiest part of the whole process. You have already done the hard part! In the early days, the finest grit I had access to was wet or dry 600-grit sandpaper. Buffing that out was hard work! For the Mach 1, grits were available up to 5,000. I was told that higher grit is available, but I was unable to obtain any. It is also possible to stop at a given grit and accept that as your final finish with no buffing. The Mach 1 looked very good in the matte shine produced at 5,000. A word of caution is in order. If you have used Rust-Oleum metallic spray as I did on the Dirty Birdy, do not sand it. The metal flakes form a matrix when they flow to the surface immediately after spraying. Sanding destroys this effect. There are many clear coats available, such as Klass Kote’s two-part system in either epoxy or urethane, and Minwax’s single-component spray can. Clear-coat the metallics and then sand or buff if needed. A well-applied clear coat is usually better left alone. If you have followed my protocol so far, you have already taken the colors that are overlapped by later colors—such as the yellow, gray, and white stripes in my example—down to either 1,000 or 2,000 grit. Between coats, when painting the successive layers, sand between them with 320- or 400-grit sandpaper. On the final coat, which is where you are now, it is inadvisable to go below 600-grit sandpaper. It is too easy to sand through the finish. Use 600-grit sandpaper wet with a balsa or rubber block to clean up all but the most minor surface flaws and variations. The block will show you if there are any high or low points. Use the reflected light techniques previously discussed to locate and remove subtle flaws. Carefully level out the raised edges at the taped color borders that I referred to as levees. This is the most likely place for a sand-through. After 600-grit sandpaper has removed all but the finest of flaws, follow with 1,000-grit, 2,000-grit, 3,000-grit, and 5,000-grit sandpaper in that order. All are removing very little paint and serving mostly to remove any scratches from the previous grit. The reason I left a few mild flaws is because the finer grits will still get them with less risk of a sand-through. Always keep the sandpaper wet. Following my example, I will take the blue and burnt orange to either 1,000 or 2,000 grit, depending upon what was previously done. Take care not to scratch previously sanded areas with a rougher grit. After everything is at a 2,000-grit smoothness, you can start sanding the entire airframe without regard to crossing over color borders. There is almost no possibility of a sand-through at these levels. This will also clean up your taped borders. This sounds like a lot of work, but it isn’t. It goes fast after the surface flaws have been removed. If at any point you do have a sand-through, you will have to tape off the nearest borders and feather-in a repair with a Badger airbrush. Brushed repairs do not work very well with epoxy paint. Wait 24 hours and go through your grits again. Try not to use 600 this time because it might remove too much. If you leave your finish at 5,000 with no buffing, these repairs cannot be seen. If you buff, the repairs may become visible, but only to the discerning eye that is looking for them with reflected light. The Mach 1 had a lot of airbrushed repairs and hardly anyone could see them, even when I pointed them out. The builder always knows—until even he forgets! For buffing, I used 3M Rubbing Compound #03900, found at Advance Auto Parts. Use a damp, soft cotton cloth such as an old T-shirt. Buff each color separately because the compound can work residue from one color into the pores of a neighboring color. I did this all by hand. It goes fast and is easy if you sand to 5,000. A power buffer is unnecessary and could cause damage. The buffing leaves a distinctive pattern of ultrafine scratches on its own. These can be hidden with a good, hard wax such as Turtle Wax. For The Toledo Show: R/C Model Expo, I applied five coats, letting each harden before applying the next. It will wear off when the model is exposed to fuel, but by then, you won’t care. I confess to still not wanting to risk flying the Mach 1 often. It’s my best finish ever. It has been flown a few times, though, and is a real sweetheart.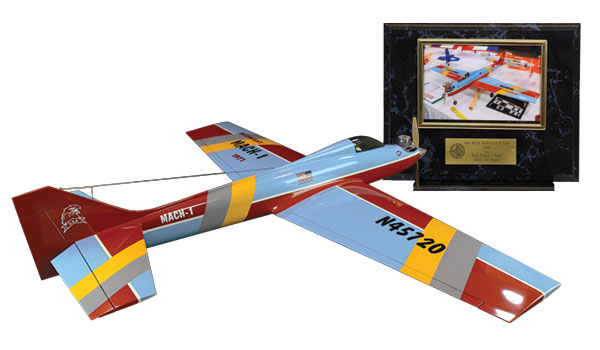
The author feels that the Mach 1 has the best finish he has done on a model aircraft. The first-place award for Best Finish went to the Mach 1 at The Toledo Show: R/C Model Expo.
I’ve since discovered Meguiar’s Ultimate Compound, which is so fine it leaves no discernible scratches that need to be waxed. There is also Meguiar’s M205 Mirror Glaze Ultra Finishing Polish, which is even finer.
Markings
I usually put the name of my airplane on the left wing (if it is vintage) per the Vintage Radio Control Society (VRCS) rulebook, and my AMA number on the right wing per AMA requirements. Vinyl transfers in any size, color, and font can be made at almost any quick sign shop. Most can even copy a script from the plans or kit box. I don’t like an overly busy or gaudy look, but a few well-placed decals and markings can really bring a finish to life. Even the Mach 1 with its six-color scheme would look plain with no other additions to dress it up. The flags you see mid-fuselage were intended for the fin, but there was a sand-through over a persistent glue joint that needed fixed without respraying. The Eagles that I chose were at first black, but then changed to white, which looked better with the white longitudinal stripe and Mach 1 decals. Don’t be afraid to change something to make it better.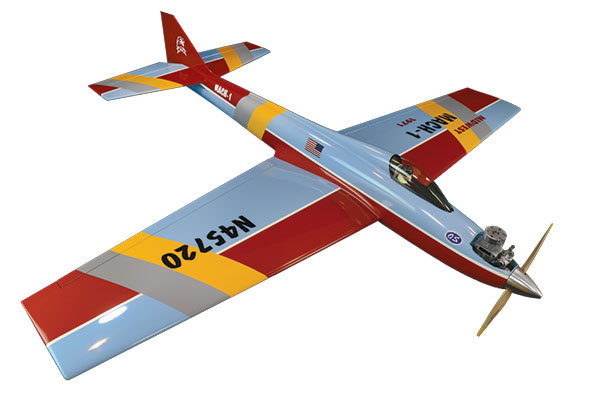
The Mach 1, with its six-color scheme, would look plain with no other additions to dress it up. The flags on the fuselage were intended for the fin, but a sand-through on a persistent glue joint needed to be fixed without respraying.
I found the mirror-image decals online. A choice of colors could be ordered to any size. There is a top and bottom backing for the application, so after they are applied, there is no film to mar the underlying finish. I did not clear coat the decals because I wanted a clean look for Toledo. Fuel may eventually deteriorate them. The bottom of the wing has a black and white chessboard with black and white chessmen. The board colors are painted, but the chessmen are cut from MonoKote trim material. The paint scheme on the Dirty Birdy has entirely painted stripes, but the previous finish had some stick-on stripes.
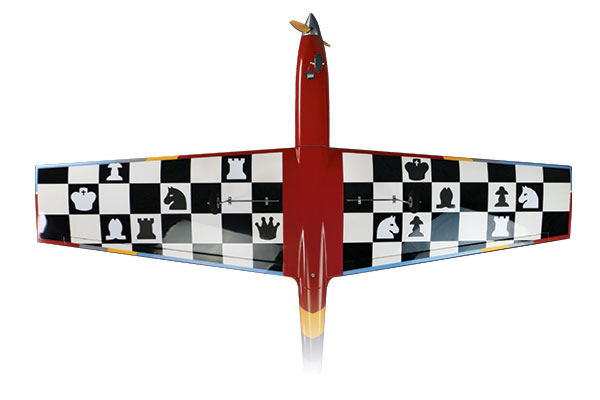
On the Mach 1, the bottom of the wing has a black and white chessboard with black and white chessmen. The board colors were painted, but the chessmen were cut from MonoKote trim material.
I usually use automotive products rather than model products. They come with a paper backing and a plastic topcoat that is removed after application. They are much easier to apply in straight lines and come in multiple stripe patterns that keep the lines perfectly parallel. Another plus is that they are made from thinner material, which doesn’t appear as though it is standing above the surface. The checkerboard on the Dirty Birdy features a spray-on silver metallic field and MonoKote stick-on squares. Done right, this can be more professional looking than sprayed squares. If you have followed this article through by painting your own airplane, chances are good that you will have a creation that will make you proud and happy for a long time. You can’t buy that satisfaction. You might even win an award, whether it is for the airplane of the month at your club or an award at an event such as The Toledo Show: R/C Model Expo. The only question is whether you want to risk flying it very much … Best of luck!
—Dan Grotzinger [email protected]


Comments
Paint
Have not had a chance to read the whole article but first noticed you said AeroGloss was not available except for clear. Unless it has changed recently, I think you can still get limited colors of Midwest AeroGloss in bottles from SIG.
AeroGloss paint
I guess I should have done a bit of research before I made that last entry. I went to the SIG site and they don't have AeroGloss for sale now. They do have cans of liquid paint for models though. And there are a few stray bottles of AeroGloss that can be found on Ebay.
Great information, learned a
Great information, learned a lot.
Add new comment